# 
**Note, the upstream of `pyeit` goes here: [eitcom/pyeit](https://github.com/eitcom/pyEIT).**
`pyEIT` is a python-based, open-source framework for Electrical Impedance Tomography (EIT). The design priciples of `pyEIT` are **modularity, minimalism, extensibility and OOP.**
## 1. Installation
`pyEIT` is purely python based, it can be installed and run without any difficulty.
### 1.1 Install using pip or conda-forge (recommended)
`pyEIT` is now availbale on `pypi` and `conda-forge`. It is purely python, which can be installed via
```bash
$ pip install pyeit
```
or
```bash
$ conda install -c conda-forge pyeit
```
### 1.2 Install from source code
You can track the git version of `pyEIT`, and use it locally by setting the `PYTHONPATH` variable.
```bash
export PYTHONPATH=/path/to/pyEIT
```
If you are using `spyder`, or `pyCharm`, you can also set `PYTHONPATH` per project in the IDE, which is more convenient.
Alternatively, but not recommended, you can compile and install from source code,
```bash
$ python setup.py build
$ python setup.py install
```
## 2. Run the examples
From the example folder, pick one demo and run!
**Note:** the following images may be outdated due to that the parameters of a EIT algorithm may be changed in different versions of `pyEIT`. And it is there in the code, so just run the demo.
### 2.1 (2D) forward and inverse computing
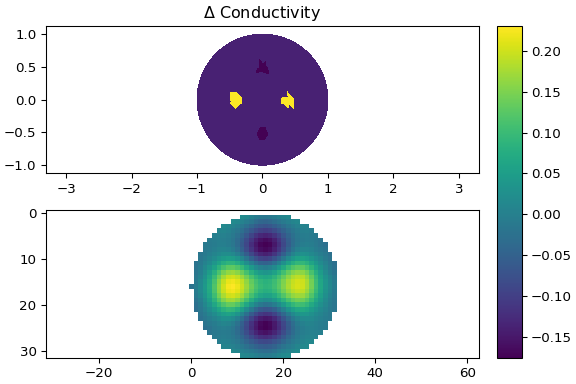
**Using** `examples/eit_dynamic_bp.py`
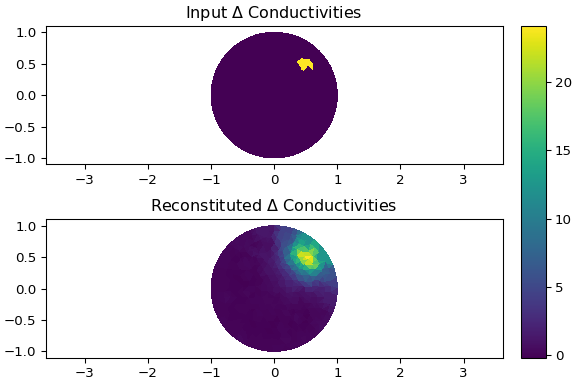
**Using** `examples/eit_dynamic_greit.py`
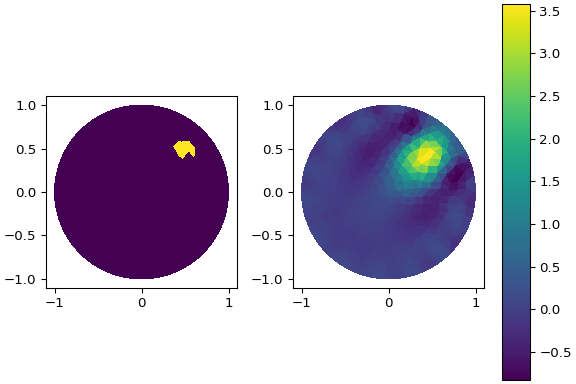
**Using** `examples/eit_dynamic_jac.py`
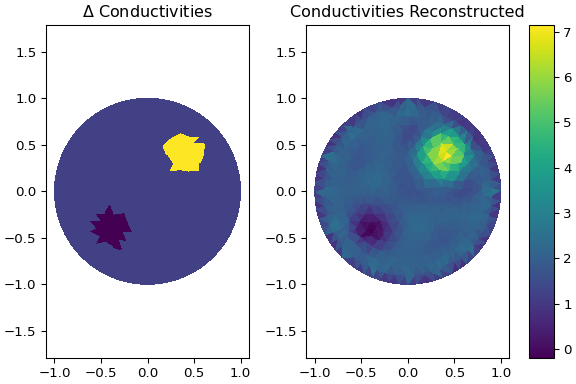
**Using** `examples/eit_static_jac.py`
### 2.2 (3D) forward and inverse computing
**Using** `examples/demo_forward3d.py`
**Using** `examples/demo_dynamic_jac3d.py`
**Limitations:**
1. 3D visualization plotted using `vispy` can be adjusted using mouse wheels interactively. Seeking a perfect visualization mode, transparency or opaque, is in fact an individual taste. User can also try `mayavi` and `vtk` for the visualization purpose using the unified 3D meshing structure.
2. Solving the inverse problem of 3D EIT, requires the electrodes to be placed at multiple altitude (z-axis) in order to have a (better) z-resolution. This should be done carefully, as adding extra z-belt introduces more stimulation patterns, which in turn adds to the computational loads.
## 3. Contribute to pyEIT
Give `pyEIT` a **star**, **fork** this project and commit a pull request **(PR)** !
### 3.1 Feature lists
- [x] 2D forward and inverse computing of EIT
- [x] Reconstruction algorithms : Gauss-Newton solver (JAC), Back-projection (BP), 2D GREIT
- [x] 2D/3D visualization!
- [x] Add support for 3D forward and inverse computing
- [x] 3D mesh generation and visualization
- [ ] Generate 2D/3D meshes from CT/MRI (based on iso2mesh [https://github.com/fangq/iso2mesh](https://github.com/fangq/iso2mesh))
- [ ] Complete electrode model (CEM) support
- [ ] Implementing the dbar algorithm for 2D difference EIT imaging
### 3.2 Package dependencies
| Packages | Optional | Note |
|----------------| ---------- |------------------------------------------|
| **numpy** | | tested with `numpy-1.19.1` |
| **scipy** | | tested with `scipy-1.5.0` |
| **matplotlib** | | tested with `matplotlib-3.3.2` |
| **trimesh** | | for loading external meshes |
| **pandas** | *Optional* | tested with `pandas-1.1.3` |
| **vispy** | *Optional* | failed with `vispy` in python 3.8 |
| **distmesh** | *Optional* | a build-in module is provided in `pyEIT` |
| **shapely** | *Optional* | for thorax mesh implementation |
**Q1, Why you choose vispy for 3D visualization?**
`pyEIT` uses `vispy` for visualizing 3D meshes (tetrahedron), and this module is not required if you are using 2D EIT only. `vispy` has minimal system dependencies and it is purely python. All you need is a decent graphical card with `OpenGL` support. It supports fast rendering, which I think is more superior to `vtk` or `mayavi` and it also has decent support for python 3. Please go to the website [vispy.org](http://vispy.org/) or github repository [vispy.github](https://github.com/vispy/vispy) for more details. Installation of vispy is simple by typing `python setup.py install`. We are also considering `mayavi` for a future version of `pyEIT`.
**Q2, When to use Shapely?**
`pyEIT` uses `Shapely` to build the thorax mesh and reconstruct EIT thoracic images. The thorax mesh shape is considered as a polygon and it is built based on real geometric measures given from a thorax figure simulated by `EIDORS` EIT MATLAB library. The figure in turns is based on a real thorax CT (Computed Tomography) scan.
To visualize thorax simulations, you should install `Shapely`. To do so, you should simply type `pip install Shapely` or `conda install shapely`. You can visit Shapely official documentation website [shapely.readthedocs.io](https://shapely.readthedocs.io/en/stable/index.html#) for more details or the dependency description at [Shapely.pypi](https://pypi.org/project/Shapely/).
## 4. Cite our work
`pyEIT` was published at the 17th International Conference on Electrical Impedance Tomography, 2016. It is now officially published at `softwareX`, vol (7), 2018.
**If you find `pyEIT` useful, please cite our work!**
```bibtex
@article{liu2018pyeit,
title={pyEIT: A python based framework for Electrical Impedance Tomography},
author={Liu, Benyuan and Yang, Bin and Xu, Canhua and Xia, Junying and Dai, Meng and Ji, Zhenyu and You, Fusheng and Dong, Xiuzhen and Shi, Xuetao and Fu, Feng},
journal={SoftwareX},
volume={7},
pages={304--308},
year={2018},
publisher={Elsevier}
}
```
Raw data
{
"_id": null,
"home_page": "https://github.com/liubenyuan/pyeit",
"name": "pyeit",
"maintainer": "",
"docs_url": null,
"requires_python": ">=3.7",
"maintainer_email": "",
"keywords": "eit",
"author": "Benyuan Liu",
"author_email": "liubenyuan@gmail.com",
"download_url": "https://files.pythonhosted.org/packages/b8/f4/7b8e4868eab62a9b3c8598edf0fac0df828edf35fcb9e35bad898e68c690/pyeit-1.2.4.tar.gz",
"platform": null,
"description": "# \n\n**Note, the upstream of `pyeit` goes here: [eitcom/pyeit](https://github.com/eitcom/pyEIT).**\n\n`pyEIT` is a python-based, open-source framework for Electrical Impedance Tomography (EIT). The design priciples of `pyEIT` are **modularity, minimalism, extensibility and OOP.**\n\n## 1. Installation\n\n`pyEIT` is purely python based, it can be installed and run without any difficulty.\n\n### 1.1 Install using pip or conda-forge (recommended)\n\n`pyEIT` is now availbale on `pypi` and `conda-forge`. It is purely python, which can be installed via\n```bash\n$ pip install pyeit\n```\nor\n```bash\n$ conda install -c conda-forge pyeit\n```\n\n### 1.2 Install from source code\n\nYou can track the git version of `pyEIT`, and use it locally by setting the `PYTHONPATH` variable.\n\n```bash\nexport PYTHONPATH=/path/to/pyEIT\n```\n\nIf you are using `spyder`, or `pyCharm`, you can also set `PYTHONPATH` per project in the IDE, which is more convenient.\n\nAlternatively, but not recommended, you can compile and install from source code,\n```bash\n$ python setup.py build\n$ python setup.py install\n```\n\n## 2. Run the examples\n\nFrom the example folder, pick one demo and run!\n\n**Note:** the following images may be outdated due to that the parameters of a EIT algorithm may be changed in different versions of `pyEIT`. And it is there in the code, so just run the demo.\n\n### 2.1 (2D) forward and inverse computing\n\n**Using** `examples/eit_dynamic_bp.py`\n\n\n\n**Using** `examples/eit_dynamic_greit.py`\n\n\n\n**Using** `examples/eit_dynamic_jac.py`\n\n\n\n**Using** `examples/eit_static_jac.py`\n\n\n\n### 2.2 (3D) forward and inverse computing\n\n**Using** `examples/demo_forward3d.py`\n\n**Using** `examples/demo_dynamic_jac3d.py`\n\n**Limitations:**\n\n 1. 3D visualization plotted using `vispy` can be adjusted using mouse wheels interactively. Seeking a perfect visualization mode, transparency or opaque, is in fact an individual taste. User can also try `mayavi` and `vtk` for the visualization purpose using the unified 3D meshing structure.\n 2. Solving the inverse problem of 3D EIT, requires the electrodes to be placed at multiple altitude (z-axis) in order to have a (better) z-resolution. This should be done carefully, as adding extra z-belt introduces more stimulation patterns, which in turn adds to the computational loads.\n\n## 3. Contribute to pyEIT\n\nGive `pyEIT` a **star**, **fork** this project and commit a pull request **(PR)** !\n\n### 3.1 Feature lists\n\n - [x] 2D forward and inverse computing of EIT\n - [x] Reconstruction algorithms : Gauss-Newton solver (JAC), Back-projection (BP), 2D GREIT\n - [x] 2D/3D visualization!\n - [x] Add support for 3D forward and inverse computing\n - [x] 3D mesh generation and visualization\n - [ ] Generate 2D/3D meshes from CT/MRI (based on iso2mesh [https://github.com/fangq/iso2mesh](https://github.com/fangq/iso2mesh))\n - [ ] Complete electrode model (CEM) support\n - [ ] Implementing the dbar algorithm for 2D difference EIT imaging\n\n### 3.2 Package dependencies\n\n| Packages | Optional | Note |\n|----------------| ---------- |------------------------------------------|\n| **numpy** | | tested with `numpy-1.19.1` |\n| **scipy** | | tested with `scipy-1.5.0` |\n| **matplotlib** | | tested with `matplotlib-3.3.2` |\n| **trimesh** | | for loading external meshes |\n| **pandas** | *Optional* | tested with `pandas-1.1.3` |\n| **vispy** | *Optional* | failed with `vispy` in python 3.8 |\n| **distmesh** | *Optional* | a build-in module is provided in `pyEIT` |\n| **shapely** | *Optional* | for thorax mesh implementation |\n\n**Q1, Why you choose vispy for 3D visualization?**\n\n`pyEIT` uses `vispy` for visualizing 3D meshes (tetrahedron), and this module is not required if you are using 2D EIT only. `vispy` has minimal system dependencies and it is purely python. All you need is a decent graphical card with `OpenGL` support. It supports fast rendering, which I think is more superior to `vtk` or `mayavi` and it also has decent support for python 3. Please go to the website [vispy.org](http://vispy.org/) or github repository [vispy.github](https://github.com/vispy/vispy) for more details. Installation of vispy is simple by typing `python setup.py install`. We are also considering `mayavi` for a future version of `pyEIT`.\n\n**Q2, When to use Shapely?**\n\n`pyEIT` uses `Shapely` to build the thorax mesh and reconstruct EIT thoracic images. The thorax mesh shape is considered as a polygon and it is built based on real geometric measures given from a thorax figure simulated by `EIDORS` EIT MATLAB library. The figure in turns is based on a real thorax CT (Computed Tomography) scan.\n\nTo visualize thorax simulations, you should install `Shapely`. To do so, you should simply type `pip install Shapely` or `conda install shapely`. You can visit Shapely official documentation website [shapely.readthedocs.io](https://shapely.readthedocs.io/en/stable/index.html#) for more details or the dependency description at [Shapely.pypi](https://pypi.org/project/Shapely/).\n\n## 4. Cite our work\n\n`pyEIT` was published at the 17th International Conference on Electrical Impedance Tomography, 2016. It is now officially published at `softwareX`, vol (7), 2018.\n\n**If you find `pyEIT` useful, please cite our work!**\n\n```bibtex\n@article{liu2018pyeit,\n title={pyEIT: A python based framework for Electrical Impedance Tomography},\n author={Liu, Benyuan and Yang, Bin and Xu, Canhua and Xia, Junying and Dai, Meng and Ji, Zhenyu and You, Fusheng and Dong, Xiuzhen and Shi, Xuetao and Fu, Feng},\n journal={SoftwareX},\n volume={7},\n pages={304--308},\n year={2018},\n publisher={Elsevier}\n}\n```\n",
"bugtrack_url": null,
"license": "BSD",
"summary": "A Python Package for EIT",
"version": "1.2.4",
"project_urls": {
"Download": "https://pypi.org/project/pyeit/#files",
"Homepage": "https://github.com/liubenyuan/pyeit",
"Source Code": "https://github.com/liubenyuan/pyeit"
},
"split_keywords": [
"eit"
],
"urls": [
{
"comment_text": "",
"digests": {
"blake2b_256": "b8f47b8e4868eab62a9b3c8598edf0fac0df828edf35fcb9e35bad898e68c690",
"md5": "5c7597ec290f73c658c0b039281844b3",
"sha256": "d218160a1b9cc0486431240118b443ae3123789afbfaeb1e52a1aa76c1efbed8"
},
"downloads": -1,
"filename": "pyeit-1.2.4.tar.gz",
"has_sig": false,
"md5_digest": "5c7597ec290f73c658c0b039281844b3",
"packagetype": "sdist",
"python_version": "source",
"requires_python": ">=3.7",
"size": 77610,
"upload_time": "2022-11-27T13:32:21",
"upload_time_iso_8601": "2022-11-27T13:32:21.295550Z",
"url": "https://files.pythonhosted.org/packages/b8/f4/7b8e4868eab62a9b3c8598edf0fac0df828edf35fcb9e35bad898e68c690/pyeit-1.2.4.tar.gz",
"yanked": false,
"yanked_reason": null
}
],
"upload_time": "2022-11-27 13:32:21",
"github": true,
"gitlab": false,
"bitbucket": false,
"codeberg": false,
"github_user": "liubenyuan",
"github_project": "pyeit",
"travis_ci": false,
"coveralls": false,
"github_actions": true,
"tox": true,
"lcname": "pyeit"
}

