<div align="center">
<img src="https://s2.loli.net/2022/03/14/zLsIBi5xueUmnrw.png">
<h1>alfred-py: Born For Deeplearning</h1>
[](https://pepy.tech/project/alfred-py)
[](https://img.shields.io/github/downloads/zhiqwang/yolov5-rt-stack/total?color=blue&label=Downloads&logo=github&logoColor=lightgrey)
[](https://github.com/zhiqwang/yolov5-rt-stack/actions/workflows/ci-test.yml)
[](https://github.com/zhiqwang/yolov5-rt-stack/actions/workflows/gh-pages.yml)
[](https://results.pre-commit.ci/latest/github/zhiqwang/yolov5-rt-stack/main)
[](LICENSE)
[](https://join.slack.com/t/yolort/shared_invite/zt-mqwc7235-940aAh8IaKYeWclrJx10SA)
[](https://github.com/jinfagang/alfred/issues?q=is%3Aopen+is%3Aissue+label%3A%22help+wanted%22)
</div>
*alfred-py* can be called from terminal via `alfred` as a tool for deep-learning usage. It also provides massive utilities to boost your daily efficiency APIs, for instance, if you want draw a box with score and label, if you want logging in your python applications, if you want convert your model to TRT engine, just `import alfred`, you can get whatever you want. More usage you can read instructions below.
## Functions Summary
Since many new users of alfred maybe not very familiar with it, conclude functions here briefly, more details see my updates:
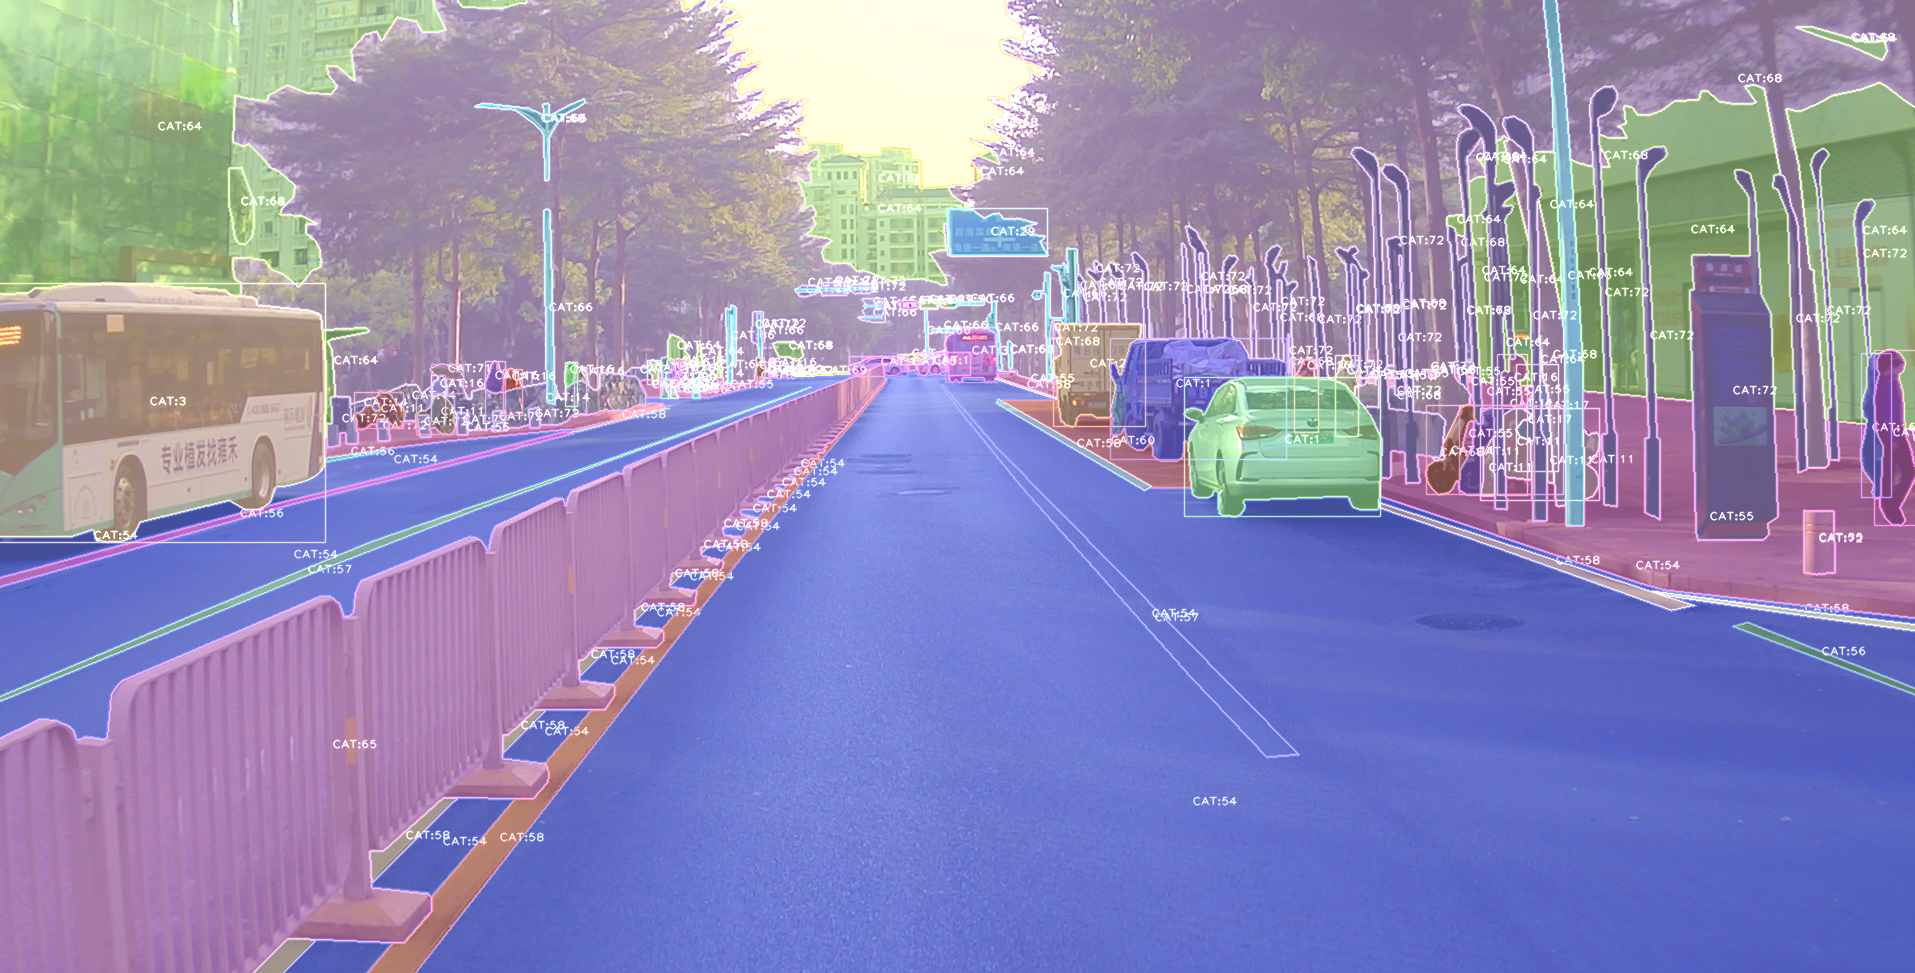
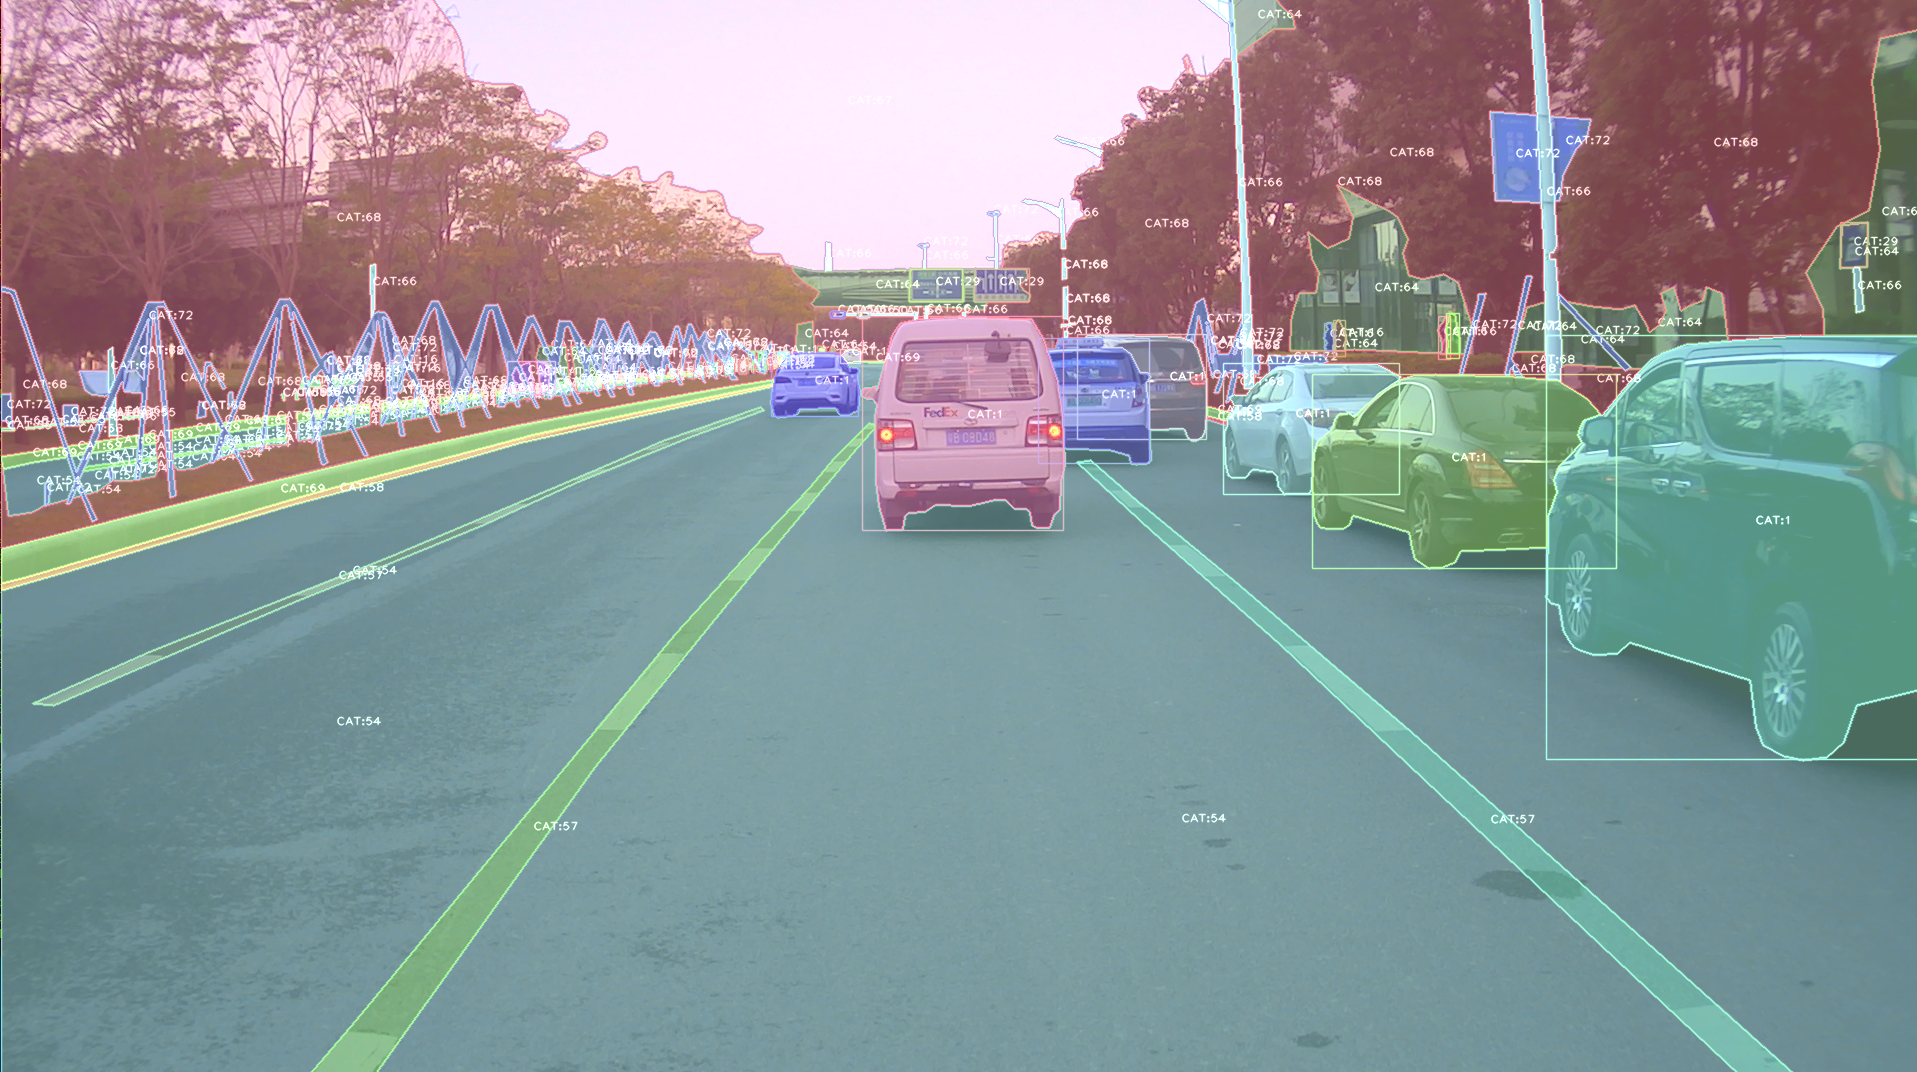
- Visualization, draw boxes, masks, keypoints is very simple, even **3D** boxes on point cloud supported;
- Command line tools, such as view your annotation data in any format (yolo, voc, coco any one);
- Deploy, you can using alfred deploy your tensorrt models;
- DL common utils, such as torch.device() etc;
- Renders, render your 3D models.
A pic visualized from alfred:
## Install
To install **alfred**, it is very simple:
requirements:
```
lxml [optional]
pycocotools [optional]
opencv-python [optional]
```
then:
```shell
sudo pip3 install alfred-py
```
**alfred is both a lib and a tool, you can import it's APIs, or you can directly call it inside your terminal**.
A glance of alfred, after you installed above package, you will have `alfred`:
- **`data`** module:
```shell
# show VOC annotations
alfred data vocview -i JPEGImages/ -l Annotations/
# show coco anntations
alfred data cocoview -j annotations/instance_2017.json -i images/
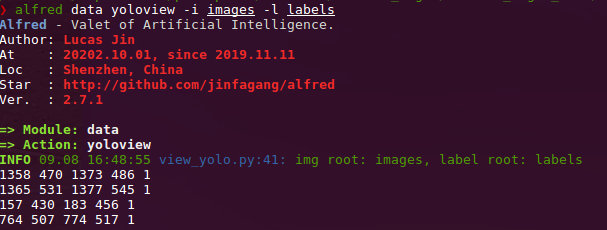
# show yolo annotations
alfred data yoloview -i images -l labels
# show detection label with txt format
alfred data txtview -i images/ -l txts/
# show more of data
alfred data -h
# eval tools
alfred data evalvoc -h
```
- **`cab`** module:
```shell
# count files number of a type
alfred cab count -d ./images -t jpg
# split a txt file into train and test
alfred cab split -f all.txt -r 0.9,0.1 -n train,val
```
- **`vision`** module;
```shell
# extract video to images
alfred vision extract -v video.mp4
# combine images to video
alfred vision 2video -d images/
```
- **`-h`** to see more:
```shell
usage: alfred [-h] [--version] {vision,text,scrap,cab,data} ...
positional arguments:
{vision,text,scrap,cab,data}
vision vision related commands.
text text related commands.
scrap scrap related commands.
cab cabinet related commands.
data data related commands.
optional arguments:
-h, --help show this help message and exit
--version, -v show version info.
```
**inside every child module, you can call it's `-h` as well: `alfred text -h`.**
> if you are on windows, you can install pycocotools via: `pip install "git+https://github.com/philferriere/cocoapi.git#egg=pycocotools&subdirectory=PythonAPI"`, we have made pycocotools as an dependencies since we need pycoco API.
## Updates
`alfred-py` has been updating for 3 years, and it will keep going!
- **2050-xxx**: *to be continue*;
- **2023.04.28**: Update the 3d keypoints visualizer, now you can visualize Human3DM kpts in realtime:

For detailes reference to `examples/demo_o3d_server.py`.
The result is generated from MotionBert.
- **2022.01.18**: Now alfred support a Mesh3D visualizer server based on Open3D:
```python
from alfred.vis.mesh3d.o3dsocket import VisOpen3DSocket
def main():
server = VisOpen3DSocket()
while True:
server.update()
if __name__ == "__main__":
main()
```
Then, you just need setup a client, send keypoints3d to server, and it will automatically visualized out.
Here is what it looks like:
- **2021.12.22**: Now alfred supported keypoints visualization, almost all datasets supported in mmpose were also supported by alfred:
```python
from alfred.vis.image.pose import vis_pose_result
# preds are poses, which is (Bs, 17, 3) for coco body
vis_pose_result(ori_image, preds, radius=5, thickness=2, show=True)
```
- **2021.12.05**: You can using `alfred.deploy.tensorrt` for tensorrt inference now:
```python
from alfred.deploy.tensorrt.common import do_inference_v2, allocate_buffers_v2, build_engine_onnx_v3
def engine_infer(engine, context, inputs, outputs, bindings, stream, test_image):
# image_input, img_raw, _ = preprocess_np(test_image)
image_input, img_raw, _ = preprocess_img((test_image))
print('input shape: ', image_input.shape)
inputs[0].host = image_input.astype(np.float32).ravel()
start = time.time()
dets, labels, masks = do_inference_v2(context, bindings=bindings, inputs=inputs,
outputs=outputs, stream=stream, input_tensor=image_input)
img_f = 'demo/demo.jpg'
with build_engine_onnx_v3(onnx_file_path=onnx_f) as engine:
inputs, outputs, bindings, stream = allocate_buffers_v2(engine)
# Contexts are used to perform inference.
with engine.create_execution_context() as context:
print(engine.get_binding_shape(0))
print(engine.get_binding_shape(1))
print(engine.get_binding_shape(2))
INPUT_SHAPE = engine.get_binding_shape(0)[-2:]
print(context.get_binding_shape(0))
print(context.get_binding_shape(1))
dets, labels, masks, img_raw = engine_infer(
engine, context, inputs, outputs, bindings, stream, img_f)
```
- **2021.11.13**: Now I add Siren SDK support!
```
from functools import wraps
from alfred.siren.handler import SirenClient
from alfred.siren.models import ChatMessage, InvitationMessage
siren = SirenClient('daybreak_account', 'password')
@siren.on_received_invitation
def on_received_invitation(msg: InvitationMessage):
print('received invitation: ', msg.invitation)
# directly agree this invitation for robots
@siren.on_received_chat_message
def on_received_chat_msg(msg: ChatMessage):
print('got new msg: ', msg.text)
siren.publish_txt_msg('I got your message O(∩_∩)O哈哈~', msg.roomId)
if __name__ == '__main__':
siren.loop()
```
Using this, you can easily setup a Chatbot. By using Siren client.
- **2021.06.24**: Add a useful commandline tool, **change your pypi source easily!!**:
```
alfred cab changesource
```
And then your pypi will using aliyun by default!
- **2021.05.07**: Upgrade Open3D instructions:
Open3D>0.9.0 no longer compatible with previous alfred-py. Please upgrade Open3D, you can build Open3D from source:
```
git clone --recursive https://github.com/intel-isl/Open3D.git
cd Open3D && mkdir build && cd build
sudo apt install libc++abi-8-dev
sudo apt install libc++-8-dev
cmake .. -DPYTHON_EXECUTABLE=/usr/bin/python3
```
**Ubuntu 16.04 blow I tried all faild to build from source**. So, please using open3d==0.9.0 for alfred-py.
- **2021.04.01**: A unified evaluator had added. As all we know, for many users, writting Evaluation might coupled deeply with your project. But with Alfred's help, you can do evaluation in any project by simply writting 8 lines of codes, for example, if your dataset format is Yolo, then do this:
```python
def infer_func(img_f):
image = cv2.imread(img_f)
results = config_dict['model'].predict_for_single_image(
image, aug_pipeline=simple_widerface_val_pipeline, classification_threshold=0.89, nms_threshold=0.6, class_agnostic=True)
if len(results) > 0:
results = np.array(results)[:, [2, 3, 4, 5, 0, 1]]
# xywh to xyxy
results[:, 2] += results[:, 0]
results[:, 3] += results[:, 1]
return results
if __name__ == '__main__':
conf_thr = 0.4
iou_thr = 0.5
imgs_root = 'data/hand/images'
labels_root = 'data/hand/labels'
yolo_parser = YoloEvaluator(imgs_root=imgs_root, labels_root=labels_root, infer_func=infer_func)
yolo_parser.eval_precisely()
```
Then you can get your evaluation results automatically. All recall, precision, mAP will printed out. More dataset format are on-going.
- **2021.03.10**:
New added `ImageSourceIter` class, when you want write a demo of your project which need to handle any input such as image file / folder / video file etc. You can using `ImageSourceIter`:
```python
from alfred.utils.file_io import ImageSourceIter
# data_f can be image_file or image_folder or video
iter = ImageSourceIter(ops.test_path)
while True:
itm = next(iter)
if isinstance(itm, str):
itm = cv2.imread(itm)
# cv2.imshow('raw', itm)
res = detect_for_pose(itm, det_model)
cv2.imshow('res', itm)
if iter.video_mode:
cv2.waitKey(1)
else:
cv2.waitKey(0)
```
And then you can avoid write anything else of deal with file glob or reading video in cv. *note that itm return can be a cv array or a file path*.
- **2021.01.25**:
**alfred** now support self-defined visualization on coco format annotation (not using pycoco tools):
If your dataset in coco format but visualize wrongly pls fire a issue to me, thank u!
- **2020.09.27**:
Now, yolo and VOC can convert to each other, so that using Alfred you can:
- convert yolo2voc;
- convert voc2yolo;
- convert voc2coco;
- convert coco2voc;
By this, you can convert any labeling format of each other.
- **2020.09.08**: After a long time past, **alfred** got some updates:
We providing `coco2yolo` ability inside it. Users can run this command to convert your data to yolo format:
```
alfred data coco2yolo -i images/ -j annotations/val_split_2020.json
```
Only should provided is your image root path and your json file. And then all result will generated into `yolo` folder under images or in images parent dir.
After that (you got your yolo folder), then you can visualize the conversion result to see if it correct or not:
```
alfred data yolovview -i images/ -l labels/
```
- **2020.07.27**: After a long time past, **alfred** finally get some updates:
Now, you can using alfred draw Chinese charactors on image without xxxx undefined encodes.
```python
from alfred.utils.cv_wrapper import put_cn_txt_on_img
img = put_cn_txt_on_img(img, spt[-1], [points[0][0], points[0][1]-25], 1.0, (255, 255, 255))
```
Also, you now can **merge** 2 VOC datasets! This is helpful when you have 2 dataset and you want merge them into a single one.
```
alfred data mergevoc -h
```
You can see more promotes.
- **2020.03.08**:Several new files added in **alfred**:
```
alfred.utils.file_io: Provide file io utils for common purpose
alfred.dl.torch.env: Provide seed or env setup in pytorch (same API as detectron2)
alfred.dl.torch.distribute: utils used for distribute training when using pytorch
```
- **2020.03.04**: We have added some **evaluation tool** to calculate mAP for object detection model performance evaluation, it's useful and can visualize result:
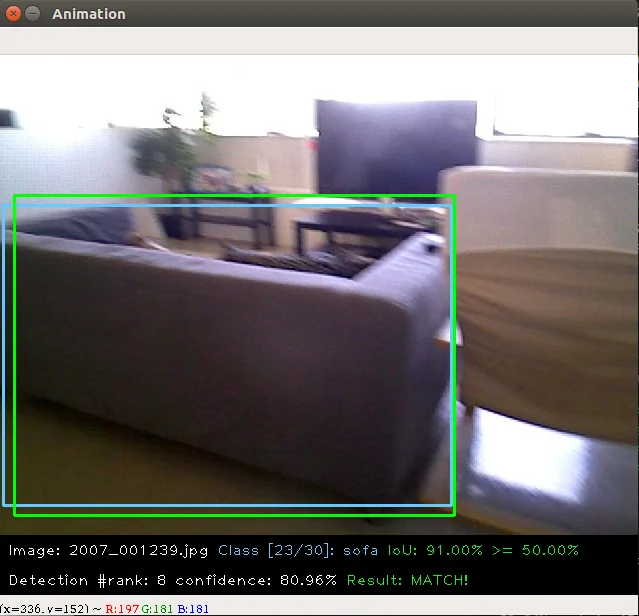

this usage is also quite simple:
```
alfred data evalvoc -g ground-truth -d detection-results -im images
```
where `-g` is your ground truth dir (contains xmls or txts), `-d` is your detection result files dir, `-im` is your images fodler. You only need save all your detected results into txts, one image one txt, and format like this:
```shell
bottle 0.14981 80 1 295 500
bus 0.12601 36 13 404 316
horse 0.12526 430 117 500 307
pottedplant 0.14585 212 78 292 118
tvmonitor 0.070565 388 89 500 196
```
- **2020.02.27**: We just update a `license` module inside alfred, say you want apply license to your project or update license, simple:
```shell script
alfred cab license -o 'MANA' -n 'YoloV3' -u 'manaai.cn'
```
you can found more detail usage with `alfred cab license -h`
- **2020-02-11**: open3d has changed their API. we have updated new open3d inside alfred, you can simply using latest open3d and run `python3 examples/draw_3d_pointcloud.py` you will see this:

- **2020-02-10**: **alfred** now support windows (experimental);
- **2020-02-01**: **武汉加油**! *alfred* fix windows pip install problem related to encoding 'gbk';
- **2020-01-14**: Added cabinet module, also add some utils under data module;
- **2019-07-18**: 1000 classes imagenet labelmap added. Call it from:
```python
from alfred.vis.image.get_dataset_label_map import imagenet_labelmap
# also, coco, voc, cityscapes labelmap were all added in
from alfred.vis.image.get_dataset_label_map import coco_labelmap
from alfred.vis.image.get_dataset_label_map import voc_labelmap
from alfred.vis.image.get_dataset_label_map import cityscapes_labelmap
```
- **2019-07-13**: We add a VOC check module in command line usage, you can now visualize your VOC format detection data like this:
```
alfred data voc_view -i ./images -l labels/
```
- **2019-05-17**: We adding **open3d** as a lib to visual 3d point cloud in python. Now you can do some simple preparation and visual 3d box right on lidar points and show like opencv!!

You can achieve this by only using **alfred-py** and **open3d**!
example code can be seen under `examples/draw_3d_pointcloud.py`. **code updated with latest open3d API**!.
- **2019-05-10**: A minor updates but **really useful** which we called **mute_tf**, do you want to disable tensorflow ignoring log? simply do this!!
```python
from alfred.dl.tf.common import mute_tf
mute_tf()
import tensorflow as tf
```
Then, the logging message were gone....
- **2019-05-07**: Adding some protos, now you can parsing tensorflow coco labelmap by using alfred:
```python
from alfred.protos.labelmap_pb2 import LabelMap
from google.protobuf import text_format
with open('coco.prototxt', 'r') as f:
lm = LabelMap()
lm = text_format.Merge(str(f.read()), lm)
names_list = [i.display_name for i in lm.item]
print(names_list)
```
- **2019-04-25**: Adding KITTI fusion, now you can get projection from 3D label to image like this:
we will also add more fusion utils such as for *nuScene* dataset.
We providing kitti fusion kitti for convert `camera link 3d points` to image pixel, and convert `lidar link 3d points` to image pixel. Roughly going through of APIs like this:
```python
# convert lidar prediction to image pixel
from alfred.fusion.kitti_fusion import LidarCamCalibData, \
load_pc_from_file, lidar_pts_to_cam0_frame, lidar_pt_to_cam0_frame
from alfred.fusion.common import draw_3d_box, compute_3d_box_lidar_coords
# consit of prediction of lidar
# which is x,y,z,h,w,l,rotation_y
res = [[4.481686, 5.147319, -1.0229858, 1.5728549, 3.646751, 1.5121397, 1.5486346],
[-2.5172017, 5.0262384, -1.0679419, 1.6241353, 4.0445814, 1.4938312, 1.620804],
[1.1783253, -2.9209857, -0.9852259, 1.5852798, 3.7360613, 1.4671413, 1.5811548]]
for p in res:
xyz = np.array([p[: 3]])
c2d = lidar_pt_to_cam0_frame(xyz, frame_calib)
if c2d is not None:
cv2.circle(img, (int(c2d[0]), int(c2d[1])), 3, (0, 255, 255), -1)
hwl = np.array([p[3: 6]])
r_y = [p[6]]
pts3d = compute_3d_box_lidar_coords(xyz, hwl, angles=r_y, origin=(0.5, 0.5, 0.5), axis=2)
pts2d = []
for pt in pts3d[0]:
coords = lidar_pt_to_cam0_frame(pt, frame_calib)
if coords is not None:
pts2d.append(coords[:2])
pts2d = np.array(pts2d)
draw_3d_box(pts2d, img)
```
And you can see something like this:
**note**:
`compute_3d_box_lidar_coords` for lidar prediction, `compute_3d_box_cam_coords` for KITTI label, **cause KITTI label is based on camera coordinates!**.
<p align="center">
<img src="https://s2.ax1x.com/2019/04/24/EVrU0O.md.png" />
</p>
**since many users ask me how to reproduces this result, you can checkout demo file under `examples/draw_3d_box.py`**;
- **2019-01-25**: We just adding network visualization tool for **pytorch** now!! How does it look? Simply print out *every layer network with output shape*, I believe this is really helpful for people to visualize their models!
```
➜ mask_yolo3 git:(master) ✗ python3 tests.py
----------------------------------------------------------------
Layer (type) Output Shape Param #
================================================================
Conv2d-1 [-1, 64, 224, 224] 1,792
ReLU-2 [-1, 64, 224, 224] 0
.........
Linear-35 [-1, 4096] 16,781,312
ReLU-36 [-1, 4096] 0
Dropout-37 [-1, 4096] 0
Linear-38 [-1, 1000] 4,097,000
================================================================
Total params: 138,357,544
Trainable params: 138,357,544
Non-trainable params: 0
----------------------------------------------------------------
Input size (MB): 0.19
Forward/backward pass size (MB): 218.59
Params size (MB): 527.79
Estimated Total Size (MB): 746.57
----------------------------------------------------------------
```
Ok, that is all. what you simply need to do is:
```python
from alfred.dl.torch.model_summary import summary
from alfred.dl.torch.common import device
from torchvision.models import vgg16
vgg = vgg16(pretrained=True)
vgg.to(device)
summary(vgg, input_size=[224, 224])
```
Support you input (224, 224) image, you will got this output, or you can change any other size to see how output changes. (currently not support for 1 channel image)
- **2018-12-7**: Now, we adding a extensible class for quickly write an image detection or segmentation demo.
If you want write a demo which **do inference on an image or an video or right from webcam**, now you can do this in standared alfred way:
```python
class ENetDemo(ImageInferEngine):
def __init__(self, f, model_path):
super(ENetDemo, self).__init__(f=f)
self.target_size = (512, 1024)
self.model_path = model_path
self.num_classes = 20
self.image_transform = transforms.Compose(
[transforms.Resize(self.target_size),
transforms.ToTensor()])
self._init_model()
def _init_model(self):
self.model = ENet(self.num_classes).to(device)
checkpoint = torch.load(self.model_path)
self.model.load_state_dict(checkpoint['state_dict'])
print('Model loaded!')
def solve_a_image(self, img):
images = Variable(self.image_transform(Image.fromarray(img)).to(device).unsqueeze(0))
predictions = self.model(images)
_, predictions = torch.max(predictions.data, 1)
prediction = predictions.cpu().numpy()[0] - 1
return prediction
def vis_result(self, img, net_out):
mask_color = np.asarray(label_to_color_image(net_out, 'cityscapes'), dtype=np.uint8)
frame = cv2.resize(img, (self.target_size[1], self.target_size[0]))
# mask_color = cv2.resize(mask_color, (frame.shape[1], frame.shape[0]))
res = cv2.addWeighted(frame, 0.5, mask_color, 0.7, 1)
return res
if __name__ == '__main__':
v_f = ''
enet_seg = ENetDemo(f=v_f, model_path='save/ENet_cityscapes_mine.pth')
enet_seg.run()
```
After that, you can directly inference from video. This usage can be found at git repo:
<p align="center"><img src="https://s1.ax1x.com/2018/12/07/F1OKLF.gif"/></p>
The repo using **alfred**: http://github.com/jinfagang/pt_enet
- **2018-11-6**: I am so glad to announce that alfred 2.0 released!😄⛽️👏👏 Let's have a quick look what have been updated:
```
# 2 new modules, fusion and vis
from alred.fusion import fusion_utils
```
For the module `fusion` contains many useful sensor fusion helper functions you may use, such as project lidar point cloud onto image.
- **2018-08-01**: Fix the video combined function not work well with sequence. Add a order algorithm to ensure video sequence right.
also add some draw bbox functions into package.
can be called like this:
- **2018-03-16**: Slightly update **alfred**, now we can using this tool to combine a video sequence back original video!
Simply do:
```shell
# alfred binary exectuable program
alfred vision 2video -d ./video_images
```
## Capable
**alfred** is both a library and a command line tool. It can do those things:
```angular2html
# extract images from video
alfred vision extract -v video.mp4
# combine image sequences into a video
alfred vision 2video -d /path/to/images
# get faces from images
alfred vision getface -d /path/contains/images/
```
Just try it out!!
## Copyright
**Alfred** build by *Lucas Jin* with ❤️, welcome star and send PR. If you got any question, you can ask me via wechat: `jintianiloveu`, this code released under GPL-3 license.
Raw data
{
"_id": null,
"home_page": "https://github.com/jinfagang/alfred",
"name": "alfred-py",
"maintainer": null,
"docs_url": null,
"requires_python": null,
"maintainer_email": null,
"keywords": "deep learning, script helper, tools",
"author": "Lucas Jin",
"author_email": "jinfagang19@163.com",
"download_url": "https://files.pythonhosted.org/packages/7d/f0/240fb33706b183f34aa0dcd9edf48bcb496a63e5b41cb5b77d544aadd644/alfred-py-3.0.11.tar.gz",
"platform": "any",
"description": "<div align=\"center\">\n\n<img src=\"https://s2.loli.net/2022/03/14/zLsIBi5xueUmnrw.png\">\n\n<h1>alfred-py: Born For Deeplearning</h1>\n\n\n[](https://pepy.tech/project/alfred-py)\n[](https://img.shields.io/github/downloads/zhiqwang/yolov5-rt-stack/total?color=blue&label=Downloads&logo=github&logoColor=lightgrey)\n\n[](https://github.com/zhiqwang/yolov5-rt-stack/actions/workflows/ci-test.yml)\n[](https://github.com/zhiqwang/yolov5-rt-stack/actions/workflows/gh-pages.yml)\n[](https://results.pre-commit.ci/latest/github/zhiqwang/yolov5-rt-stack/main)\n\n\n[](LICENSE)\n[](https://join.slack.com/t/yolort/shared_invite/zt-mqwc7235-940aAh8IaKYeWclrJx10SA)\n[](https://github.com/jinfagang/alfred/issues?q=is%3Aopen+is%3Aissue+label%3A%22help+wanted%22)\n\n</div>\n\n\n*alfred-py* can be called from terminal via `alfred` as a tool for deep-learning usage. It also provides massive utilities to boost your daily efficiency APIs, for instance, if you want draw a box with score and label, if you want logging in your python applications, if you want convert your model to TRT engine, just `import alfred`, you can get whatever you want. More usage you can read instructions below.\n\n\n\n## Functions Summary\n\nSince many new users of alfred maybe not very familiar with it, conclude functions here briefly, more details see my updates:\n\n- Visualization, draw boxes, masks, keypoints is very simple, even **3D** boxes on point cloud supported;\n- Command line tools, such as view your annotation data in any format (yolo, voc, coco any one);\n- Deploy, you can using alfred deploy your tensorrt models;\n- DL common utils, such as torch.device() etc;\n- Renders, render your 3D models.\n\n\nA pic visualized from alfred:\n\n\n\n\n## Install\n\nTo install **alfred**, it is very simple:\n\nrequirements:\n\n```\nlxml [optional]\npycocotools [optional]\nopencv-python [optional]\n\n```\nthen:\n\n```shell\nsudo pip3 install alfred-py\n```\n\n**alfred is both a lib and a tool, you can import it's APIs, or you can directly call it inside your terminal**.\n\nA glance of alfred, after you installed above package, you will have `alfred`:\n\n- **`data`** module:\n \n ```shell\n # show VOC annotations\n alfred data vocview -i JPEGImages/ -l Annotations/\n # show coco anntations\n alfred data cocoview -j annotations/instance_2017.json -i images/\n # show yolo annotations\n alfred data yoloview -i images -l labels\n # show detection label with txt format\n alfred data txtview -i images/ -l txts/\n # show more of data\n alfred data -h\n \n # eval tools\n alfred data evalvoc -h\n ```\n \n- **`cab`** module:\n \n ```shell\n # count files number of a type\n alfred cab count -d ./images -t jpg\n # split a txt file into train and test\n alfred cab split -f all.txt -r 0.9,0.1 -n train,val\n ```\n \n- **`vision`** module;\n \n ```shell\n # extract video to images\n alfred vision extract -v video.mp4\n # combine images to video\n alfred vision 2video -d images/\n ```\n \n- **`-h`** to see more:\n\n ```shell\n usage: alfred [-h] [--version] {vision,text,scrap,cab,data} ...\n \n positional arguments:\n {vision,text,scrap,cab,data}\n vision vision related commands.\n text text related commands.\n scrap scrap related commands.\n cab cabinet related commands.\n data data related commands.\n \n optional arguments:\n -h, --help show this help message and exit\n --version, -v show version info.\n ```\n\n **inside every child module, you can call it's `-h` as well: `alfred text -h`.**\n\n \n\n> if you are on windows, you can install pycocotools via: `pip install \"git+https://github.com/philferriere/cocoapi.git#egg=pycocotools&subdirectory=PythonAPI\"`, we have made pycocotools as an dependencies since we need pycoco API.\n\n\n\n## Updates\n\n`alfred-py`\u3000has been updating for 3 years, and it will keep going!\n\n- **2050-xxx**: *to be continue*;\n- **2023.04.28**: Update the 3d keypoints visualizer, now you can visualize Human3DM kpts in realtime:\n \n For detailes reference to `examples/demo_o3d_server.py`.\n The result is generated from MotionBert.\n- **2022.01.18**: Now alfred support a Mesh3D visualizer server based on Open3D:\n ```python\n from alfred.vis.mesh3d.o3dsocket import VisOpen3DSocket\n\n def main():\n server = VisOpen3DSocket()\n while True:\n server.update()\n\n\n if __name__ == \"__main__\":\n main()\n ```\n Then, you just need setup a client, send keypoints3d to server, and it will automatically visualized out.\n Here is what it looks like:\n \n\n- **2021.12.22**: Now alfred supported keypoints visualization, almost all datasets supported in mmpose were also supported by alfred:\n ```python\n from alfred.vis.image.pose import vis_pose_result\n\n # preds are poses, which is (Bs, 17, 3) for coco body\n vis_pose_result(ori_image, preds, radius=5, thickness=2, show=True)\n ```\n\n- **2021.12.05**: You can using `alfred.deploy.tensorrt` for tensorrt inference now:\n ```python\n from alfred.deploy.tensorrt.common import do_inference_v2, allocate_buffers_v2, build_engine_onnx_v3\n\n def engine_infer(engine, context, inputs, outputs, bindings, stream, test_image):\n\n # image_input, img_raw, _ = preprocess_np(test_image)\n image_input, img_raw, _ = preprocess_img((test_image))\n print('input shape: ', image_input.shape)\n inputs[0].host = image_input.astype(np.float32).ravel()\n\n start = time.time()\n dets, labels, masks = do_inference_v2(context, bindings=bindings, inputs=inputs,\n outputs=outputs, stream=stream, input_tensor=image_input)\n img_f = 'demo/demo.jpg'\n with build_engine_onnx_v3(onnx_file_path=onnx_f) as engine:\n inputs, outputs, bindings, stream = allocate_buffers_v2(engine)\n # Contexts are used to perform inference.\n with engine.create_execution_context() as context:\n print(engine.get_binding_shape(0))\n print(engine.get_binding_shape(1))\n print(engine.get_binding_shape(2))\n INPUT_SHAPE = engine.get_binding_shape(0)[-2:]\n\n print(context.get_binding_shape(0))\n print(context.get_binding_shape(1))\n dets, labels, masks, img_raw = engine_infer(\n engine, context, inputs, outputs, bindings, stream, img_f)\n ```\n \n- **2021.11.13**: Now I add Siren SDK support!\n ```\n from functools import wraps\n from alfred.siren.handler import SirenClient\n from alfred.siren.models import ChatMessage, InvitationMessage\n\n siren = SirenClient('daybreak_account', 'password')\n\n\n @siren.on_received_invitation\n def on_received_invitation(msg: InvitationMessage):\n print('received invitation: ', msg.invitation)\n # directly agree this invitation for robots\n\n\n @siren.on_received_chat_message\n def on_received_chat_msg(msg: ChatMessage):\n print('got new msg: ', msg.text)\n siren.publish_txt_msg('I got your message O(\u2229_\u2229)O\u54c8\u54c8~', msg.roomId)\n\n\n if __name__ == '__main__':\n siren.loop()\n ```\n Using this, you can easily setup a Chatbot. By using Siren client.\n\n- **2021.06.24**: Add a useful commandline tool, **change your pypi source easily!!**:\n ```\n alfred cab changesource\n ```\n And then your pypi will using aliyun by default!\n- **2021.05.07**: Upgrade Open3D instructions:\n Open3D>0.9.0 no longer compatible with previous alfred-py. Please upgrade Open3D, you can build Open3D from source:\n ```\n git clone --recursive https://github.com/intel-isl/Open3D.git\n cd Open3D && mkdir build && cd build\n sudo apt install libc++abi-8-dev\n sudo apt install libc++-8-dev\n cmake .. -DPYTHON_EXECUTABLE=/usr/bin/python3\n ```\n **Ubuntu 16.04 blow I tried all faild to build from source**. So, please using open3d==0.9.0 for alfred-py.\n- **2021.04.01**: A unified evaluator had added. As all we know, for many users, writting Evaluation might coupled deeply with your project. But with Alfred's help, you can do evaluation in any project by simply writting 8 lines of codes, for example, if your dataset format is Yolo, then do this:\n ```python\n def infer_func(img_f):\n image = cv2.imread(img_f)\n results = config_dict['model'].predict_for_single_image(\n image, aug_pipeline=simple_widerface_val_pipeline, classification_threshold=0.89, nms_threshold=0.6, class_agnostic=True)\n if len(results) > 0:\n results = np.array(results)[:, [2, 3, 4, 5, 0, 1]]\n # xywh to xyxy\n results[:, 2] += results[:, 0]\n results[:, 3] += results[:, 1]\n return results\n\n if __name__ == '__main__':\n conf_thr = 0.4\n iou_thr = 0.5\n\n imgs_root = 'data/hand/images'\n labels_root = 'data/hand/labels'\n\n yolo_parser = YoloEvaluator(imgs_root=imgs_root, labels_root=labels_root, infer_func=infer_func)\n yolo_parser.eval_precisely()\n ```\n Then you can get your evaluation results automatically. All recall, precision, mAP will printed out. More dataset format are on-going.\n- **2021.03.10**:\n New added `ImageSourceIter` class, when you want write a demo of your project which need to handle any input such as image file / folder / video file etc. You can using `ImageSourceIter`:\n\n ```python\n from alfred.utils.file_io import ImageSourceIter\n \n # data_f can be image_file or image_folder or video\n iter = ImageSourceIter(ops.test_path)\n while True:\n itm = next(iter)\n if isinstance(itm, str):\n itm = cv2.imread(itm)\n # cv2.imshow('raw', itm)\n res = detect_for_pose(itm, det_model)\n cv2.imshow('res', itm)\n if iter.video_mode:\n cv2.waitKey(1)\n else:\n cv2.waitKey(0)\n \n ```\n And then you can avoid write anything else of deal with file glob or reading video in cv. *note that itm return can be a cv array or a file path*.\n- **2021.01.25**:\n **alfred** now support self-defined visualization on coco format annotation (not using pycoco tools):\n\n \n\n If your dataset in coco format but visualize wrongly pls fire a issue to me, thank u!\n- **2020.09.27**:\n Now, yolo and VOC can convert to each other, so that using Alfred you can:\n - convert yolo2voc;\n - convert voc2yolo;\n - convert voc2coco;\n - convert coco2voc;\n\n By this, you can convert any labeling format of each other.\n- **2020.09.08**: After a long time past, **alfred** got some updates:\n We providing `coco2yolo` ability inside it. Users can run this command to convert your data to yolo format:\n\n ```\n alfred data coco2yolo -i images/ -j annotations/val_split_2020.json\n ```\n\n Only should provided is your image root path and your json file. And then all result will generated into `yolo` folder under images or in images parent dir.\n\n After that (you got your yolo folder), then you can visualize the conversion result to see if it correct or not:\n\n ```\n alfred data yolovview -i images/ -l labels/\n ```\n\n \n\n- **2020.07.27**: After a long time past, **alfred** finally get some updates:\n\n \n\n Now, you can using alfred draw Chinese charactors on image without xxxx undefined encodes.\n\n ```python\n from alfred.utils.cv_wrapper import put_cn_txt_on_img\n \n img = put_cn_txt_on_img(img, spt[-1], [points[0][0], points[0][1]-25], 1.0, (255, 255, 255))\n ```\n\n Also, you now can **merge** 2 VOC datasets! This is helpful when you have 2 dataset and you want merge them into a single one.\n\n ```\n alfred data mergevoc -h\n ```\n\n You can see more promotes.\n\n- **2020.03.08**\uff1aSeveral new files added in **alfred**:\n\n ```\n alfred.utils.file_io: Provide file io utils for common purpose\n alfred.dl.torch.env: Provide seed or env setup in pytorch (same API as detectron2)\n alfred.dl.torch.distribute: utils used for distribute training when using pytorch\n ```\n\n- **2020.03.04**: We have added some **evaluation tool** to calculate mAP for object detection model performance evaluation, it's useful and can visualize result:\n \n \n\n this usage is also quite simple:\n \n ```\n alfred data evalvoc -g ground-truth -d detection-results -im images\n ```\n\n where `-g` is your ground truth dir (contains xmls or txts), `-d` is your detection result files dir, `-im` is your images fodler. You only need save all your detected results into txts, one image one txt, and format like this:\n \n ```shell\n bottle 0.14981 80 1 295 500 \n bus 0.12601 36 13 404 316 \n horse 0.12526 430 117 500 307 \n pottedplant 0.14585 212 78 292 118 \n tvmonitor 0.070565 388 89 500 196 \n ```\n\n- **2020.02.27**: We just update a `license` module inside alfred, say you want apply license to your project or update license, simple:\n\n ```shell script\n alfred cab license -o 'MANA' -n 'YoloV3' -u 'manaai.cn'\n ```\n you can found more detail usage with `alfred cab license -h`\n\n- **2020-02-11**: open3d has changed their API. we have updated new open3d inside alfred, you can simply using latest open3d and run `python3 examples/draw_3d_pointcloud.py` you will see this:\n\n \n\n- **2020-02-10**: **alfred** now support windows (experimental);\n- **2020-02-01**: **\u6b66\u6c49\u52a0\u6cb9**! *alfred* fix windows pip install problem related to encoding 'gbk';\n- **2020-01-14**: Added cabinet module, also add some utils under data module;\n- **2019-07-18**: 1000 classes imagenet labelmap added. Call it from:\n\n ```python\n from alfred.vis.image.get_dataset_label_map import imagenet_labelmap\n\n # also, coco, voc, cityscapes labelmap were all added in\n from alfred.vis.image.get_dataset_label_map import coco_labelmap\n from alfred.vis.image.get_dataset_label_map import voc_labelmap\n from alfred.vis.image.get_dataset_label_map import cityscapes_labelmap\n ```\n- **2019-07-13**: We add a VOC check module in command line usage, you can now visualize your VOC format detection data like this:\n\n ```\n alfred data voc_view -i ./images -l labels/\n ```\n- **2019-05-17**: We adding **open3d** as a lib to visual 3d point cloud in python. Now you can do some simple preparation and visual 3d box right on lidar points and show like opencv!!\n\n \n\n You can achieve this by only using **alfred-py** and **open3d**!\n\n example code can be seen under `examples/draw_3d_pointcloud.py`. **code updated with latest open3d API**!.\n\n- **2019-05-10**: A minor updates but **really useful** which we called **mute_tf**, do you want to disable tensorflow ignoring log? simply do this!!\n\n ```python\n from alfred.dl.tf.common import mute_tf\n mute_tf()\n import tensorflow as tf\n ```\n Then, the logging message were gone....\n\n- **2019-05-07**: Adding some protos, now you can parsing tensorflow coco labelmap by using alfred:\n ```python\n from alfred.protos.labelmap_pb2 import LabelMap\n from google.protobuf import text_format\n\n with open('coco.prototxt', 'r') as f:\n lm = LabelMap()\n lm = text_format.Merge(str(f.read()), lm)\n names_list = [i.display_name for i in lm.item]\n print(names_list)\n ```\n\n- **2019-04-25**: Adding KITTI fusion, now you can get projection from 3D label to image like this:\n we will also add more fusion utils such as for *nuScene* dataset.\n\n We providing kitti fusion kitti for convert `camera link 3d points` to image pixel, and convert `lidar link 3d points` to image pixel. Roughly going through of APIs like this:\n\n ```python\n # convert lidar prediction to image pixel\n from alfred.fusion.kitti_fusion import LidarCamCalibData, \\\n load_pc_from_file, lidar_pts_to_cam0_frame, lidar_pt_to_cam0_frame\n from alfred.fusion.common import draw_3d_box, compute_3d_box_lidar_coords\n\n # consit of prediction of lidar\n # which is x,y,z,h,w,l,rotation_y\n res = [[4.481686, 5.147319, -1.0229858, 1.5728549, 3.646751, 1.5121397, 1.5486346],\n [-2.5172017, 5.0262384, -1.0679419, 1.6241353, 4.0445814, 1.4938312, 1.620804],\n [1.1783253, -2.9209857, -0.9852259, 1.5852798, 3.7360613, 1.4671413, 1.5811548]]\n\n for p in res:\n xyz = np.array([p[: 3]])\n c2d = lidar_pt_to_cam0_frame(xyz, frame_calib)\n if c2d is not None:\n cv2.circle(img, (int(c2d[0]), int(c2d[1])), 3, (0, 255, 255), -1)\n hwl = np.array([p[3: 6]])\n r_y = [p[6]]\n pts3d = compute_3d_box_lidar_coords(xyz, hwl, angles=r_y, origin=(0.5, 0.5, 0.5), axis=2)\n\n pts2d = []\n for pt in pts3d[0]:\n coords = lidar_pt_to_cam0_frame(pt, frame_calib)\n if coords is not None:\n pts2d.append(coords[:2])\n pts2d = np.array(pts2d)\n draw_3d_box(pts2d, img)\n ```\n\n And you can see something like this:\n\n **note**:\n\n `compute_3d_box_lidar_coords` for lidar prediction, `compute_3d_box_cam_coords` for KITTI label, **cause KITTI label is based on camera coordinates!**.\n <p align=\"center\">\n <img src=\"https://s2.ax1x.com/2019/04/24/EVrU0O.md.png\" />\n </p>\n\n **since many users ask me how to reproduces this result, you can checkout demo file under `examples/draw_3d_box.py`**;\n\n\n- **2019-01-25**: We just adding network visualization tool for **pytorch** now!! How does it look? Simply print out *every layer network with output shape*, I believe this is really helpful for people to visualize their models!\n\n ```\n \u279c mask_yolo3 git:(master) \u2717 python3 tests.py\n ----------------------------------------------------------------\n Layer (type) Output Shape Param #\n ================================================================\n Conv2d-1 [-1, 64, 224, 224] 1,792\n ReLU-2 [-1, 64, 224, 224] 0\n .........\n Linear-35 [-1, 4096] 16,781,312\n ReLU-36 [-1, 4096] 0\n Dropout-37 [-1, 4096] 0\n Linear-38 [-1, 1000] 4,097,000\n ================================================================\n Total params: 138,357,544\n Trainable params: 138,357,544\n Non-trainable params: 0\n ----------------------------------------------------------------\n Input size (MB): 0.19\n Forward/backward pass size (MB): 218.59\n Params size (MB): 527.79\n Estimated Total Size (MB): 746.57\n ----------------------------------------------------------------\n \n ```\n\n Ok, that is all. what you simply need to do is:\n\n ```python\n from alfred.dl.torch.model_summary import summary\n from alfred.dl.torch.common import device\n \n from torchvision.models import vgg16\n \n vgg = vgg16(pretrained=True)\n vgg.to(device)\n summary(vgg, input_size=[224, 224])\n ```\n\n Support you input (224, 224) image, you will got this output, or you can change any other size to see how output changes. (currently not support for 1 channel image)\n\n- **2018-12-7**: Now, we adding a extensible class for quickly write an image detection or segmentation demo.\n\n If you want write a demo which **do inference on an image or an video or right from webcam**, now you can do this in standared alfred way:\n\n ```python\n class ENetDemo(ImageInferEngine):\n \n def __init__(self, f, model_path):\n super(ENetDemo, self).__init__(f=f)\n \n self.target_size = (512, 1024)\n self.model_path = model_path\n self.num_classes = 20\n \n self.image_transform = transforms.Compose(\n [transforms.Resize(self.target_size),\n transforms.ToTensor()])\n \n self._init_model()\n \n def _init_model(self):\n self.model = ENet(self.num_classes).to(device)\n checkpoint = torch.load(self.model_path)\n self.model.load_state_dict(checkpoint['state_dict'])\n print('Model loaded!')\n \n def solve_a_image(self, img):\n images = Variable(self.image_transform(Image.fromarray(img)).to(device).unsqueeze(0))\n predictions = self.model(images)\n _, predictions = torch.max(predictions.data, 1)\n prediction = predictions.cpu().numpy()[0] - 1\n return prediction\n \n def vis_result(self, img, net_out):\n mask_color = np.asarray(label_to_color_image(net_out, 'cityscapes'), dtype=np.uint8)\n frame = cv2.resize(img, (self.target_size[1], self.target_size[0]))\n # mask_color = cv2.resize(mask_color, (frame.shape[1], frame.shape[0]))\n res = cv2.addWeighted(frame, 0.5, mask_color, 0.7, 1)\n return res\n \n \n if __name__ == '__main__':\n v_f = ''\n enet_seg = ENetDemo(f=v_f, model_path='save/ENet_cityscapes_mine.pth')\n enet_seg.run()\n ```\n\n After that, you can directly inference from video. This usage can be found at git repo: \n\n <p align=\"center\"><img src=\"https://s1.ax1x.com/2018/12/07/F1OKLF.gif\"/></p>\nThe repo using **alfred**: http://github.com/jinfagang/pt_enet\n \n- **2018-11-6**: I am so glad to announce that alfred 2.0 released\uff01\ud83d\ude04\u26fd\ufe0f\ud83d\udc4f\ud83d\udc4f Let's have a quick look what have been updated:\n\n ```\n # 2 new modules, fusion and vis\n from alred.fusion import fusion_utils\n ```\n\n For the module `fusion` contains many useful sensor fusion helper functions you may use, such as project lidar point cloud onto image.\n\n- **2018-08-01**: Fix the video combined function not work well with sequence. Add a order algorithm to ensure video sequence right.\n also add some draw bbox functions into package.\n\n can be called like this:\n- **2018-03-16**: Slightly update **alfred**, now we can using this tool to combine a video sequence back original video!\n Simply do:\n\n ```shell\n # alfred binary exectuable program\n alfred vision 2video -d ./video_images\n ```\n\n\n## Capable\n\n**alfred** is both a library and a command line tool. It can do those things:\n\n```angular2html\n# extract images from video\nalfred vision extract -v video.mp4\n# combine image sequences into a video\nalfred vision 2video -d /path/to/images\n# get faces from images\nalfred vision getface -d /path/contains/images/\n\n```\n\nJust try it out!!\n\n## Copyright\n\n**Alfred** build by *Lucas Jin* with \u2764\ufe0f\uff0c welcome star and send PR. If you got any question, you can ask me via wechat: `jintianiloveu`, this code released under GPL-3 license.\n",
"bugtrack_url": null,
"license": "GPL-3.0",
"summary": "Alfred is a DeepLearning utility library.",
"version": "3.0.11",
"project_urls": {
"Homepage": "https://github.com/jinfagang/alfred"
},
"split_keywords": [
"deep learning",
" script helper",
" tools"
],
"urls": [
{
"comment_text": "",
"digests": {
"blake2b_256": "7df0240fb33706b183f34aa0dcd9edf48bcb496a63e5b41cb5b77d544aadd644",
"md5": "2349624dadd2b333945d0495d5e406ef",
"sha256": "00604076079d563ce1ee454f441697849dd63900b6721b79383ba775d7b04c30"
},
"downloads": -1,
"filename": "alfred-py-3.0.11.tar.gz",
"has_sig": false,
"md5_digest": "2349624dadd2b333945d0495d5e406ef",
"packagetype": "sdist",
"python_version": "source",
"requires_python": null,
"size": 1763143,
"upload_time": "2024-08-08T03:27:04",
"upload_time_iso_8601": "2024-08-08T03:27:04.091512Z",
"url": "https://files.pythonhosted.org/packages/7d/f0/240fb33706b183f34aa0dcd9edf48bcb496a63e5b41cb5b77d544aadd644/alfred-py-3.0.11.tar.gz",
"yanked": false,
"yanked_reason": null
}
],
"upload_time": "2024-08-08 03:27:04",
"github": true,
"gitlab": false,
"bitbucket": false,
"codeberg": false,
"github_user": "jinfagang",
"github_project": "alfred",
"travis_ci": false,
"coveralls": false,
"github_actions": false,
"lcname": "alfred-py"
}

