| Name | froster JSON |
| Version |
0.20.1
 JSON
JSON |
| download |
| home_page | None |
| Summary | Froster is a tool for easy archive and restore between local file systems and AWS S3 storage. |
| upload_time | 2025-02-04 03:55:56 |
| maintainer | None |
| docs_url | None |
| author | Dirk Petersen |
| requires_python | <4.0,>=3.9 |
| license | MIT |
| keywords |
|
| VCS |
|
| bugtrack_url |
|
| requirements |
No requirements were recorded.
|
| Travis-CI |
No Travis.
|
| coveralls test coverage |
No coveralls.
|

[](https://pypi.org/project/froster/)
[](https://pypi.org/project/froster/)
[](https://raw.githubusercontent.com/dirkpetersen/froster/main/LICENSE)
[](https://pypi.org/project/froster/)
[](https://github.com/dirkpetersen/froster/actions/workflows/pypi-release-publish.yml)
[](https://github.com/dirkpetersen/froster/actions/workflows/test-credentials.yml)
[](https://github.com/dirkpetersen/froster/actions/workflows/test-basic-features.yml)
Froster is a user-friendly archiving tool for teams that move data between high-cost POSIX file systems and low-cost S3-like object storage systems. It currently supports these S3 providers: AWS, GCS, Wasabi, IDrive, Ceph, and Minio. Froster can efficiently crawl your Posix file system metadata, recommend folders for archiving, generate checksums, and upload your selections to Glacier or other S3-like storage. It can retrieve data back from the archive using a single command. Additionally, Froster can mount S3/Glacier storage inside your on-premise file system and also restore it to an AWS EC2 instance.
</br>
## Installation pre-requisite: packages
### On Debian / Ubuntu
```
sudo apt update
sudo apt install -y curl python3-pip python3-venv python3-dev gcc lib32gcc-s1 unzip fuse3
```
### On Fedora / RHEL / Rocky
```
sudo dnf update -y
sudo dnf install -y curl python3-pip python3-devel gcc unzip fuse3 which
```
### On HPC machine (RHEL based)
Please get in touch with your administrator to install these packages (Python >= 3.8)
```
curl python3 python3-pip python3-devel gcc lib32gcc-s1 which unzip fuse3
```
</br>
## Installation
To install Froster, execute the following command in your terminal:
```
curl -s https://raw.githubusercontent.com/dirkpetersen/froster/main/install.sh?$(date +%s) | bash
```
To check that everything is installed correctly, run `froster --info` or `froster --version` commands.
Check available commands on the help section `froster --help`
</br>
## Update
To update Froster, execute the same command from the [Installation section](#installation).
Froster will prompt you once a week when a new update is available.
You can manually check if there is an update available by running the command:
```
froster update
```
</br>
## Configuration
To run Froster, you need to configure it first. Froster will guide you through the configuration with questions you need to answer. In most cases, you can accept default options by pressing enter.
To configure Froster, run the command:
```
froster config
```
If you have any doubts while configuring Froster, check the [Configuration sections explanation](#configuration-sections-explanation)
If you want a clean config file, run the config command with the `--reset` option:
```
froster config --reset
```
</br>
### Import and Export Configuration
If several users of the same team want to use Froster, they will have to configure the same profiles to work with the same configuration, buckets, endpoints, etc. To ease this configuration across teams, a user that has already configured Froster can export its configuration. This will export all configurations except for sensitive information: username, email, and credentials. To export a configuration, run the command:
```
froster config --export /folder/path
```
To import a configuration, run the command:
```
froster config --import /path/to/exported/config
```
Please note that the `froster config` command still needs to be executed, as username, email, and credentials still need to be configured.
</br>
## Basic usage of Froster
### Credentials
The credentials command checks that the current selected profile is correctly configured and has valid credentials.
```
froster credentials
```
### Index
The index command crawls your file system, looking for hotspots (i.e., folders with files larger than 1GB).
It uses a third-party tool called [filesystem-reporting-tools](https://github.com/fizwit/filesystem-reporting-tools), which uses parallel threads to crawl large filesystems efficiently.
This command is not strictly necessary for archiving, but it helps you to spot large folders that are potentially worth archiving. You can provide one or more folders separated by space:
```
froster index [folders...]
```
Check more options at `froster index --help`.
### Archive
The archive command uploads folders from the local filesystem to the default profile's S3 bucket. If one or more folders are provided, they will be archived. If no folder is provided, froster will allow you to select hotspots of previously indexed folders.
```
froster archive [folders...]
```
Check more options at `froster archive --help`.
**Note**: To change default profile use `froster --default-profile` command. To use a different profile for the current command, you can use the `--profile PROFILE` flag. Check these options at `froster --help`
### Delete
The delete command deletes previously archived folders. If one or more folders are provided, all of them will be deleted from the local filesystem ONLY after verifying that they have been successfully stored in the S3 server. If no folder is provided, froster will allow you to select a folder from previously successfully archived folders. It is worth noting that this command checks if the folders have been successfully uploaded to the S3 bucket. Please do NOT delete folders manually.
```
froster delete [folders...]
```
Check more options at `froster delete --help`.
### Restore
The restore command restores a previously deleted folder (i.e., deleted by using the `froster delete` command). This command will first trigger the folder retrieval if folders are stored in a DEEP_ARCHIVE storage class (See [AWS Storage Class guide](https://docs.aws.amazon.com/AmazonS3/latest/userguide/storage-class-intro.html)). Once retrieval finishes, executing this command again will download files from the S3 bucket to the local filesystem.
```
froster restore [folders...]
```
Check more options at `froster restore --help`.
### Mount / Umount
The mount / umount command (u)mounts the remote S3 or Glacier storage in your local file system at the location of the original folder. If one or more folders are provided, they will be (u)mounted. If no folder is provided, froster will allow you to select folders of previously archived folders.
```
froster mount [folders...]
```
```
froster umount [folders...]
```
Check more options at `froster mount --help`.
***
## Table of Contents
- [Installation pre-requisite: packages](#installation-pre-requisite-packages)
- [On Debian / Ubuntu](#on-debian--ubuntu)
- [On Fedora / RHEL / Rocky](#on-fedora--rhel--rocky)
- [On HPC machine (RHEL based)](#on-hpc-machine-rhel-based)
- [Installation](#installation)
- [Update](#update)
- [Configuration](#configuration)
- [Import and Export Configuration](#import-and-export-configuration)
- [Basic usage of Froster](#basic-usage-of-froster)
- [Credentials](#credentials)
- [Index](#index)
- [Archive](#archive)
- [Delete](#delete)
- [Restore](#restore)
- [Mount / Umount](#mount--umount)
- [Table of Contents](#table-of-contents)
- [Problem](#problem)
- [Motivation](#motivation)
- [Design](#design)
- [Preparing Froster](#preparing-froster)
- [Configuring](#configuring)
- [Configuration sections explanation](#configuration-sections-explanation)
- [AWS configuration for teams](#aws-configuration-for-teams)
- [Changing defaults with aliases](#changing-defaults-with-aliases)
- [Using Froster](#using-froster)
- [Standard usage](#standard-usage)
- [Large scale use on HPC](#large-scale-use-on-hpc)
- [Picking old and large data](#picking-old-and-large-data)
- [Special use cases](#special-use-cases)
- [Recursive operations](#recursive-operations)
- [Tarring small files](#tarring-small-files)
- [NIH Life Sciences metadata](#nih-life-sciences-metadata)
- [Using desktop tools to browse S3 Glacier](#using-desktop-tools-to-browse-s3-glacier)
- [Cloudberry Explorer](#cloudberry-explorer)
- [Cyberduck](#cyberduck)
- [More detailed file system analysis](#more-detailed-file-system-analysis)
- [Command line help](#command-line-help)
- [froster --help](#froster---help)
- [froster config --help](#froster-config---help)
- [froster index --help](#froster-index---help)
- [froster archive --help](#froster-archive---help)
- [froster delete --help](#froster-delete---help)
- [froster {mount|umount} --help](#froster-mountumount---help)
- [froster restore --help](#froster-restore---help)
- [FAQ and Troubleshooting](#faq-and-troubleshooting)
- [Why can't I use Froster to archive to Google Drive, Sharepoint/OneDrive, etc ?](#why-cant-i-use-froster-to-archive-to-google-drive-sharepointonedrive-etc-)
- [Contributing](#contributing)
- [Install Froster in development mode](#install-froster-in-development-mode)
- [Froster development](#froster-development)
- [Release new Froster version](#release-new-froster-version)
- [Commercial solutions](#commercial-solutions)
- [Discontinuing Froster](#discontinuing-froster)
## Problem
We have yet to find an easy-to-use, open-source solution for large-scale archiving intended to free up disk space on a primary storage system. Researchers, who may have hundreds of terabytes or even petabytes of data, must decide what to archive and where. Archiving processes can stretch for days and are susceptible to failure. These processes must be able to resume automatically until completion and need to be validated (for instance, through a checksum comparison with the source). Additionally, it's crucial to maintain some metadata regarding when the archiving occurred, where the data was transferred to, and the data's original location to restore it quickly.
## Motivation
The main motivations behind the creation of `Froster` are:
- We were working with researchers to optimize their archiving processes. In doing so, we wanted to understand user workflows and identify the essential metadata to be captured. Thanks to Froster's compact codebase, it can be easily adapted to various needs. Metadata could be captured through an additional web interface. However, a web system often requires IT support and an extra layer of authentication. It might be simpler to gather such information through a [Textual TUI interface](https://www.textualize.io/projects/). A first [demo of this option is here](#nih-life-sciences-metadata). The insights gained through working with `Froster` will likely guide the development or acquisition of more advanced tools in the future.
- HPC users often find AWS Glacier inaccessible or complex and perceive that it is expensive because of Egress fees. This is despite evidence that most data for most research users has not been touched in years. It seems that it is very difficult to build an on-premises archive solution with a lower TCO than AWS Glacier or similar offerings from other cloud providers such as IDrive E2
- Secure the archiving process via checksum verification. After every transfer, a checksum verifies the integrity of destination files, ensuring no data gets lost.
## Design
1. First, we may need to crawl the file system, which sometimes has billions of files, to find data that is actually worth archiving. For this, Froster uses the well-known [pwalk](https://github.com/fizwit/filesystem-reporting-tools), a multi-threaded parallel file system crawler that creates a large CSV file of all discovered file metadata.
1. Our focus is on archiving folders rather than individual files, as data in the same folder typically belongs together. To this end, we filter the pwalk's CSV file with [DuckDB](https://duckdb.org) and get a new list (CSV) of the largest folders sorted by size. (We call this a `Hotspots` file)
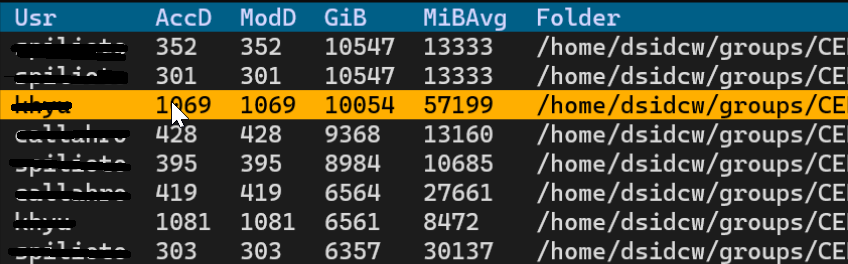
1. We pass this new list (CSV) to an interactive tool based on [Textual](https://textual.textualize.io/), which displays a table of folders alongside their total size in GiB, their average file sizes in MiB (MiBAvg), as well as their age in days since last accessed (AccD) and modified (ModD). Users can scroll down and right using the mouse and hitting enter will trigger the archiving of the selected folder.
1. All files < 1 MiB size are moved to an archive called Froster.smallfiles.tar before uploading. You can also [avoid tarring](#tarring-small-files)
1. We pass the folder to [Rclone](https://rclone.org) to execute a copy job in the background.
1. Many researchers with large datasets will have a Slurm cluster connected to their data storage system. This is ideal for long-running data copy jobs, and Slurm can automatically re-run copy jobs that fail. Researchers can also use the `--no-slurm` option to execute the job in the foreground. This is the default if Slurm is not installed on the Linux machine.
1. Before copying, we place files with checksums (e.g., `.froster.md5sum`) in the folders to be archived. This allows for an easy subsequent checksum comparison, providing the user with evidence that all data was correctly archived (through size and md5sum comparisons).
1. After files have been deleted from the source folder, we place a file named `Where-did-the-files-go.txt` in it. This file describes where the data was archived and provides instructions on how to retrieve it.
1. Optionally allow `archive --recursive` to enable archiving of entire folder trees. [More details here](#recursive-operations).
1. (Optional) Link to NIH metadata with the `archive --nih` option to link to life sciences research projects [More details here](#nih-life-sciences-metadata).
<!-- 1. Optionally restore to a cloud machine (AWS EC2 instance) with the `restore --aws` option to avoid egress fees. [More details here](#restore-to-cloud-machine), also please see [this discussion](https://github.com/dirkpetersen/froster/discussions/12). -->
## Preparing Froster
### Configuring
The config is mostly automated. You can just run `froster config` command. You need to answer a few questions for which you can accept defaults in most cases.
When running `froster config`, you should confirm the default DEEP_ARCHIVE for `AWS S3 storage class` as this is currently the most cost-effective storage solution. It takes only 48-72 hours to retrieve your data with the least expensive retrieval option ('Bulk'). See [AWS Storage Class guide](https://docs.aws.amazon.com/AmazonS3/latest/userguide/storage-class-intro.html). However, you can choose other [AWS S3 storage classes](https://rclone.org/s3/#s3-storage-class) supported by the rclone copy tool.
Froster uses `~/.aws` files to store credentials, regions, and endpoints in the AWS standard way.
Check the [rclone S3 docs](https://rclone.org/s3/) to learn about different providers and endpoints.
Froster has been tested with numerous S3-compatible storage systems such as GCS, Wasabi, IDrive, Ceph, and Minio. At this time, only AWS supports the DEEP_ARCHIVE storage class.
### Configuration sections explanation
Down below, you will find an explanation of each configuration section:
- SET USER
- Set your name. This information will be stored locally as metadata when archiving files.
- SET EMAIL
- Set your email. This information will be stored locally as metadata when archiving files. Email is also used to notify about SLURM executions.
- SET SHARED
- If set to yes, then enter the path to the shared folder. The shared folder will be used to store hotspots (output of `froster index <folder>` command) and the archiving database (file with all archived files). This is useful when Froster is used by more than one user. Current user hotspots will be copied to the new shared folder. The archiving database will ONLY be copied to the shared folder if no archiving database is already in the shared folder.
- If set to no, hotspots and the archiving database will be stored in the local user filesystem.
- SET NIH
- If set to yes, it allows you to create a link between the data you archive and the research project granted by a funding organization to increase the [FAIR level](https://the-turing-way.netlify.app/reproducible-research/rdm/rdm-fair.html) of an archived dataset. The National Institutes of Health (NIH) has maintained a large database of all publicly funded life sciences projects in the US since the 1980s at [NIH RePORTER](https://reporter.nih.gov).
- SET PROFILE
- Profiles are Froster's most important configuration. You will need to have at least one configured profile to be able to archive folders to your S3 provider. Profiles store the following information:
- Select profile: Configure an existing profile or create a new one.
- Select S3 provider: Select the S3 provider for this profile. Currently supported S3 providers are AWS, GCS, Wasabi, IDrive, Ceph, and Minio. There is also a generic option called "Other," where you can configure a generic S3 provider.
- Select credentials: Select the credentials for this profile or create new ones. These credentials will be used to authenticate to your S3 provider. They are stored in the ```~/.aws/credentials``` file.
- Select region: Select the region for this profile or create a new one. ```-- no region --``` option will set the region to the value "default".
- Select S3 bucket: Select the bucket for this profile or create a new one.
- Enter directory inside S3 bucket: Enter the root folder where files will be archived for the selected S3 bucket.
- Select the S3 storage class: Select the S3 storage class for this profile or create a new one. ```DEEP_ARCHIVE``` is currently the most cost-effective storage solution available. See [AWS Storage Class guide](https://docs.aws.amazon.com/AmazonS3/latest/userguide/storage-class-intro.html)
- SET SLURM
- Configure several SLURM options that will be passed to the SLURM script upon execution.
<!-- #### working with multiple users
If we set a team configuration using `froster config /our/shared/froster/config` Froster knows 3 types of users or roles:
* **Data Stewards**: Users with full write access, they can delete/destroy data in the archive as well as in the local file system
* **Archive Users**: Data scientists with read-only access to the archive bucket, they can restore data or mount the archive into the local file system
* **Other Users**: Users without access to the archive cannot use froster with this team. However they can setup their own froster configuration using a different bucket and setup a new team.
The team config requires correct permissions for the AWS bucket (archive) and in your shared Posix file system where the Froster configuration and json database resides. In the Posix file system we need a security group (e.g. an ActiveDirectory groups called data_steward_grp) to give the group of data stewards write access to the shared config. For this we execute 2 commands:
```
chgrp data_steward_grp /our/shared/froster/config
chmod 2775 /our/shared/froster/config
```
The chmod command ensures that the group of data stewards has write access while all other users have read only access to the configuration. Using 2775 instead of 0775 ensures that the group ownership is inherited to all sub-directories when running chmod (SETGID, This chmod command is run automatically each time you run `froster config`) -->
### AWS configuration for teams
You typically use AWS Identity and Access Management (IAM) to set up policies for S3. You can define permissions at a granular level, such as by specifying individual API actions or using resource-level permissions for specific S3 buckets and objects.
Here's a step-by-step guide for a simple permission setup for Data Stewards and Archive Users using the IAM Management Console:
1. Open the IAM console at https://console.aws.amazon.com/iam/ and login with an administrative user account.
1. Create User Groups: It's easier to manage permissions by grouping users. Create two groups: ReadWriteGroup and ReadOnlyGroup. Add the Data Stewards to ReadWriteGroup and the Archive Users to ReadOnlyGroup
1. Create one each IAM Policy (JSON Files) for ReadWriteGroup and ReadOnlyGroup. The s3:RestoreObject action allows users to restore data from Glacier.
1. Attach Policies to Groups: In the IAM console, select the ReadWriteGroup group, click on "Add permissions" and then "Attach policies". Create a new policy using the first JSON, and attach it to this group. Do the same for ReadOnlyGroup using the second JSON.
Policy ReadWriteGroup:
```
{
"Version": "2012-10-17",
"Statement": [
{
"Effect": "Allow",
"Action": [
"s3:PutObject",
"s3:GetObject",
"s3:ListBucket",
"s3:DeleteObject",
"s3:RestoreObject"
],
"Resource": [
"arn:aws:s3:::your-bucket-name",
"arn:aws:s3:::your-bucket-name/*"
]
}
]
}
```
Policy ReadOnlyGroup:
```
{
"Version": "2012-10-17",
"Statement": [
{
"Effect": "Allow",
"Action": [
"s3:GetObject",
"s3:ListBucket",
"s3:RestoreObject"
],
"Resource": [
"arn:aws:s3:::your-bucket-name",
"arn:aws:s3:::your-bucket-name/*"
]
}
]
}
```
### Changing defaults with aliases
Froster has several global options that you may prefer, but you don't like to type them all the time. We have `--no-slurm` (don't submit batch jobs even if Slurm is found), `--cores` (use a number of CPU cores that is different from the default 4), and `--profile` (use a different profile than default_profile for S3 related commands). You can create a command alias that uses these settings by default. For example, if you think that typing froster is too long and would like to rather type `fro` and use 8 cpu cores in the foreground with a custom profile named `myceph` you can simply enter this command in bash:
```
alias fro="froster --no-slurm --cores=8 --profile=myceph"
```
If you would like to keep this past the next login you can add this alias to the bottom of ~/.bashrc:
```
echo 'alias fro="froster --no-slurm --cores=8 --profile=myceph"' >> ~/.bashrc
```
<!-- #### advanced configuration
Some advanced configuration settings are not offered through a user interface, but you can change them under `~/.froster/config`. For example, `~/.froster/config/general` has one file per setting which makes it very easy to use the settings in shell scripts, for example when writing addon tools:
```
DEFAULT_STORAGE_CLASS=$(cat ~/.froster/config/general/s3_storage_class)
```
a few advanced settings at ~/.froster/config/general deserve more explanation:
* min_index_folder_size_gib (Default: 10)
If the sum of all file sizes in one folder level is larger than this value in GiB that folder will be included in a hotspots file, which is generated using the `froster index` command
* min_index_folder_size_avg_mib (Default: 10)
If the size of one folder level is at least min_index_folder_size_gib and if the average file size in that folder level is larger than this value in MiB that folder will be included in a hotspots file which is generated using the `froster index` command
* max_hotspots_display_entries (Default: 5000)
The maximum number of entries that will be shown in the dialog once a hotspot file is selected after using the `froster archive` command.
* max_small_file_size_kib (Default: 1024)
If a file is smaller than this size, it will be moved to a file Froster.smallfiles.tar at the same folder level before uploading with the `froster archive` command. This is useful because Glacier consumes an overhead of about 40 KiB for each uploaded file. If you want to avoid tarring files set max_small_file_size_kib to 0. -->
## Using Froster
### Standard usage
In its most simple form, Froster can archive a specific folder, delete the source, and restore the data interactively on a standalone Linux machine.
For example, we have 2 files in a folder
```
vmachado@vmachado:~$ ls -la ~/Desktop/froster/csv
total 2008
-rw-rw-r-- 1 vmachado vmachado 1126400 jul 1 17:19 9j6_3ne_medium_1.out
-rw-rw-r-- 1 vmachado vmachado 921600 jul 1 17:19 9j6_rqu_small_1.out
```
Now let's archive this folder
```
vmachado@vmachado:~$ froster archive ~/Desktop/froster/csv
ARCHIVING /home/vmachado/Desktop/froster/csv
Generating Froster.allfiles.csv and tar small files...
...done
Generating checksums...
...done
Uploading Froster.allfiles.csv file...
...done
Uploading files...
...done
Verifying checksums...
...done
ARCHIVING SUCCESSFULLY COMPLETED
PROVIDER: "AWS"
PROFILE: "profile aws"
ENDPOINT: "https://s3.eu-west-2.amazonaws.com"
LOCAL SOURCE: "/home/vmachado/Desktop/froster/csv"
S3 DESTINATION: ":s3:froster-vmachado-test/froster/home/vmachado/Desktop/froster/csv"
```
Froster creates MD5 checksums for the files in the local folder, uploads them, and then compares the checksums in the archive with the local ones.
Now we delete the local data as we have evidence that the data is intact in the archive. We could execute `froster delete ~/csv`, but since the archiving process took a long time, we forgot which folder we needed to delete. We just run `froster delete` without the folder argument to see a list of archived folders and pick the one in which we want to delete files.

after the deletion is completed, we see that a manifest file was created that gives users some info.
```
vmachado@vmachado:~$ froster delete
DELETING /home/vmachado/Desktop/froster/csv...
Verifying checksums...
...done
Deleting files...
...done
DELETING SUCCESSFULLY COMPLETED
LOCAL DELETED FOLDER: /home/vmachado/Desktop/froster/csv
AWS S3 DESTINATION: :s3:froster-vmachado-test/froster/home/vmachado/Desktop/froster/csv
Total files deleted: 2
Manifest: /home/vmachado/Desktop/froster/csv/Where-did-the-files-go.txt
```
The file has information that should allow other users to find out where the data went and who to contact to get it back. It is important to understand that before deletion, Froster will compare the checksums of each file that was archived with the file in the archive and will only delete local files that have an identical copy in the archive. The manifest file and the checksum comparison are good reasons why you should always let Froster handle the data deletion instead of deleting the source folder manually.
```
vmachado@vmachado:~$ cat /home/dp/csv/Where-did-the-files-go.txt
The files in this folder have been moved to an AWS S3 archive!
Archive location: :s3:froster-vmachado-test/froster/home/vmachado/Desktop/froster/csv
Archive aws profile: profile aws
Archiver user: vmachado
Archiver email: your@email.com
froster-archives.json: /home/vmachado/.local/share/froster/froster-archives.json
Archive tool: https://github.com/dirkpetersen/froster
Restore command: froster restore "/home/vmachado/Desktop/froster/csv"
Deletion date: 2024-07-01 17:23:19.917602
First 10 files deleted this time:
9j6_3ne_medium_1.out, Froster.smallfiles.tar
Please see more metadata in Froster.allfiles.csv file
You can use "visidata" or "vd" tool to help you visualize Froster.allfiles.csv file
```
After a folder has been deleted and you wish to view the file names in the archive, simply execute `froster mount`. Then, select the folder you want to access. Froster will then mount the bucket location to the folder that was deleted. This allows you to see file and folder names, along with their modification dates. Additionally, you can view the `Froster.allfiles.csv` file using any editor or the `visidata` / `vd` tool. This particular file contains metadata for all files in the folders, including those archived in a .tar format. If you haven't used the DEEP_ARCHIVE or GLACIER S3 archive tiers, you can also copy individual files or access them through your existing pipelines. Remember to use froster umount to unmount the folder when done.
```
vd /home/vmachado/Desktop/froster/csv
froster mount
froster umount
```
The `visidata` tool can display but also manipulate csv files:

After a while you may want to restore the data. Again, you forgot the actual folder location and invoke `froster restore` without the folder argument to see the same dialog with a list of achived folders. Select a folder and hit "Enter" to restore immediatelty.
```
vmachado@vmachado:~$ froster restore
RESTORING /home/vmachado/Desktop/froster/csv
Triggered Glacier retrievals: 2
Currently retrieving from Glacier: 0
Retrieved from Glacier: 0
Not in Glacier: 1
Glacier retrievals pending. Depending on the storage class and restore mode run this command again in:
Expedited mode: ~ 5 minuts
Standard mode: ~ 12 hours
Bulk mode: ~ 48 hours
NOTE: You can check more accurate times in the AWS S3 console
```
If you use the DEEP_ARCHIVE (default) or GLACIER AWS S3 storage classes, the first execution of `froster restore` will initiate a Glacier retrieval. This retrieval will copy the data in the background from the Glacier archive to the S3 One Zone-IA storage class which costs about $10 per TiB/month and keep it there for 30 days by default (you can change this to something like 7 days with `froster restore --days 7`). Wait for 12 hours and run the `froster restore` command again. If all data has been retrieved (which means both "Triggered Glacier retrievals" and "Currently retrieving from Glacier" show 0) the restore to the original folder location will proceed. As an alternative to running `froster restore` a second time, you can use `froster mount` which allows you to access individual files once they have been retrieved from Glacier.
```
dp@grammy:~$ froster restore
RESTORING /home/vmachado/Desktop/froster/csv
Triggered Glacier retrievals: 0
Currently retrieving from Glacier: 0
Retrieved from Glacier: 2
Not in Glacier: 1
Downloading files...
...done
Generating checksums...
...done
Verifying checksums...
...done
Untarring Froster.smallfiles.tar...
...done
RESTORATION OF /home/vmachado/Desktop/froster/csv COMPLETED SUCCESSFULLY
```
Note that if you restore from AWS S3 to on-premises, you may be subject to AWS data egress charges (up to $90 per TiB downloaded, or $20 per TiB with AWS DirectConnect), unless your organization has negotiated an [AWS data egress waiver](https://aws.amazon.com/blogs/publicsector/data-egress-waiver-available-for-eligible-researchers-and-institutions/).
### Large scale use on HPC
If you have hundreds of terabytes or even petabytes of data in billions of files, you may not be able to easily locate data that is worth archiving. Among hundreds of thousands of folders, there are typically only a few hundred that make up most of your storage consumption. We call these folders 'Hotspots,' and to find them, you use the `froster index` command and pass the root directory of your lab data.
```
[user@login ~]$ froster index /home/vmachado/data_2
SLURM JOB
ID: 2251
Type: index
Check status: "squeue -j 2251"
Check output: "tail -n 100 -f /home/.local/shared/froster/slurm/froster-index@+home+vmachado+data_2-2251.out"
Cancel the job: "scancel 2251"
```
we can see the status of the job and then use the suggested tail command to see how the indexing is progressing, we can see that the job finished successfully
```
[user@login ~]$ tail -n 100 -f /home/.local/shared/froster/slurm/froster-index@+home+vmachado+data_2-2251.out
INDEXING /home/vmachado/data_2
Hotspots file: /home/vmachado/shared_dir/hotspots/+home+vmachado+data_2.csv
with 0 hotspots >= 1 GiB
with a total disk use of 0.0 TiB
Total folders processed: 3
INDEXING SUCCESSFULLY COMPLETED
```
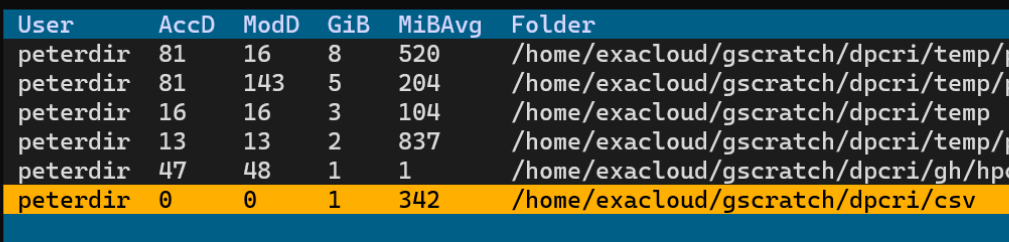
now we run the `froster archive` command without entering folder names on the command line. We just created a csv folder for testing that contains 3 csv files with a total of about 1.1 GiB data. We pick this csv folder. It shows that it has been accessed 0 days ago (column AccD) because we just created it.

```
[user@login ~]$ froster archive /home/vmachado/data_2
SLURM JOB
ID: 2252
Type: archive
Check status: "squeue -j 2252"
Check output: "tail -n 100 -f /home/.local/shared/froster/slurm/froster-archive@+home+vmachado+data_2-2252.out"
Cancel the job: "scancel 2252"
```
Once the archive job has been completed, you should receive an email from your Slurm system.
### Picking old and large data
Now let's take it to the next level. Small datasets are not really worth archiving as the cost of storing them is low .... and if we started archiving data that was just used last week, some users would get really angry with us. This means our task is pretty clear: First we are looking for datasets that are large and old. In the example below we want to identify datasets that have not been touched in 3 years (1095 days) and that are larger than 1 TiB (1024 GiB without subfolders). We are executing `froster archive --older 1095 --larger 1024`. As you can see, this produces an output command that you can copy and paste directly into the shell of your HPC login node to submit an archiving batch job. In this case you will save more than 50 TiB of disk space with a few seconds of labor even though the archiving job may take days to run.
```
froster archive --older 1095 --larger 1024
Processing hotspots file /home/users/dp/.froster/config/hotspots/@XxxxermanLab.csv!
Run this command to archive all selected folders in batch mode:
froster archive \
"/home/groups/XxxxermanLab/xxxriti/tabulation-virus2" \
"/home/groups/XxxxermanLab/xxxsojd/KIR6.2_collaboration" \
"/home/groups/XxxxermanLab/xxxtofia/ER-alpha/WildType_Estradiol_Pose1_BrokenH12_WExplore" \
"/home/groups/XxxxermanLab/xxxriti/estrogen-receptor" \
"/home/groups/XxxxermanLab/xxxsojd/covid_we_data" \
"/home/groups/XxxxermanLab/xxxsojd/covid_data/we_data" \
"/home/groups/XxxxermanLab/xxxtossh/lc8-allostery-study/gromacs/7D35/7D35-comparison/singly-bound-structure/md_5us" \
"/home/groups/XxxxermanLab/xxxtossh/lc8-allostery-study/gromacs/7D35/7D35-comparison/doubly-bound-structure/md_5us" \
"/home/groups/XxxxermanLab/xxxtossh/lc8-allostery-study/gromacs/7D35/7D35-comparison/apo-structure/md_5us" \
"/home/groups/XxxxermanLab/xxxperma/cell/live_cell/mcf10a/batch_17nov20/wctm/17nov20" \
"/home/groups/XxxxermanLab/xxxperma/cell/live_cell/mcf10a/ligcomb_17jun21"
Total space to archive: 54,142 GiB
```
Note: you can also use `--newer xxx --larger yyy to identify files that have only been added recently`
### Special use cases
#### Recursive operations
By default, Froster ignores sub-folders, as only files that reside directly in a chosen folder will be archived. There are two reasons for this: First, if your goal is cost reduction rather than data management, most folders are small and not worth archiving. We want to focus on the few large folders (Hotspots) that make a difference. Secondly, many storage administrators are uncomfortable with users moving hundreds of terabytes. If an entire folder tree can be archived with a single command, it may create bottlenecks in the network or storage systems.
However, you can use the `archive --recursive` option with the archive command to include all sub-folders
#### Tarring small files
Folders with large amounts of small files have always been problematic to manage, as they can degrade a storage system's metadata performance, and copying many of them is very slow. Since Glacier objects have an overhead of 40K per uploaded file, storage consumption can quickly get out of hand if not properly managed, as a folder with 1 million tiny files would require an additional 40GB storage capacity.
Froster addresses this by moving all small files < 1 MiB to a Tar archive called Froster.smallfiles.tar in each folder.
Froster.smallfiles.tar is created before uploading. When restoring data Froster.smallfiles.tar is automatically extracted and then removed. You do not need to know anything about Froster.smallfiles.tar as you will only see Froster.smallfiles.tar in the S3-like object store after it has been deleted from the local file system. If you browse the objectstore with a tool such as [Cyberduck](#using-cyberduck-to-browse-glacier) you will see a file Froster.allfiles.csv along with Froster.smallfiles.tar. The CSV file contains a list of all filenames and metadata, including the ones that were tarred to provide additional transparency.
To avoid tarring, use this command: `froster archive—- notar` option.
```
echo 0 > ~/.froster/config/general/max_small_file_size_kib
```
#### NIH Life Sciences metadata
In many cases, we would like to create a link between the data we archive and the research project granted by a funding organization to increase the [FAIR level](https://the-turing-way.netlify.app/reproducible-research/rdm/rdm-fair.html) of an archived dataset. The National Institutes of Health (NIH) has maintained a large database of all publicly funded life sciences projects in the US since the 1980s at [NIH RePORTER](https://reporter.nih.gov). Froster uses the [RePORTER API](https://api.reporter.nih.gov) to allow you to search for grants and link them to your datasets.
To invoke the search interface configure it as default on the `froster config` SET_NIH section or use the --nih option with `archive` subcommand
```
froster archive --nih [folders...]
```

You can search multiple times. Once you find the grant you are looking for, hit TAB and use the allow keys to select the grant and confirm with enter
<!-- #### Restore to cloud machine
In some cases, you may want to restore rarely needed data from Glacier to a cloud machine on EC2. The most frequent use case is to save AWS Egress fees. Use the --aws option with the restore sub-command to create a new ec2 instance with enough local disk space to restore your data there: `froster restore --aws ~/archtest/data1`
```
dp@grammy:~$ froster restore --aws ~/archtest/data1
Total data in all folders: 1.30 GiB
Chosen Instance: c5ad.large
Using Image ID: ami-0a6c63f0325635301
Launching instance i-08028464562bbxxxx ... please wait ...
|████████████████████████████████████████████████--| 96.7%
Security Group "sg-0b648aca16f7c5efd" attached.
Instance IP: 34.222.33.xxx
Waiting for ssh host to become ready ...
will execute 'froster restore /home/dp/archtest/data1' on 34.222.33.xxx ...
Warning: Permanently added '34.222.33.xxx' (ECDSA) to the list of known hosts.
Executed bootstrap and restore script ... you may have to wait a while ...
but you can already login using "froster ssh"
Sent email "Froster restore on EC2" to dp@domain.edu!
```
After the instance is created, simply run `froster ssh` to login to the last EC2 instance you created or (if you have created multiple machines) `froster ssh <ip-address>`. Once logged in, use the up-arrow key to list the folder where data should be restored. (Note the data may not be there yet). The environment you find has Conda (with Python and R) as well as Docker and Apptainer/Singularity installed.
```
dp@grammy:~$ froster ssh
Connecting to 34.222.33.xxx ...
, #_
~\_ ####_
~~ \_#####\
~~ \###|
~~ \#/ ___ Amazon Linux 2023 (ECS Optimized)
~~ V~' '->
~~~ /
~~._. _/
_/ _/
_/m/'
For documentation, visit http://aws.amazon.com/documentation/ecs
Last login: Thu Oct 26 09:41:12 2023 from xxx.xxx.221.46
Access JupyterLab:
http://34.222.33.xxx:8888/lab?token=d453d8aec274c43eb703031c97xxxxxxxxxxxxxxxxxxxx
type "conda deactivate" to leave current conda environment
(base) ec2-user@froster:~$
```
In addition, you can click the link (often ctrl+click) to a Jupyter Lab Notebook, which has Python and R Kernels installed. You will find a symbolic link starting 'restored-' in your home directory that points to your data. How should this EC2 instance be configured? Please [participate in this discussion](https://github.com/dirkpetersen/froster/discussions/12)

-->
#### Using desktop tools to browse S3 Glacier
##### Cloudberry Explorer
Cloudberry Explorer is a GUI tool to browse, upload and transfer data from AWS S3/Glacier.
* Download Cloudberry Explorer for [Windows](https://www.msp360.com/explorer/windows/) or [Mac](https://www.msp360.com/explorer/mac/)
* Launch and select Amazon S3

* Enter your credentials and pick your preferred region under 'Advanced'

##### Cyberduck
[Cyberduck](https://cyberduck.io/download/) is anonther GUI tool to browse, upload and transfer data from AWS S3/Glacier. When creating a new Bookmark, pick the `S3 (with timestamps)` service. If it does not show up in the list pick `More Options...` at the bottom of the list and then search for `timestamps` in Profiles. This ensures that you can see the original modification date of the uploaded files while browsing and not the date they were uploaded to S3/Glacier. All files called `Froster.allfiles.csv` are not stored in Glacier but S3 and you can just mark the file and hit the `Edit` button in the toolbar or run ctrl+k to open that file with the default tool for csv files on your computer (this is often Excel)

#### More detailed file system analysis
`froster index` runs `pwalk` to create a large csv file with all file system information but this file is immediately deleted after running the index and all detailed file information is lost. You can save that original file (warning: it can be huge) using the `--pwalk-copy` option and then analyze that data later. You can then use `visidata` (command: vd) to view the csv file (hit q to quit `visidata`)
```
froster index --pwalk-copy ~/my_department.csv /shared/my_department
vd ~/my_department.csv
```
## Command line help
Each of the sub-commands has a help option, for example `froster archive --help`
### froster --help
```
dp@grammy:~$ froster --help
usage: froster [-h] [-c CORES] [-d] [-D] [-i] [-l] [-m MEMORY] [-n] [-p PROFILE] [-v]
{credentials,crd,config,cnf,index,idx,archive,arc,delete,del,mount,umount,restore,rst,update,upd} ...
A user-friendly archiving tool for teams that move data between high-cost POSIX file systems and low-cost S3-like object storage systems
positional arguments:
{credentials,crd,config,cnf,index,idx,archive,arc,delete,del,mount,umount,restore,rst,update,upd}
sub-command help
options:
-h, --help show this help message and exit
-c CORES, --cores CORES
Number of cores to be allocated for the machine. (default=4)
-d, --debug verbose output for all commands
-D, --default-profile
Select default profile
-i, --info print froster and packages info
-l, --log-print Print the log file to the screen
-m MEMORY, --mem MEMORY
Amount of memory to be allocated for the machine in GB. (default=64)
-n, --no-slurm do not submit a Slurm job, execute in the foreground.
-p PROFILE, --profile PROFILE
User this profile for the current session
-v, --version print froster version
```
### froster config --help
```
dp@grammy:~$ froster config --help
usage: froster config [-h] [-p] [-r] [-i IMPORT_CONFIG] [-e EXPORT_CONFIG]
Froster configuration bootstrap. This command will guide you through the
configuration of Froster. You can also import and export configurations.
options:
-h, --help show this help message and exit
-p, --print Print the current configuration
-r, --reset Delete the current configuration and start over
-i IMPORT_CONFIG, --import IMPORT_CONFIG
Import a given configuration file
-e EXPORT_CONFIG, --export EXPORT_CONFIG
Export the current configuration to the given directory
```
### froster index --help
```
dp@grammy:~$ froster index --help
usage: froster index [-h] [-f] [-p] [-y PWALKCOPY] [folders ...]
Scan a file system folder tree using 'pwalk' and generate a hotspots CSV file
that lists the largest folders. As this process is compute intensive the
index job will be automatically submitted to Slurm if the Slurm tools are
found.
positional arguments:
folders Folders you would like to index (separated by space), using the pwalk file system crawler
options:
-h, --help show this help message and exit
-f, --force Force indexing
-p, --permissions Print read and write permissions for the provided folder(s)
-y PWALKCOPY, --pwalk-copy PWALKCOPY
Directory where the pwalk CSV file should be copied to.
```
### froster archive --help
```
dp@grammy:~$ froster archive --help
usage: froster archive [-h] [-f] [-l LARGER] [-o OLDER] [--newer NEWER] [-n] [-i NIHREF] [-m] [-r] [-s] [-t] [-d] [folders ...]
Select from a list of large folders, that has been created by 'froster index', and
archive a folder to S3/Glacier. Once you select a folder the archive job will be
automatically submitted to Slurm. You can also automate this process
positional arguments:
folders folders you would like to archive (separated by space), the last folder in this list is the target
options:
-h, --help show this help message and exit
-f, --force Force archiving of a folder that contains the .froster.md5sum file
-l LARGER, --larger LARGER
Archive folders larger than <GiB>. This option
works in conjunction with --older <days>. If both
options are set froster will print a command that
allows you to archive all matching folders at once.
-o OLDER, --older OLDER
Archive folders that have not been accessed more than
<days>. (optionally set --mtime to select folders that
have not been modified more than <days>). This option
works in conjunction with --larger <GiB>. If both
options are set froster will print a command that
allows you to archive all matching folders at once.
--newer NEWER, -w NEWER
Archive folders that have been accessed within the last
<days>. (optionally set --mtime to select folders that
have not been modified more than <days>). This option
works in conjunction with --larger <GiB>. If both
options are set froster will print a command that
allows you to archive all matching folders at once.
-n, --nih Search and Link Metadata from NIH Reporter
-i NIHREF, --nih-ref NIHREF
Use NIH Reporter reference for the current archive
-m, --mtime Use modified file time (mtime) instead of accessed time (atime)
-r, --recursive Archive the current folder and all sub-folders
-s, --reset
This will not download any data, but recusively reset a folder
from previous (e.g. failed) archiving attempt.
It will delete .froster.md5sum and extract Froster.smallfiles.tar
-t, --no-tar Do not move small files to tar file before archiving
-d, --dry-run Execute a test archive without actually copying the data
```
### froster delete --help
```
dp@grammy:~$ froster delete --help
usage: froster delete [-h] [-r] [folders ...]
Remove data from a local filesystem folder that has been confirmed to
be archived (through checksum verification). Use this instead of deleting manually
positional arguments:
folders folders (separated by space) from which you would like to delete files, you can only delete files that have been archived
options:
-h, --help show this help message and exit
-r, --recursive Delete the current archived folder and all archived sub-folders
```
### froster {mount|umount} --help
```
dp@grammy:~$ froster mount --help
usage: froster mount [-h] [-a] [-l] [-m MOUNTPOINT] [folders ...]
Mount or unmount the remote S3 or Glacier storage in your local file system
at the location of the original folder.
positional arguments:
folders archived folders (separated by space) which you would like to mount.
options:
-h, --help show this help message and exit
-a, --aws Mount folder on new EC2 instance instead of local machine
-l, --list List all mounted folders
-m MOUNTPOINT, --mount-point MOUNTPOINT
pick a custom mount point, this only works if you select a single folder.
```
### froster restore --help
```
fdp@grammy:~$ froster restore --help
usage: froster restore [-h] [-a] [-d DAYS] [-i INSTANCETYPE] [-l] [-m] [-o RETRIEVEOPT] [-r] [folders ...]
Restore data from AWS Glacier to AWS S3 One Zone-IA. You do not need
to download all data to local storage after the restore is complete.
Just use the mount sub command.
positional arguments:
folders folders you would like to to restore (separated by space)
options:
-h, --help show this help message and exit
-a, --aws Restore folder on new AWS EC2 instance instead of local machine
-d DAYS, --days DAYS Number of days to keep data in S3 One Zone-IA storage at $10/TiB/month (default: 30)
-i INSTANCETYPE, --instance-type INSTANCETYPE
The EC2 instance type is auto-selected, but you can pick any other type here
-l, --no-download skip download to local storage after retrieval from Glacier
-m, --monitor Monitor EC2 server for cost and idle time.
-o RETRIEVEOPT, --retrieve-opt RETRIEVEOPT
More information at:
https://docs.aws.amazon.com/AmazonS3/latest/userguide/restoring-objects-retrieval-options.html
https://aws.amazon.com/es/s3/pricing/
S3 GLACIER DEEP ARCHIVE or S3 INTELLIGET-TIERING DEEP ARCHIVE ACCESS
Bulk:
- Within 48 hours retrieval <-- default
- costs of $2.50 per TiB
Standard:
- Within 12 hours retrieval
- costs of $10 per TiB
Expedited:
- 9-12 hours retrieval
- costs of $30 per TiB
S3 GLACIER FLEXIBLE RETRIEVAL or S3 INTELLIGET-TIERING ARCHIVE ACCESS
Bulk:
- 5-12 hours retrieval
- costs of $2.50 per TiB
Standard:
- 3-5 hours retrieval
- costs of $10 per TiB
Expedited:
- 1-5 minutes retrieval
- costs of $30 per TiB
In addition to the retrieval cost, AWS will charge you about
$10/TiB/month for the duration you keep the data in S3.
(Costs in Summer 2023)
-r, --recursive Restore the current archived folder and all archived sub-folders
```
<!-- ### froster ssh --help (froster scp --help)
```
dp@grammy:~$ froster ssh --help
usage: froster ssh [-h] [--list] [--terminate <hostname>] [sshargs ...]
positional arguments:
sshargs multiple arguments to ssh/scp such as hostname or user@hostname oder folder
optional arguments:
-h, --help show this help message and exit
--list, -l List running Froster AWS EC2 instances
--terminate <hostname>, -t <hostname>
Terminate AWS EC2 instance with this public IP Address or instance id
``` -->
## FAQ and Troubleshooting
<!-- ### Error: Permission denied (publickey,gssapi-keyex,gssapi-with-mic)
This error can occur when using `froster restore --aws`. To resolve this problem delete or rename the ssh key `~/.froster/config/cloud/froster-ec2.pem` (or froster-ec2.pem in your shared config location) -->
### Why can't I use Froster to archive to Google Drive, Sharepoint/OneDrive, etc ?
Today, Froster only supports S3 compatible stores, but it could be adapted to support more as it is using Rclone underneath, which supports almost everything. The annoying thing with end-user file-sharing services such as Drive/OneDrive/Sharepoint is that you need to have an OAuth authentication token, and this needs to be re-generated often. This is not user-friendly on an HPC machine without GUI and web browser, and on a standard Linux machine, it is still not super smooth.
Another adjustment is needed: you have perhaps seen that the tool creates a tar file for each directory. Currently, only files < 1MB are tarred up (this can be changed). At least for Sharepoint, one wants to create larger tar archives as the number of total files is limited in Sharepoint. If you are interested in this please submit an issue.
## Contributing
### Install Froster in development mode
If you want to develop Froster features, you can install it in --editable mode.
This allows you to modify the package source code and see the changes directly without having to reinstall the package.
To install Froster in --editable mode follow these steps:
1. Download the repository
```
git clone https://github.com/dirkpetersen/froster.git
```
1. Go to the downloaded repository
```
cd froster
```
1. Create a virtual environment
```
python3 -m venv .venv
```
1. Activate virtual environment
```
source .venv/bin/activate
```
1. Set LOCAL_INSTALL environment variable to true
```
export LOCAL_INSTALL=true
```
1. execute the install.sh script
```
./install.sh
```
Now Froster is installed in --editable mode inside the virtual environment.
Any changes to the source code will be immediately reflected without needing to reinstall froster.
Beware that ```froster --version``` takes the version from the package metadata (pyproject.toml). Therefore Froster's version will only be updated if reinstalled. This only affects to version printing value.
> **Note**: If you want to develop and debug Froster using [VS Code](https://code.visualstudio.com/), you should create the virtual environment via VS Code following these instructions: [Python environments in VS Code](https://code.visualstudio.com/docs/python/environments). Delete any previous virtual enviroments and let VS Code create the environment, otherwise you will experiencie some inconsistencies while debugging. Follow the rest installation instructions. Now you can debug froster by pressing `F5` or via the command palette. You can also debug by giving CLI command parameters.
### Froster development
For developing on Froster, please follow the standard convention of Fork and Pull Request. More information in Github's manual [Contributing to a project](https://docs.github.com/en/get-started/exploring-projects-on-github/contributing-to-a-project)
### Release new Froster version
Froster's releases to [PyPi](https://pypi.org/search/?q=froster) are automatically handled by GitHub Actions.
A release in the [Froster's Github repository](https://github.com/dirkpetersen/froster) will trigger the Release Github Actions Workflow and it will upload the new release package to [PyPi](https://pypi.org/search/?q=froster).
After the new Froster development, the Froster version MUST be increased.
To increase the Froster version update the [pyproject.toml version](https://github.com/dirkpetersen/froster/blob/2ac87cc3b2438cffb874ca436fbe565abf272dab/pyproject.toml#L7). The Froster's version follows this convention: `v<Major>.<Minor>.<Subminor>`
When to increase each value?
- Major: Introduce breaking changes or major new features.
- Minor: Add functionality in a backward-compatible manner.
- Subminor: Make backward-compatible bug fixes or small improvements.
Steps to release a new version of Froster:
1. Go to [Froster's release site](https://github.com/dirkpetersen/froster/releases)
1. "Draft a new release"
1. Make sure the target branch is "main"
1. Make sure you `"Choose a tag",` follow version tag convention: `v<Major>.<Minor>.<Subminor>`
1. Make sure to select `"+ Create new tag vXX.XX.XX on publish"`
1. Go to bottom page and tick `Set as the latest release`
1. Press `Publish release` button
> **Warning**: Even though the new package version is immediately released and shown as available in [PyPi](https://pypi.org/search/?q=froster), it takes a few minutes to actually update the package in the PyPi servers. Please wait ~5 minutes before updating Froster, or you will likely be installing the old version.
## Commercial solutions
You can self-install Froster in a few seconds without requiring root access, and you can collaborate well in small teams. However, since Froster requires you to have write access to all folders and at least read access to all files you manage, it will not scale to many users. If you are looking for feature-rich software managed by IT, you should consider an Enterprise solution such as [Starfish](https://starfishstorage.com).
Froster is a good on-ramp to Starfish. If many users in your organization end up using Froster, it is time to consider Starfish as an alternative, but if fewer than a handful of users find Froster useful, you may be able to defer your Starfish project until you have a critical mass. You can access many advanced Starfish features through a web browser while Froster has a simple CLI/TUI interface.
## Discontinuing Froster
All good things inevitably come to an end. Consider what you might encounter when attempting to restore your data 15 years from now. While AWS Glacier and Rclone will still exist, we cannot guarantee the continued maintenance of components like Textual or DuckDB, or even Froster itself. However, even if certain tools fade away, you can always rely on utilities like Rclone or [Cyberduck](#using-cyberduck-to-browse-glacier) (for smaller amounts of data) to retrieve your data, as it is kept in its original format.
Alternatively, the shell script [s3-restore.sh](https://github.com/dirkpetersen/froster/blob/main/s3-restore.sh) simplifies this process, driving Rclone with the appropriate settings. Using the command `s3-restore.sh list`, you can view all folders archived in the JSON database. Default localtion of Froster JSON database is: `~/.local/share/froster/froster-archives.json`. This path may have changed if you are using a shared configuration. Check the `Where-did-the-files-go.txt` manifest for more information on the folder's metadata.
To restore a specific folder, simply use the command followed by the desired path, for example: `s3-restore.sh /my/shared/folder`. It's worth noting that system administrators might hesitate to endorse tools written in programming languages they aren't familiar with, such as Python. Fortunately, `s3-restore.sh` is a straightforward bash shell script, easily customizable to suit specific needs.
Note: You need to populate the environment variables for `s3-restore.sh` script to work. Check out the first lines of the script
Raw data
{
"_id": null,
"home_page": null,
"name": "froster",
"maintainer": null,
"docs_url": null,
"requires_python": "<4.0,>=3.9",
"maintainer_email": null,
"keywords": null,
"author": "Dirk Petersen",
"author_email": "no@mail.com",
"download_url": "https://files.pythonhosted.org/packages/67/50/26c8f8dd6ecfb7be5f14662bbd1c92f171d9559b68213633f0db5886711e/froster-0.20.1.tar.gz",
"platform": null,
"description": "\n\n\n[](https://pypi.org/project/froster/)\n[](https://pypi.org/project/froster/)\n[](https://raw.githubusercontent.com/dirkpetersen/froster/main/LICENSE)\n[](https://pypi.org/project/froster/)\n[](https://github.com/dirkpetersen/froster/actions/workflows/pypi-release-publish.yml)\n[](https://github.com/dirkpetersen/froster/actions/workflows/test-credentials.yml)\n[](https://github.com/dirkpetersen/froster/actions/workflows/test-basic-features.yml)\n\nFroster is a user-friendly archiving tool for teams that move data between high-cost POSIX file systems and low-cost S3-like object storage systems. It currently supports these S3 providers: AWS, GCS, Wasabi, IDrive, Ceph, and Minio. Froster can efficiently crawl your Posix file system metadata, recommend folders for archiving, generate checksums, and upload your selections to Glacier or other S3-like storage. It can retrieve data back from the archive using a single command. Additionally, Froster can mount S3/Glacier storage inside your on-premise file system and also restore it to an AWS EC2 instance. \n\n</br>\n\n## Installation pre-requisite: packages\n\n### On Debian / Ubuntu\n\n```\nsudo apt update\nsudo apt install -y curl python3-pip python3-venv python3-dev gcc lib32gcc-s1 unzip fuse3\n```\n\n### On Fedora / RHEL / Rocky\n\n```\nsudo dnf update -y\nsudo dnf install -y curl python3-pip python3-devel gcc unzip fuse3 which\n```\n\n### On HPC machine (RHEL based)\n\nPlease get in touch with your administrator to install these packages (Python >= 3.8)\n```\ncurl python3 python3-pip python3-devel gcc lib32gcc-s1 which unzip fuse3\n```\n\n</br>\n\n\n## Installation\n\nTo install Froster, execute the following command in your terminal:\n\n```\ncurl -s https://raw.githubusercontent.com/dirkpetersen/froster/main/install.sh?$(date +%s) | bash\n\n```\n\nTo check that everything is installed correctly, run `froster --info` or `froster --version` commands.\nCheck available commands on the help section `froster --help`\n\n\n</br>\n\n## Update\n\nTo update Froster, execute the same command from the [Installation section](#installation). \n\nFroster will prompt you once a week when a new update is available.\nYou can manually check if there is an update available by running the command:\n```\nfroster update\n``` \n\n</br>\n\n## Configuration\n\nTo run Froster, you need to configure it first. Froster will guide you through the configuration with questions you need to answer. In most cases, you can accept default options by pressing enter.\nTo configure Froster, run the command:\n```\nfroster config\n```\nIf you have any doubts while configuring Froster, check the [Configuration sections explanation](#configuration-sections-explanation)\n\nIf you want a clean config file, run the config command with the `--reset` option:\n```\nfroster config --reset\n```\n\n</br>\n\n### Import and Export Configuration\n\nIf several users of the same team want to use Froster, they will have to configure the same profiles to work with the same configuration, buckets, endpoints, etc. To ease this configuration across teams, a user that has already configured Froster can export its configuration. This will export all configurations except for sensitive information: username, email, and credentials. To export a configuration, run the command:\n```\nfroster config --export /folder/path\n```\n\nTo import a configuration, run the command:\n```\nfroster config --import /path/to/exported/config\n```\n\nPlease note that the `froster config` command still needs to be executed, as username, email, and credentials still need to be configured.\n\n</br>\n\n## Basic usage of Froster\n\n### Credentials\n\nThe credentials command checks that the current selected profile is correctly configured and has valid credentials.\n\n```\nfroster credentials\n``` \n\n### Index\n\nThe index command crawls your file system, looking for hotspots (i.e., folders with files larger than 1GB).\nIt uses a third-party tool called [filesystem-reporting-tools](https://github.com/fizwit/filesystem-reporting-tools), which uses parallel threads to crawl large filesystems efficiently.\n\nThis command is not strictly necessary for archiving, but it helps you to spot large folders that are potentially worth archiving. You can provide one or more folders separated by space:\n\n```\nfroster index [folders...]\n``` \n\nCheck more options at `froster index --help`.\n\n### Archive\n\nThe archive command uploads folders from the local filesystem to the default profile's S3 bucket. If one or more folders are provided, they will be archived. If no folder is provided, froster will allow you to select hotspots of previously indexed folders.\n\n```\nfroster archive [folders...]\n``` \nCheck more options at `froster archive --help`.\n\n**Note**: To change default profile use `froster --default-profile` command. To use a different profile for the current command, you can use the `--profile PROFILE` flag. Check these options at `froster --help`\n\n### Delete\n\nThe delete command deletes previously archived folders. If one or more folders are provided, all of them will be deleted from the local filesystem ONLY after verifying that they have been successfully stored in the S3 server. If no folder is provided, froster will allow you to select a folder from previously successfully archived folders. It is worth noting that this command checks if the folders have been successfully uploaded to the S3 bucket. Please do NOT delete folders manually.\n```\nfroster delete [folders...]\n``` \nCheck more options at `froster delete --help`.\n\n### Restore\n\nThe restore command restores a previously deleted folder (i.e., deleted by using the `froster delete` command). This command will first trigger the folder retrieval if folders are stored in a DEEP_ARCHIVE storage class (See [AWS Storage Class guide](https://docs.aws.amazon.com/AmazonS3/latest/userguide/storage-class-intro.html)). Once retrieval finishes, executing this command again will download files from the S3 bucket to the local filesystem.\n```\nfroster restore [folders...]\n``` \nCheck more options at `froster restore --help`.\n\n### Mount / Umount\nThe mount / umount command (u)mounts the remote S3 or Glacier storage in your local file system at the location of the original folder. If one or more folders are provided, they will be (u)mounted. If no folder is provided, froster will allow you to select folders of previously archived folders.\n```\nfroster mount [folders...]\n```\n```\nfroster umount [folders...]\n``` \nCheck more options at `froster mount --help`.\n\n***\n\n## Table of Contents\n\n- [Installation pre-requisite: packages](#installation-pre-requisite-packages)\n - [On Debian / Ubuntu](#on-debian--ubuntu)\n - [On Fedora / RHEL / Rocky](#on-fedora--rhel--rocky)\n - [On HPC machine (RHEL based)](#on-hpc-machine-rhel-based)\n- [Installation](#installation)\n- [Update](#update)\n- [Configuration](#configuration)\n - [Import and Export Configuration](#import-and-export-configuration)\n- [Basic usage of Froster](#basic-usage-of-froster)\n - [Credentials](#credentials)\n - [Index](#index)\n - [Archive](#archive)\n - [Delete](#delete)\n - [Restore](#restore)\n - [Mount / Umount](#mount--umount)\n- [Table of Contents](#table-of-contents)\n- [Problem](#problem)\n- [Motivation](#motivation)\n- [Design](#design)\n- [Preparing Froster](#preparing-froster)\n - [Configuring](#configuring)\n - [Configuration sections explanation](#configuration-sections-explanation)\n - [AWS configuration for teams](#aws-configuration-for-teams)\n - [Changing defaults with aliases](#changing-defaults-with-aliases)\n- [Using Froster](#using-froster)\n - [Standard usage](#standard-usage)\n - [Large scale use on HPC](#large-scale-use-on-hpc)\n - [Picking old and large data](#picking-old-and-large-data)\n - [Special use cases](#special-use-cases)\n - [Recursive operations](#recursive-operations)\n - [Tarring small files](#tarring-small-files)\n - [NIH Life Sciences metadata](#nih-life-sciences-metadata)\n - [Using desktop tools to browse S3 Glacier](#using-desktop-tools-to-browse-s3-glacier)\n - [Cloudberry Explorer](#cloudberry-explorer)\n - [Cyberduck](#cyberduck)\n - [More detailed file system analysis](#more-detailed-file-system-analysis)\n- [Command line help](#command-line-help)\n - [froster --help](#froster---help)\n - [froster config --help](#froster-config---help)\n - [froster index --help](#froster-index---help)\n - [froster archive --help](#froster-archive---help)\n - [froster delete --help](#froster-delete---help)\n - [froster {mount|umount} --help](#froster-mountumount---help)\n - [froster restore --help](#froster-restore---help)\n- [FAQ and Troubleshooting](#faq-and-troubleshooting)\n - [Why can't I use Froster to archive to Google Drive, Sharepoint/OneDrive, etc ?](#why-cant-i-use-froster-to-archive-to-google-drive-sharepointonedrive-etc-)\n- [Contributing](#contributing)\n - [Install Froster in development mode](#install-froster-in-development-mode)\n - [Froster development](#froster-development)\n - [Release new Froster version](#release-new-froster-version)\n- [Commercial solutions](#commercial-solutions)\n- [Discontinuing Froster](#discontinuing-froster)\n\n## Problem \n\nWe have yet to find an easy-to-use, open-source solution for large-scale archiving intended to free up disk space on a primary storage system. Researchers, who may have hundreds of terabytes or even petabytes of data, must decide what to archive and where. Archiving processes can stretch for days and are susceptible to failure. These processes must be able to resume automatically until completion and need to be validated (for instance, through a checksum comparison with the source). Additionally, it's crucial to maintain some metadata regarding when the archiving occurred, where the data was transferred to, and the data's original location to restore it quickly.\n\n## Motivation \n\nThe main motivations behind the creation of `Froster` are:\n\n- We were working with researchers to optimize their archiving processes. In doing so, we wanted to understand user workflows and identify the essential metadata to be captured. Thanks to Froster's compact codebase, it can be easily adapted to various needs. Metadata could be captured through an additional web interface. However, a web system often requires IT support and an extra layer of authentication. It might be simpler to gather such information through a [Textual TUI interface](https://www.textualize.io/projects/). A first [demo of this option is here](#nih-life-sciences-metadata). The insights gained through working with `Froster` will likely guide the development or acquisition of more advanced tools in the future. \n\n- HPC users often find AWS Glacier inaccessible or complex and perceive that it is expensive because of Egress fees. This is despite evidence that most data for most research users has not been touched in years. It seems that it is very difficult to build an on-premises archive solution with a lower TCO than AWS Glacier or similar offerings from other cloud providers such as IDrive E2\n\n- Secure the archiving process via checksum verification. After every transfer, a checksum verifies the integrity of destination files, ensuring no data gets lost.\n\n\n## Design \n\n1. First, we may need to crawl the file system, which sometimes has billions of files, to find data that is actually worth archiving. For this, Froster uses the well-known [pwalk](https://github.com/fizwit/filesystem-reporting-tools), a multi-threaded parallel file system crawler that creates a large CSV file of all discovered file metadata.\n\n1. Our focus is on archiving folders rather than individual files, as data in the same folder typically belongs together. To this end, we filter the pwalk's CSV file with [DuckDB](https://duckdb.org) and get a new list (CSV) of the largest folders sorted by size. (We call this a `Hotspots` file)\n\n1. We pass this new list (CSV) to an interactive tool based on [Textual](https://textual.textualize.io/), which displays a table of folders alongside their total size in GiB, their average file sizes in MiB (MiBAvg), as well as their age in days since last accessed (AccD) and modified (ModD). Users can scroll down and right using the mouse and hitting enter will trigger the archiving of the selected folder.\n \n\n1. All files < 1 MiB size are moved to an archive called Froster.smallfiles.tar before uploading. You can also [avoid tarring](#tarring-small-files) \n\n1. We pass the folder to [Rclone](https://rclone.org) to execute a copy job in the background.\n\n1. Many researchers with large datasets will have a Slurm cluster connected to their data storage system. This is ideal for long-running data copy jobs, and Slurm can automatically re-run copy jobs that fail. Researchers can also use the `--no-slurm` option to execute the job in the foreground. This is the default if Slurm is not installed on the Linux machine.\n\n1. Before copying, we place files with checksums (e.g., `.froster.md5sum`) in the folders to be archived. This allows for an easy subsequent checksum comparison, providing the user with evidence that all data was correctly archived (through size and md5sum comparisons).\n\n1. After files have been deleted from the source folder, we place a file named `Where-did-the-files-go.txt` in it. This file describes where the data was archived and provides instructions on how to retrieve it.\n\n1. Optionally allow `archive --recursive` to enable archiving of entire folder trees. [More details here](#recursive-operations).\n\n1. (Optional) Link to NIH metadata with the `archive --nih` option to link to life sciences research projects [More details here](#nih-life-sciences-metadata).\n\n<!-- 1. Optionally restore to a cloud machine (AWS EC2 instance) with the `restore --aws` option to avoid egress fees. [More details here](#restore-to-cloud-machine), also please see [this discussion](https://github.com/dirkpetersen/froster/discussions/12). -->\n\n## Preparing Froster \n\n### Configuring \n\nThe config is mostly automated. You can just run `froster config` command. You need to answer a few questions for which you can accept defaults in most cases. \n\nWhen running `froster config`, you should confirm the default DEEP_ARCHIVE for `AWS S3 storage class` as this is currently the most cost-effective storage solution. It takes only 48-72 hours to retrieve your data with the least expensive retrieval option ('Bulk'). See [AWS Storage Class guide](https://docs.aws.amazon.com/AmazonS3/latest/userguide/storage-class-intro.html). However, you can choose other [AWS S3 storage classes](https://rclone.org/s3/#s3-storage-class) supported by the rclone copy tool. \n\nFroster uses `~/.aws` files to store credentials, regions, and endpoints in the AWS standard way.\n\nCheck the [rclone S3 docs](https://rclone.org/s3/) to learn about different providers and endpoints.\n\nFroster has been tested with numerous S3-compatible storage systems such as GCS, Wasabi, IDrive, Ceph, and Minio. At this time, only AWS supports the DEEP_ARCHIVE storage class.\n\n### Configuration sections explanation\n\nDown below, you will find an explanation of each configuration section:\n\n- SET USER\n - Set your name. This information will be stored locally as metadata when archiving files.\n\n- SET EMAIL\n - Set your email. This information will be stored locally as metadata when archiving files. Email is also used to notify about SLURM executions.\n\n- SET SHARED\n - If set to yes, then enter the path to the shared folder. The shared folder will be used to store hotspots (output of `froster index <folder>` command) and the archiving database (file with all archived files). This is useful when Froster is used by more than one user. Current user hotspots will be copied to the new shared folder. The archiving database will ONLY be copied to the shared folder if no archiving database is already in the shared folder.\n - If set to no, hotspots and the archiving database will be stored in the local user filesystem.\n\n- SET NIH\n - If set to yes, it allows you to create a link between the data you archive and the research project granted by a funding organization to increase the [FAIR level](https://the-turing-way.netlify.app/reproducible-research/rdm/rdm-fair.html) of an archived dataset. The National Institutes of Health (NIH) has maintained a large database of all publicly funded life sciences projects in the US since the 1980s at [NIH RePORTER](https://reporter.nih.gov).\n\n- SET PROFILE\n - Profiles are Froster's most important configuration. You will need to have at least one configured profile to be able to archive folders to your S3 provider. Profiles store the following information:\n - Select profile: Configure an existing profile or create a new one.\n - Select S3 provider: Select the S3 provider for this profile. Currently supported S3 providers are AWS, GCS, Wasabi, IDrive, Ceph, and Minio. There is also a generic option called \"Other,\" where you can configure a generic S3 provider.\n - Select credentials: Select the credentials for this profile or create new ones. These credentials will be used to authenticate to your S3 provider. They are stored in the ```~/.aws/credentials``` file.\n - Select region: Select the region for this profile or create a new one. ```-- no region --``` option will set the region to the value \"default\".\n - Select S3 bucket: Select the bucket for this profile or create a new one.\n - Enter directory inside S3 bucket: Enter the root folder where files will be archived for the selected S3 bucket.\n - Select the S3 storage class: Select the S3 storage class for this profile or create a new one. ```DEEP_ARCHIVE``` is currently the most cost-effective storage solution available. See [AWS Storage Class guide](https://docs.aws.amazon.com/AmazonS3/latest/userguide/storage-class-intro.html)\n\n- SET SLURM\n - Configure several SLURM options that will be passed to the SLURM script upon execution.\n\n<!-- #### working with multiple users \n\nIf we set a team configuration using `froster config /our/shared/froster/config` Froster knows 3 types of users or roles:\n\n* **Data Stewards**: Users with full write access, they can delete/destroy data in the archive as well as in the local file system\n* **Archive Users**: Data scientists with read-only access to the archive bucket, they can restore data or mount the archive into the local file system\n* **Other Users**: Users without access to the archive cannot use froster with this team. However they can setup their own froster configuration using a different bucket and setup a new team. \n\nThe team config requires correct permissions for the AWS bucket (archive) and in your shared Posix file system where the Froster configuration and json database resides. In the Posix file system we need a security group (e.g. an ActiveDirectory groups called data_steward_grp) to give the group of data stewards write access to the shared config. For this we execute 2 commands:\n\n```\nchgrp data_steward_grp /our/shared/froster/config\nchmod 2775 /our/shared/froster/config\n```\n\nThe chmod command ensures that the group of data stewards has write access while all other users have read only access to the configuration. Using 2775 instead of 0775 ensures that the group ownership is inherited to all sub-directories when running chmod (SETGID, This chmod command is run automatically each time you run `froster config`) -->\n\n### AWS configuration for teams\n\nYou typically use AWS Identity and Access Management (IAM) to set up policies for S3. You can define permissions at a granular level, such as by specifying individual API actions or using resource-level permissions for specific S3 buckets and objects.\n\nHere's a step-by-step guide for a simple permission setup for Data Stewards and Archive Users using the IAM Management Console:\n\n1. Open the IAM console at https://console.aws.amazon.com/iam/ and login with an administrative user account.\n1. Create User Groups: It's easier to manage permissions by grouping users. Create two groups: ReadWriteGroup and ReadOnlyGroup. Add the Data Stewards to ReadWriteGroup and the Archive Users to ReadOnlyGroup\n1. Create one each IAM Policy (JSON Files) for ReadWriteGroup and ReadOnlyGroup. The s3:RestoreObject action allows users to restore data from Glacier.\n1. Attach Policies to Groups: In the IAM console, select the ReadWriteGroup group, click on \"Add permissions\" and then \"Attach policies\". Create a new policy using the first JSON, and attach it to this group. Do the same for ReadOnlyGroup using the second JSON.\n\nPolicy ReadWriteGroup:\n```\n{\n \"Version\": \"2012-10-17\",\n \"Statement\": [\n {\n \"Effect\": \"Allow\",\n \"Action\": [\n \"s3:PutObject\",\n \"s3:GetObject\",\n \"s3:ListBucket\",\n \"s3:DeleteObject\",\n \"s3:RestoreObject\"\n ],\n \"Resource\": [\n \"arn:aws:s3:::your-bucket-name\",\n \"arn:aws:s3:::your-bucket-name/*\"\n ]\n }\n ]\n}\n\n```\n\nPolicy ReadOnlyGroup:\n```\n{\n \"Version\": \"2012-10-17\",\n \"Statement\": [\n {\n \"Effect\": \"Allow\",\n \"Action\": [\n \"s3:GetObject\",\n \"s3:ListBucket\",\n \"s3:RestoreObject\"\n ],\n \"Resource\": [\n \"arn:aws:s3:::your-bucket-name\",\n \"arn:aws:s3:::your-bucket-name/*\"\n ]\n }\n ]\n}\n\n```\n\n### Changing defaults with aliases\n\nFroster has several global options that you may prefer, but you don't like to type them all the time. We have `--no-slurm` (don't submit batch jobs even if Slurm is found), `--cores` (use a number of CPU cores that is different from the default 4), and `--profile` (use a different profile than default_profile for S3 related commands). You can create a command alias that uses these settings by default. For example, if you think that typing froster is too long and would like to rather type `fro` and use 8 cpu cores in the foreground with a custom profile named `myceph` you can simply enter this command in bash:\n\n```\nalias fro=\"froster --no-slurm --cores=8 --profile=myceph\"\n```\n\nIf you would like to keep this past the next login you can add this alias to the bottom of ~/.bashrc:\n\n```\necho 'alias fro=\"froster --no-slurm --cores=8 --profile=myceph\"' >> ~/.bashrc\n```\n\n<!-- #### advanced configuration \n\nSome advanced configuration settings are not offered through a user interface, but you can change them under `~/.froster/config`. For example, `~/.froster/config/general` has one file per setting which makes it very easy to use the settings in shell scripts, for example when writing addon tools: \n\n```\nDEFAULT_STORAGE_CLASS=$(cat ~/.froster/config/general/s3_storage_class)\n```\n\na few advanced settings at ~/.froster/config/general deserve more explanation:\n\n* min_index_folder_size_gib (Default: 10)\n\nIf the sum of all file sizes in one folder level is larger than this value in GiB that folder will be included in a hotspots file, which is generated using the `froster index` command \n\n\n* min_index_folder_size_avg_mib (Default: 10)\n\nIf the size of one folder level is at least min_index_folder_size_gib and if the average file size in that folder level is larger than this value in MiB that folder will be included in a hotspots file which is generated using the `froster index` command \n\n* max_hotspots_display_entries (Default: 5000)\n\nThe maximum number of entries that will be shown in the dialog once a hotspot file is selected after using the `froster archive` command.\n\n* max_small_file_size_kib (Default: 1024)\n\nIf a file is smaller than this size, it will be moved to a file Froster.smallfiles.tar at the same folder level before uploading with the `froster archive` command. This is useful because Glacier consumes an overhead of about 40 KiB for each uploaded file. If you want to avoid tarring files set max_small_file_size_kib to 0. -->\n\n## Using Froster \n\n### Standard usage\n\nIn its most simple form, Froster can archive a specific folder, delete the source, and restore the data interactively on a standalone Linux machine. \n\nFor example, we have 2 files in a folder\n\n```\nvmachado@vmachado:~$ ls -la ~/Desktop/froster/csv\n\ntotal 2008\n-rw-rw-r-- 1 vmachado vmachado 1126400 jul 1 17:19 9j6_3ne_medium_1.out\n-rw-rw-r-- 1 vmachado vmachado 921600 jul 1 17:19 9j6_rqu_small_1.out\n```\n\nNow let's archive this folder \n\n```\nvmachado@vmachado:~$ froster archive ~/Desktop/froster/csv\n\nARCHIVING /home/vmachado/Desktop/froster/csv\n\n Generating Froster.allfiles.csv and tar small files...\n ...done\n\n Generating checksums...\n ...done\n\n Uploading Froster.allfiles.csv file...\n ...done\n\n Uploading files...\n ...done\n\n Verifying checksums...\n ...done\n\nARCHIVING SUCCESSFULLY COMPLETED\n\n PROVIDER: \"AWS\"\n PROFILE: \"profile aws\"\n ENDPOINT: \"https://s3.eu-west-2.amazonaws.com\"\n LOCAL SOURCE: \"/home/vmachado/Desktop/froster/csv\"\n S3 DESTINATION: \":s3:froster-vmachado-test/froster/home/vmachado/Desktop/froster/csv\"\n```\n\nFroster creates MD5 checksums for the files in the local folder, uploads them, and then compares the checksums in the archive with the local ones.\n\nNow we delete the local data as we have evidence that the data is intact in the archive. We could execute `froster delete ~/csv`, but since the archiving process took a long time, we forgot which folder we needed to delete. We just run `froster delete` without the folder argument to see a list of archived folders and pick the one in which we want to delete files.\n\n\n\n\nafter the deletion is completed, we see that a manifest file was created that gives users some info.\n\n```\nvmachado@vmachado:~$ froster delete\n\nDELETING /home/vmachado/Desktop/froster/csv...\n\n Verifying checksums...\n ...done\n\n Deleting files...\n ...done\n\nDELETING SUCCESSFULLY COMPLETED\n\n LOCAL DELETED FOLDER: /home/vmachado/Desktop/froster/csv\n AWS S3 DESTINATION: :s3:froster-vmachado-test/froster/home/vmachado/Desktop/froster/csv\n\n Total files deleted: 2\n\n Manifest: /home/vmachado/Desktop/froster/csv/Where-did-the-files-go.txt\n```\n\nThe file has information that should allow other users to find out where the data went and who to contact to get it back. It is important to understand that before deletion, Froster will compare the checksums of each file that was archived with the file in the archive and will only delete local files that have an identical copy in the archive. The manifest file and the checksum comparison are good reasons why you should always let Froster handle the data deletion instead of deleting the source folder manually.\n\n```\nvmachado@vmachado:~$ cat /home/dp/csv/Where-did-the-files-go.txt\n\nThe files in this folder have been moved to an AWS S3 archive!\n\nArchive location: :s3:froster-vmachado-test/froster/home/vmachado/Desktop/froster/csv\nArchive aws profile: profile aws\nArchiver user: vmachado\nArchiver email: your@email.com\nfroster-archives.json: /home/vmachado/.local/share/froster/froster-archives.json\nArchive tool: https://github.com/dirkpetersen/froster\nRestore command: froster restore \"/home/vmachado/Desktop/froster/csv\"\nDeletion date: 2024-07-01 17:23:19.917602\n\n\nFirst 10 files deleted this time:\n9j6_3ne_medium_1.out, Froster.smallfiles.tar\n\nPlease see more metadata in Froster.allfiles.csv file\n\nYou can use \"visidata\" or \"vd\" tool to help you visualize Froster.allfiles.csv file\n\n```\n\nAfter a folder has been deleted and you wish to view the file names in the archive, simply execute `froster mount`. Then, select the folder you want to access. Froster will then mount the bucket location to the folder that was deleted. This allows you to see file and folder names, along with their modification dates. Additionally, you can view the `Froster.allfiles.csv` file using any editor or the `visidata` / `vd` tool. This particular file contains metadata for all files in the folders, including those archived in a .tar format. If you haven't used the DEEP_ARCHIVE or GLACIER S3 archive tiers, you can also copy individual files or access them through your existing pipelines. Remember to use froster umount to unmount the folder when done. \n\n```\nvd /home/vmachado/Desktop/froster/csv\nfroster mount\nfroster umount\n```\n\nThe `visidata` tool can display but also manipulate csv files:\n\n\n\nAfter a while you may want to restore the data. Again, you forgot the actual folder location and invoke `froster restore` without the folder argument to see the same dialog with a list of achived folders. Select a folder and hit \"Enter\" to restore immediatelty.\n\n \n```\nvmachado@vmachado:~$ froster restore\n \nRESTORING /home/vmachado/Desktop/froster/csv\n\n Triggered Glacier retrievals: 2\n Currently retrieving from Glacier: 0\n Retrieved from Glacier: 0\n Not in Glacier: 1\n\n\n Glacier retrievals pending. Depending on the storage class and restore mode run this command again in:\n Expedited mode: ~ 5 minuts\n\n Standard mode: ~ 12 hours\n\n Bulk mode: ~ 48 hours\n\n \nNOTE: You can check more accurate times in the AWS S3 console\n```\n\nIf you use the DEEP_ARCHIVE (default) or GLACIER AWS S3 storage classes, the first execution of `froster restore` will initiate a Glacier retrieval. This retrieval will copy the data in the background from the Glacier archive to the S3 One Zone-IA storage class which costs about $10 per TiB/month and keep it there for 30 days by default (you can change this to something like 7 days with `froster restore --days 7`). Wait for 12 hours and run the `froster restore` command again. If all data has been retrieved (which means both \"Triggered Glacier retrievals\" and \"Currently retrieving from Glacier\" show 0) the restore to the original folder location will proceed. As an alternative to running `froster restore` a second time, you can use `froster mount` which allows you to access individual files once they have been retrieved from Glacier.\n\n```\ndp@grammy:~$ froster restore\n\nRESTORING /home/vmachado/Desktop/froster/csv\n\n Triggered Glacier retrievals: 0\n Currently retrieving from Glacier: 0\n Retrieved from Glacier: 2\n Not in Glacier: 1\n\n Downloading files...\n ...done\n\n Generating checksums...\n ...done\n\n Verifying checksums...\n ...done\n\n Untarring Froster.smallfiles.tar... \n ...done\n\nRESTORATION OF /home/vmachado/Desktop/froster/csv COMPLETED SUCCESSFULLY\n```\n\nNote that if you restore from AWS S3 to on-premises, you may be subject to AWS data egress charges (up to $90 per TiB downloaded, or $20 per TiB with AWS DirectConnect), unless your organization has negotiated an [AWS data egress waiver](https://aws.amazon.com/blogs/publicsector/data-egress-waiver-available-for-eligible-researchers-and-institutions/).\n\n### Large scale use on HPC\n\nIf you have hundreds of terabytes or even petabytes of data in billions of files, you may not be able to easily locate data that is worth archiving. Among hundreds of thousands of folders, there are typically only a few hundred that make up most of your storage consumption. We call these folders 'Hotspots,' and to find them, you use the `froster index` command and pass the root directory of your lab data. \n\n```\n[user@login ~]$ froster index /home/vmachado/data_2\n\nSLURM JOB\n\n ID: 2251\n Type: index\n Check status: \"squeue -j 2251\"\n Check output: \"tail -n 100 -f /home/.local/shared/froster/slurm/froster-index@+home+vmachado+data_2-2251.out\"\n Cancel the job: \"scancel 2251\"\n\n```\n\nwe can see the status of the job and then use the suggested tail command to see how the indexing is progressing, we can see that the job finished successfully \n\n```\n[user@login ~]$ tail -n 100 -f /home/.local/shared/froster/slurm/froster-index@+home+vmachado+data_2-2251.out\n\nINDEXING /home/vmachado/data_2\n\nHotspots file: /home/vmachado/shared_dir/hotspots/+home+vmachado+data_2.csv\n with 0 hotspots >= 1 GiB\n with a total disk use of 0.0 TiB\n\nTotal folders processed: 3\n\nINDEXING SUCCESSFULLY COMPLETED\n```\n\nnow we run the `froster archive` command without entering folder names on the command line. We just created a csv folder for testing that contains 3 csv files with a total of about 1.1 GiB data. We pick this csv folder. It shows that it has been accessed 0 days ago (column AccD) because we just created it. \n\n\n\n\n\n\n\n\n```\n[user@login ~]$ froster archive /home/vmachado/data_2\n\nSLURM JOB\n\n ID: 2252\n Type: archive\n Check status: \"squeue -j 2252\"\n Check output: \"tail -n 100 -f /home/.local/shared/froster/slurm/froster-archive@+home+vmachado+data_2-2252.out\"\n Cancel the job: \"scancel 2252\"\n\n```\n\nOnce the archive job has been completed, you should receive an email from your Slurm system.\n\n### Picking old and large data \n\nNow let's take it to the next level. Small datasets are not really worth archiving as the cost of storing them is low .... and if we started archiving data that was just used last week, some users would get really angry with us. This means our task is pretty clear: First we are looking for datasets that are large and old. In the example below we want to identify datasets that have not been touched in 3 years (1095 days) and that are larger than 1 TiB (1024 GiB without subfolders). We are executing `froster archive --older 1095 --larger 1024`. As you can see, this produces an output command that you can copy and paste directly into the shell of your HPC login node to submit an archiving batch job. In this case you will save more than 50 TiB of disk space with a few seconds of labor even though the archiving job may take days to run. \n\n```\nfroster archive --older 1095 --larger 1024\n\nProcessing hotspots file /home/users/dp/.froster/config/hotspots/@XxxxermanLab.csv!\n\nRun this command to archive all selected folders in batch mode:\n\nfroster archive \\\n\"/home/groups/XxxxermanLab/xxxriti/tabulation-virus2\" \\\n\"/home/groups/XxxxermanLab/xxxsojd/KIR6.2_collaboration\" \\\n\"/home/groups/XxxxermanLab/xxxtofia/ER-alpha/WildType_Estradiol_Pose1_BrokenH12_WExplore\" \\\n\"/home/groups/XxxxermanLab/xxxriti/estrogen-receptor\" \\\n\"/home/groups/XxxxermanLab/xxxsojd/covid_we_data\" \\\n\"/home/groups/XxxxermanLab/xxxsojd/covid_data/we_data\" \\\n\"/home/groups/XxxxermanLab/xxxtossh/lc8-allostery-study/gromacs/7D35/7D35-comparison/singly-bound-structure/md_5us\" \\\n\"/home/groups/XxxxermanLab/xxxtossh/lc8-allostery-study/gromacs/7D35/7D35-comparison/doubly-bound-structure/md_5us\" \\\n\"/home/groups/XxxxermanLab/xxxtossh/lc8-allostery-study/gromacs/7D35/7D35-comparison/apo-structure/md_5us\" \\\n\"/home/groups/XxxxermanLab/xxxperma/cell/live_cell/mcf10a/batch_17nov20/wctm/17nov20\" \\\n\"/home/groups/XxxxermanLab/xxxperma/cell/live_cell/mcf10a/ligcomb_17jun21\"\n\nTotal space to archive: 54,142 GiB\n```\n\nNote: you can also use `--newer xxx --larger yyy to identify files that have only been added recently`\n\n\n### Special use cases\n\n#### Recursive operations\n\nBy default, Froster ignores sub-folders, as only files that reside directly in a chosen folder will be archived. There are two reasons for this: First, if your goal is cost reduction rather than data management, most folders are small and not worth archiving. We want to focus on the few large folders (Hotspots) that make a difference. Secondly, many storage administrators are uncomfortable with users moving hundreds of terabytes. If an entire folder tree can be archived with a single command, it may create bottlenecks in the network or storage systems.\nHowever, you can use the `archive --recursive` option with the archive command to include all sub-folders\n\n#### Tarring small files\n\nFolders with large amounts of small files have always been problematic to manage, as they can degrade a storage system's metadata performance, and copying many of them is very slow. Since Glacier objects have an overhead of 40K per uploaded file, storage consumption can quickly get out of hand if not properly managed, as a folder with 1 million tiny files would require an additional 40GB storage capacity.\n\nFroster addresses this by moving all small files < 1 MiB to a Tar archive called Froster.smallfiles.tar in each folder.\nFroster.smallfiles.tar is created before uploading. When restoring data Froster.smallfiles.tar is automatically extracted and then removed. You do not need to know anything about Froster.smallfiles.tar as you will only see Froster.smallfiles.tar in the S3-like object store after it has been deleted from the local file system. If you browse the objectstore with a tool such as [Cyberduck](#using-cyberduck-to-browse-glacier) you will see a file Froster.allfiles.csv along with Froster.smallfiles.tar. The CSV file contains a list of all filenames and metadata, including the ones that were tarred to provide additional transparency.\n \nTo avoid tarring, use this command: `froster archive\u2014- notar` option.\n\n```\necho 0 > ~/.froster/config/general/max_small_file_size_kib\n```\n\n#### NIH Life Sciences metadata\n\nIn many cases, we would like to create a link between the data we archive and the research project granted by a funding organization to increase the [FAIR level](https://the-turing-way.netlify.app/reproducible-research/rdm/rdm-fair.html) of an archived dataset. The National Institutes of Health (NIH) has maintained a large database of all publicly funded life sciences projects in the US since the 1980s at [NIH RePORTER](https://reporter.nih.gov). Froster uses the [RePORTER API](https://api.reporter.nih.gov) to allow you to search for grants and link them to your datasets.\n\nTo invoke the search interface configure it as default on the `froster config` SET_NIH section or use the --nih option with `archive` subcommand\n\n```\nfroster archive --nih [folders...]\n```\n\n\n\n\nYou can search multiple times. Once you find the grant you are looking for, hit TAB and use the allow keys to select the grant and confirm with enter\n\n<!-- #### Restore to cloud machine \n\nIn some cases, you may want to restore rarely needed data from Glacier to a cloud machine on EC2. The most frequent use case is to save AWS Egress fees. Use the --aws option with the restore sub-command to create a new ec2 instance with enough local disk space to restore your data there: `froster restore --aws ~/archtest/data1`\n\n```\ndp@grammy:~$ froster restore --aws ~/archtest/data1\nTotal data in all folders: 1.30 GiB\nChosen Instance: c5ad.large\nUsing Image ID: ami-0a6c63f0325635301\nLaunching instance i-08028464562bbxxxx ... please wait ...\n|\u2588\u2588\u2588\u2588\u2588\u2588\u2588\u2588\u2588\u2588\u2588\u2588\u2588\u2588\u2588\u2588\u2588\u2588\u2588\u2588\u2588\u2588\u2588\u2588\u2588\u2588\u2588\u2588\u2588\u2588\u2588\u2588\u2588\u2588\u2588\u2588\u2588\u2588\u2588\u2588\u2588\u2588\u2588\u2588\u2588\u2588\u2588\u2588--| 96.7%\nSecurity Group \"sg-0b648aca16f7c5efd\" attached.\nInstance IP: 34.222.33.xxx\n Waiting for ssh host to become ready ...\n will execute 'froster restore /home/dp/archtest/data1' on 34.222.33.xxx ...\n Warning: Permanently added '34.222.33.xxx' (ECDSA) to the list of known hosts.\n Executed bootstrap and restore script ... you may have to wait a while ...\n but you can already login using \"froster ssh\"\nSent email \"Froster restore on EC2\" to dp@domain.edu!\n```\n\nAfter the instance is created, simply run `froster ssh` to login to the last EC2 instance you created or (if you have created multiple machines) `froster ssh <ip-address>`. Once logged in, use the up-arrow key to list the folder where data should be restored. (Note the data may not be there yet). The environment you find has Conda (with Python and R) as well as Docker and Apptainer/Singularity installed. \n\n```\ndp@grammy:~$ froster ssh\nConnecting to 34.222.33.xxx ...\n\n , #_\n ~\\_ ####_\n ~~ \\_#####\\\n ~~ \\###|\n ~~ \\#/ ___ Amazon Linux 2023 (ECS Optimized)\n ~~ V~' '->\n ~~~ /\n ~~._. _/\n _/ _/\n _/m/'\n\nFor documentation, visit http://aws.amazon.com/documentation/ecs\nLast login: Thu Oct 26 09:41:12 2023 from xxx.xxx.221.46\nAccess JupyterLab:\n http://34.222.33.xxx:8888/lab?token=d453d8aec274c43eb703031c97xxxxxxxxxxxxxxxxxxxx\ntype \"conda deactivate\" to leave current conda environment\n(base) ec2-user@froster:~$\n```\n\nIn addition, you can click the link (often ctrl+click) to a Jupyter Lab Notebook, which has Python and R Kernels installed. You will find a symbolic link starting 'restored-' in your home directory that points to your data. How should this EC2 instance be configured? Please [participate in this discussion](https://github.com/dirkpetersen/froster/discussions/12) \n\n\n -->\n\n#### Using desktop tools to browse S3 Glacier\n\n##### Cloudberry Explorer\n\nCloudberry Explorer is a GUI tool to browse, upload and transfer data from AWS S3/Glacier.\n\n* Download Cloudberry Explorer for [Windows](https://www.msp360.com/explorer/windows/) or [Mac](https://www.msp360.com/explorer/mac/)\n* Launch and select Amazon S3\n\n\n\n* Enter your credentials and pick your preferred region under 'Advanced'\n\n\n\n\n##### Cyberduck\n\n[Cyberduck](https://cyberduck.io/download/) is anonther GUI tool to browse, upload and transfer data from AWS S3/Glacier. When creating a new Bookmark, pick the `S3 (with timestamps)` service. If it does not show up in the list pick `More Options...` at the bottom of the list and then search for `timestamps` in Profiles. This ensures that you can see the original modification date of the uploaded files while browsing and not the date they were uploaded to S3/Glacier. All files called `Froster.allfiles.csv` are not stored in Glacier but S3 and you can just mark the file and hit the `Edit` button in the toolbar or run ctrl+k to open that file with the default tool for csv files on your computer (this is often Excel)\n\n\n\n\n#### More detailed file system analysis \n\n`froster index` runs `pwalk` to create a large csv file with all file system information but this file is immediately deleted after running the index and all detailed file information is lost. You can save that original file (warning: it can be huge) using the `--pwalk-copy` option and then analyze that data later. You can then use `visidata` (command: vd) to view the csv file (hit q to quit `visidata`)\n\n```\nfroster index --pwalk-copy ~/my_department.csv /shared/my_department\nvd ~/my_department.csv\n```\n\n## Command line help \n\nEach of the sub-commands has a help option, for example `froster archive --help`\n \n### froster --help\n\n```\ndp@grammy:~$ froster --help\n\nusage: froster [-h] [-c CORES] [-d] [-D] [-i] [-l] [-m MEMORY] [-n] [-p PROFILE] [-v]\n {credentials,crd,config,cnf,index,idx,archive,arc,delete,del,mount,umount,restore,rst,update,upd} ...\n\nA user-friendly archiving tool for teams that move data between high-cost POSIX file systems and low-cost S3-like object storage systems\n\npositional arguments:\n {credentials,crd,config,cnf,index,idx,archive,arc,delete,del,mount,umount,restore,rst,update,upd}\n sub-command help\n\noptions:\n -h, --help show this help message and exit\n -c CORES, --cores CORES\n Number of cores to be allocated for the machine. (default=4)\n -d, --debug verbose output for all commands\n -D, --default-profile\n Select default profile\n -i, --info print froster and packages info\n -l, --log-print Print the log file to the screen\n -m MEMORY, --mem MEMORY\n Amount of memory to be allocated for the machine in GB. (default=64)\n -n, --no-slurm do not submit a Slurm job, execute in the foreground.\n -p PROFILE, --profile PROFILE\n User this profile for the current session\n -v, --version print froster version\n```\n\n### froster config --help\n \n```\ndp@grammy:~$ froster config --help\n\nusage: froster config [-h] [-p] [-r] [-i IMPORT_CONFIG] [-e EXPORT_CONFIG]\n\nFroster configuration bootstrap. This command will guide you through the\nconfiguration of Froster. You can also import and export configurations.\n\noptions:\n -h, --help show this help message and exit\n -p, --print Print the current configuration\n -r, --reset Delete the current configuration and start over\n -i IMPORT_CONFIG, --import IMPORT_CONFIG\n Import a given configuration file\n -e EXPORT_CONFIG, --export EXPORT_CONFIG\n Export the current configuration to the given directory\n```\n\n### froster index --help\n \n```\ndp@grammy:~$ froster index --help\n\nusage: froster index [-h] [-f] [-p] [-y PWALKCOPY] [folders ...]\n\nScan a file system folder tree using 'pwalk' and generate a hotspots CSV file\nthat lists the largest folders. As this process is compute intensive the\nindex job will be automatically submitted to Slurm if the Slurm tools are\nfound.\n\npositional arguments:\n folders Folders you would like to index (separated by space), using the pwalk file system crawler \n\noptions:\n -h, --help show this help message and exit\n -f, --force Force indexing\n -p, --permissions Print read and write permissions for the provided folder(s)\n -y PWALKCOPY, --pwalk-copy PWALKCOPY\n Directory where the pwalk CSV file should be copied to.\n```\n \n### froster archive --help\n\n```\ndp@grammy:~$ froster archive --help\n\nusage: froster archive [-h] [-f] [-l LARGER] [-o OLDER] [--newer NEWER] [-n] [-i NIHREF] [-m] [-r] [-s] [-t] [-d] [folders ...]\n\nSelect from a list of large folders, that has been created by 'froster index', and\narchive a folder to S3/Glacier. Once you select a folder the archive job will be\nautomatically submitted to Slurm. You can also automate this process\n\npositional arguments:\n folders folders you would like to archive (separated by space), the last folder in this list is the target \n\noptions:\n -h, --help show this help message and exit\n -f, --force Force archiving of a folder that contains the .froster.md5sum file\n -l LARGER, --larger LARGER\n \n Archive folders larger than <GiB>. This option\n works in conjunction with --older <days>. If both\n options are set froster will print a command that\n allows you to archive all matching folders at once.\n -o OLDER, --older OLDER\n \n Archive folders that have not been accessed more than\n <days>. (optionally set --mtime to select folders that\n have not been modified more than <days>). This option\n works in conjunction with --larger <GiB>. If both\n options are set froster will print a command that\n allows you to archive all matching folders at once.\n --newer NEWER, -w NEWER\n \n Archive folders that have been accessed within the last \n <days>. (optionally set --mtime to select folders that\n have not been modified more than <days>). This option\n works in conjunction with --larger <GiB>. If both \n options are set froster will print a command that \n allows you to archive all matching folders at once.\n -n, --nih Search and Link Metadata from NIH Reporter\n -i NIHREF, --nih-ref NIHREF\n Use NIH Reporter reference for the current archive\n -m, --mtime Use modified file time (mtime) instead of accessed time (atime)\n -r, --recursive Archive the current folder and all sub-folders\n -s, --reset \n This will not download any data, but recusively reset a folder\n from previous (e.g. failed) archiving attempt.\n It will delete .froster.md5sum and extract Froster.smallfiles.tar\n -t, --no-tar Do not move small files to tar file before archiving\n -d, --dry-run Execute a test archive without actually copying the data\n```\n\n### froster delete --help\n \n```\ndp@grammy:~$ froster delete --help\n\nusage: froster delete [-h] [-r] [folders ...]\n\nRemove data from a local filesystem folder that has been confirmed to\nbe archived (through checksum verification). Use this instead of deleting manually\n\npositional arguments:\n folders folders (separated by space) from which you would like to delete files, you can only delete files that have been archived\n\noptions:\n -h, --help show this help message and exit\n -r, --recursive Delete the current archived folder and all archived sub-folders\n```\n\n### froster {mount|umount} --help\n\n```\ndp@grammy:~$ froster mount --help\nusage: froster mount [-h] [-a] [-l] [-m MOUNTPOINT] [folders ...]\n\nMount or unmount the remote S3 or Glacier storage in your local file system\nat the location of the original folder.\n\npositional arguments:\n folders archived folders (separated by space) which you would like to mount.\n\noptions:\n -h, --help show this help message and exit\n -a, --aws Mount folder on new EC2 instance instead of local machine\n -l, --list List all mounted folders\n -m MOUNTPOINT, --mount-point MOUNTPOINT\n pick a custom mount point, this only works if you select a single folder.\n```\n\n### froster restore --help\n \n```\nfdp@grammy:~$ froster restore --help\nusage: froster restore [-h] [-a] [-d DAYS] [-i INSTANCETYPE] [-l] [-m] [-o RETRIEVEOPT] [-r] [folders ...]\n\nRestore data from AWS Glacier to AWS S3 One Zone-IA. You do not need\nto download all data to local storage after the restore is complete.\nJust use the mount sub command.\n\npositional arguments:\n folders folders you would like to to restore (separated by space)\n\noptions:\n -h, --help show this help message and exit\n -a, --aws Restore folder on new AWS EC2 instance instead of local machine\n -d DAYS, --days DAYS Number of days to keep data in S3 One Zone-IA storage at $10/TiB/month (default: 30)\n -i INSTANCETYPE, --instance-type INSTANCETYPE\n The EC2 instance type is auto-selected, but you can pick any other type here\n -l, --no-download skip download to local storage after retrieval from Glacier\n -m, --monitor Monitor EC2 server for cost and idle time.\n -o RETRIEVEOPT, --retrieve-opt RETRIEVEOPT\n \n More information at:\n https://docs.aws.amazon.com/AmazonS3/latest/userguide/restoring-objects-retrieval-options.html\n https://aws.amazon.com/es/s3/pricing/\n \n S3 GLACIER DEEP ARCHIVE or S3 INTELLIGET-TIERING DEEP ARCHIVE ACCESS\n Bulk:\n - Within 48 hours retrieval <-- default\n - costs of $2.50 per TiB\n Standard:\n - Within 12 hours retrieval\n - costs of $10 per TiB\n Expedited:\n - 9-12 hours retrieval\n - costs of $30 per TiB\n \n S3 GLACIER FLEXIBLE RETRIEVAL or S3 INTELLIGET-TIERING ARCHIVE ACCESS\n Bulk:\n - 5-12 hours retrieval\n - costs of $2.50 per TiB\n Standard:\n - 3-5 hours retrieval\n - costs of $10 per TiB\n Expedited:\n - 1-5 minutes retrieval\n - costs of $30 per TiB\n \n \n In addition to the retrieval cost, AWS will charge you about\n $10/TiB/month for the duration you keep the data in S3.\n (Costs in Summer 2023)\n -r, --recursive Restore the current archived folder and all archived sub-folders\n```\n\n<!-- ### froster ssh --help (froster scp --help)\n\n```\ndp@grammy:~$ froster ssh --help\nusage: froster ssh [-h] [--list] [--terminate <hostname>] [sshargs ...]\n\npositional arguments:\n sshargs multiple arguments to ssh/scp such as hostname or user@hostname oder folder\n\noptional arguments:\n -h, --help show this help message and exit\n --list, -l List running Froster AWS EC2 instances\n --terminate <hostname>, -t <hostname>\n Terminate AWS EC2 instance with this public IP Address or instance id\n``` -->\n\n## FAQ and Troubleshooting\n\n<!-- ### Error: Permission denied (publickey,gssapi-keyex,gssapi-with-mic)\n\nThis error can occur when using `froster restore --aws`. To resolve this problem delete or rename the ssh key `~/.froster/config/cloud/froster-ec2.pem` (or froster-ec2.pem in your shared config location) -->\n\n### Why can't I use Froster to archive to Google Drive, Sharepoint/OneDrive, etc ?\n\nToday, Froster only supports S3 compatible stores, but it could be adapted to support more as it is using Rclone underneath, which supports almost everything. The annoying thing with end-user file-sharing services such as Drive/OneDrive/Sharepoint is that you need to have an OAuth authentication token, and this needs to be re-generated often. This is not user-friendly on an HPC machine without GUI and web browser, and on a standard Linux machine, it is still not super smooth. \nAnother adjustment is needed: you have perhaps seen that the tool creates a tar file for each directory. Currently, only files < 1MB are tarred up (this can be changed). At least for Sharepoint, one wants to create larger tar archives as the number of total files is limited in Sharepoint. If you are interested in this please submit an issue. \n\n\n\n## Contributing\n\n### Install Froster in development mode \n\nIf you want to develop Froster features, you can install it in --editable mode.\nThis allows you to modify the package source code and see the changes directly without having to reinstall the package.\n\nTo install Froster in --editable mode follow these steps:\n\n1. Download the repository\n```\ngit clone https://github.com/dirkpetersen/froster.git\n```\n\n1. Go to the downloaded repository\n``` \ncd froster\n``` \n\n1. Create a virtual environment\n``` \npython3 -m venv .venv\n```\n\n1. Activate virtual environment\n``` \nsource .venv/bin/activate\n```\n\n1. Set LOCAL_INSTALL environment variable to true\n```\nexport LOCAL_INSTALL=true\n``` \n\n1. execute the install.sh script\n``` \n./install.sh\n``` \n\nNow Froster is installed in --editable mode inside the virtual environment.\nAny changes to the source code will be immediately reflected without needing to reinstall froster.\nBeware that ```froster --version``` takes the version from the package metadata (pyproject.toml). Therefore Froster's version will only be updated if reinstalled. This only affects to version printing value.\n\n> **Note**: If you want to develop and debug Froster using [VS Code](https://code.visualstudio.com/), you should create the virtual environment via VS Code following these instructions: [Python environments in VS Code](https://code.visualstudio.com/docs/python/environments). Delete any previous virtual enviroments and let VS Code create the environment, otherwise you will experiencie some inconsistencies while debugging. Follow the rest installation instructions. Now you can debug froster by pressing `F5` or via the command palette. You can also debug by giving CLI command parameters.\n\n### Froster development\n\nFor developing on Froster, please follow the standard convention of Fork and Pull Request. More information in Github's manual [Contributing to a project](https://docs.github.com/en/get-started/exploring-projects-on-github/contributing-to-a-project)\n\n\n### Release new Froster version\n\nFroster's releases to [PyPi](https://pypi.org/search/?q=froster) are automatically handled by GitHub Actions.\nA release in the [Froster's Github repository](https://github.com/dirkpetersen/froster) will trigger the Release Github Actions Workflow and it will upload the new release package to [PyPi](https://pypi.org/search/?q=froster).\n\nAfter the new Froster development, the Froster version MUST be increased.\nTo increase the Froster version update the [pyproject.toml version](https://github.com/dirkpetersen/froster/blob/2ac87cc3b2438cffb874ca436fbe565abf272dab/pyproject.toml#L7). The Froster's version follows this convention: `v<Major>.<Minor>.<Subminor>`\n\nWhen to increase each value?\n- Major: Introduce breaking changes or major new features.\n- Minor: Add functionality in a backward-compatible manner.\n- Subminor: Make backward-compatible bug fixes or small improvements.\n\nSteps to release a new version of Froster:\n1. Go to [Froster's release site](https://github.com/dirkpetersen/froster/releases)\n\n1. \"Draft a new release\"\n\n1. Make sure the target branch is \"main\"\n\n1. Make sure you `\"Choose a tag\",` follow version tag convention: `v<Major>.<Minor>.<Subminor>`\n\n1. Make sure to select `\"+ Create new tag vXX.XX.XX on publish\"`\n\n1. Go to bottom page and tick `Set as the latest release`\n\n1. Press `Publish release` button\n\n> **Warning**: Even though the new package version is immediately released and shown as available in [PyPi](https://pypi.org/search/?q=froster), it takes a few minutes to actually update the package in the PyPi servers. Please wait ~5 minutes before updating Froster, or you will likely be installing the old version.\n\n## Commercial solutions \n\nYou can self-install Froster in a few seconds without requiring root access, and you can collaborate well in small teams. However, since Froster requires you to have write access to all folders and at least read access to all files you manage, it will not scale to many users. If you are looking for feature-rich software managed by IT, you should consider an Enterprise solution such as [Starfish](https://starfishstorage.com).\nFroster is a good on-ramp to Starfish. If many users in your organization end up using Froster, it is time to consider Starfish as an alternative, but if fewer than a handful of users find Froster useful, you may be able to defer your Starfish project until you have a critical mass. You can access many advanced Starfish features through a web browser while Froster has a simple CLI/TUI interface.\n\n## Discontinuing Froster \n\nAll good things inevitably come to an end. Consider what you might encounter when attempting to restore your data 15 years from now. While AWS Glacier and Rclone will still exist, we cannot guarantee the continued maintenance of components like Textual or DuckDB, or even Froster itself. However, even if certain tools fade away, you can always rely on utilities like Rclone or [Cyberduck](#using-cyberduck-to-browse-glacier) (for smaller amounts of data) to retrieve your data, as it is kept in its original format. \n\nAlternatively, the shell script [s3-restore.sh](https://github.com/dirkpetersen/froster/blob/main/s3-restore.sh) simplifies this process, driving Rclone with the appropriate settings. Using the command `s3-restore.sh list`, you can view all folders archived in the JSON database. Default localtion of Froster JSON database is: `~/.local/share/froster/froster-archives.json`. This path may have changed if you are using a shared configuration. Check the `Where-did-the-files-go.txt` manifest for more information on the folder's metadata. \n\nTo restore a specific folder, simply use the command followed by the desired path, for example: `s3-restore.sh /my/shared/folder`. It's worth noting that system administrators might hesitate to endorse tools written in programming languages they aren't familiar with, such as Python. Fortunately, `s3-restore.sh` is a straightforward bash shell script, easily customizable to suit specific needs. \n\nNote: You need to populate the environment variables for `s3-restore.sh` script to work. Check out the first lines of the script\n\n",
"bugtrack_url": null,
"license": "MIT",
"summary": "Froster is a tool for easy archive and restore between local file systems and AWS S3 storage.",
"version": "0.20.1",
"project_urls": null,
"split_keywords": [],
"urls": [
{
"comment_text": null,
"digests": {
"blake2b_256": "9cada3f82659a30624a328008308aa70c7ea62a94866fe6fd39853f078a51741",
"md5": "bbbbafed2a99d183ed95b5c7ebc77fb5",
"sha256": "f1134b89641e145891c2d45ccb02388d55227f7a144248e61c0236d470aa21ec"
},
"downloads": -1,
"filename": "froster-0.20.1-py3-none-any.whl",
"has_sig": false,
"md5_digest": "bbbbafed2a99d183ed95b5c7ebc77fb5",
"packagetype": "bdist_wheel",
"python_version": "py3",
"requires_python": "<4.0,>=3.9",
"size": 86367,
"upload_time": "2025-02-04T03:55:54",
"upload_time_iso_8601": "2025-02-04T03:55:54.228082Z",
"url": "https://files.pythonhosted.org/packages/9c/ad/a3f82659a30624a328008308aa70c7ea62a94866fe6fd39853f078a51741/froster-0.20.1-py3-none-any.whl",
"yanked": false,
"yanked_reason": null
},
{
"comment_text": null,
"digests": {
"blake2b_256": "675026c8f8dd6ecfb7be5f14662bbd1c92f171d9559b68213633f0db5886711e",
"md5": "82056130e094ed4abe52e3a07c8010fd",
"sha256": "81ccc6d688bd15ae9829bc5c7ba56a760f8524e3edc8f6fc57cba61ab1b3be42"
},
"downloads": -1,
"filename": "froster-0.20.1.tar.gz",
"has_sig": false,
"md5_digest": "82056130e094ed4abe52e3a07c8010fd",
"packagetype": "sdist",
"python_version": "source",
"requires_python": "<4.0,>=3.9",
"size": 103430,
"upload_time": "2025-02-04T03:55:56",
"upload_time_iso_8601": "2025-02-04T03:55:56.869647Z",
"url": "https://files.pythonhosted.org/packages/67/50/26c8f8dd6ecfb7be5f14662bbd1c92f171d9559b68213633f0db5886711e/froster-0.20.1.tar.gz",
"yanked": false,
"yanked_reason": null
}
],
"upload_time": "2025-02-04 03:55:56",
"github": false,
"gitlab": false,
"bitbucket": false,
"codeberg": false,
"lcname": "froster"
}
