# [Jet Bridge](https://app.jetadmin.io/demo) [](https://twitter.com/intent/tweet?text=Language%20agnostic%20Bridge%20for%20Jet%20%E2%80%93%20Back%20office%20totally%20ready%20to%20run%20your%20service&url=https://github.com/jet-admin/jet-bridge/&via=Jet_Admin&hashtags=admin,interface,backoffice,developers,jetadmin)
for Jet Admin – Admin panel framework for your application
Description
===========
* About Jet Admin: https://www.jetadmin.io
* **Live Demo**: https://app.jetadmin.io/demo
* Documentation: https://docs.jetadmin.io/
* Support: support@jetadmin.io
**Jet Admin** is a SaaS service that automatically generates extendable back office for your application. <br />
**Jet Bridge** is a standalone app which generates REST API thought which your SQL database is connected to **Jet Admin**. <br />
This project has been designed to fit requirements of small startups and mature companies.
- **Data Privacy**. Jet does not access your data: its transferred directly from browser to your application.
- **Customizable Interface**. With WYSIWYG interface customization your can change almost every part of interface.
- **Extendable**. Flex Features allows you to create your custom Actions, Views, Fields and other.
- **Works with any technology**. The interface is generated automatically based on an analysis of the data and data structure of your database.
- **Quick installation**. All you need is to install Jet Bridge and connect it to your database.
This is a complete remake of our popular [Django Jet](https://github.com/geex-arts/django-jet) admin interface.
Features
========
- **CRUD (create, read, update, delete)**
All common operations to view, create, update or delete data.
<img width="300px" src="https://raw.githubusercontent.com/jet-admin/jet-bridge/dev/static/list.jpeg" alt="CRUD (create, read, update, delete)">
- **Search and Filter**
Filter data easily by any field with most common lookups and search them by text occurrence. For some specific cases you can create SQL Segment to filter with.
<img width="300px" src="https://raw.githubusercontent.com/jet-admin/jet-bridge/dev/static/filters.jpeg" alt="Search and Filter">
- **Segments**
Segments allow you to save applied set of filters as a Segment or create it from SQL query for quick use in future.
<img width="300px" src="https://raw.githubusercontent.com/jet-admin/jet-bridge/dev/static/segment.jpeg" alt="Segments">
- **WYSIWYG Interface Customization**
You can customize almost every part of interface visually – navigation menu, collection list views, record create/update forms.
<img width="300px" src="https://raw.githubusercontent.com/jet-admin/jet-bridge/dev/static/customize.jpg" alt="WYSIWYG Interface Customization">
- **List View layout**
A number of out-of-the-box list layouts except default Table View like Kanban Board and Map with markers.
<img width="300px" src="https://raw.githubusercontent.com/jet-admin/jet-bridge/dev/static/kanban.jpeg" alt="List View layout">
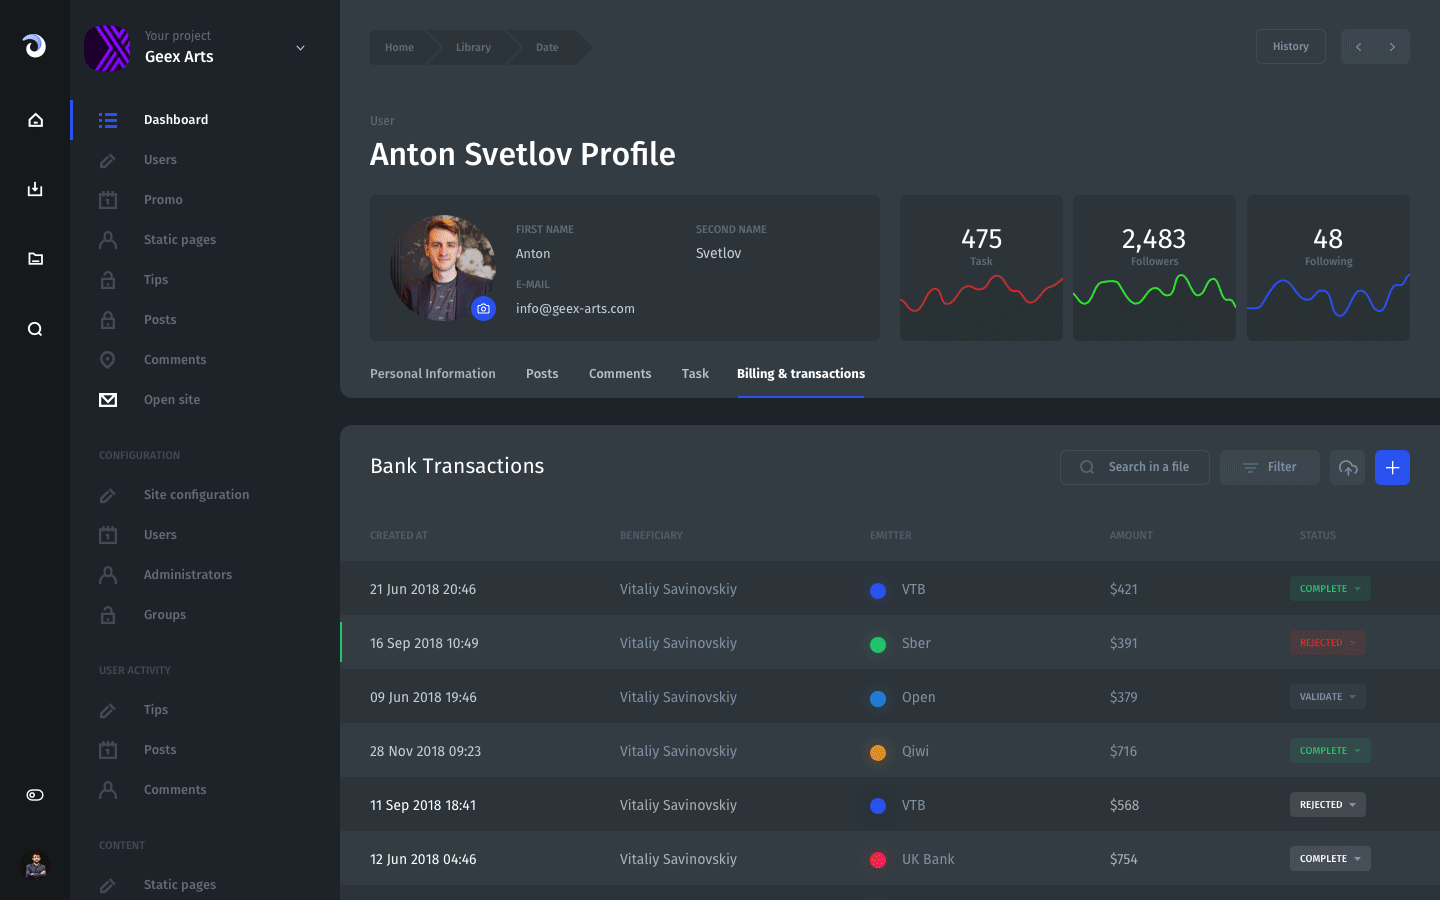
- **Dashboards**
Create different types of charts, tables and other widgets to visualize your KPIs or monitor data without programming – inside your visual interface. Complex data queries can be created with SQL.
<img width="300px" src="https://raw.githubusercontent.com/jet-admin/jet-bridge/dev/static/dashboard.jpeg" alt="Dashboards">
- **Teams and Permissions**
Invite users to collaborate on a project and assign access rights based on their team.
<img width="300px" src="https://raw.githubusercontent.com/jet-admin/jet-bridge/dev/static/users.jpeg" alt="Teams and Permissions">
- **Export**
You can export all collection data or part of it into the most common formats like CSV or Excel.
<img width="300px" src="https://raw.githubusercontent.com/jet-admin/jet-bridge/dev/static/export.jpeg" alt="Export">
- **Responsive Layout**
The interface is optimized for any device from phones to tablets to desktops.
Extendability
=============
While we are trying to include most of important features out of the box sometimes its not enough. For any specific cases we offer Flex features to implement functionality not available with standard features:
- **Custom Views**
For very specific pages you can create your own custom FlexView based on React, Angular or any other framework and integrate it in Jet Admin interface. Writing your own custom JS/CSS/HTML has no limits in implementing any page you need.
- **Custom Actions**
If need to run some operations on records or any other business logic inside your Backend you can create FlexActions and run them directly from Jet Admin interface. Passing some additional parameters to your Backend is supported.
- **Custom Fields**
Sometimes using existing fields is not enough and you need to create custom which can be a combination of multiple fields, use fields from related collections and be result of some calculation. In this case you can use FlexField and write your custom JavaScript function which can format fields data any way you want.
How It Works
============
**Jet Admin** is a SaaS frontend application hosted on **Jet Admin** side that works in your browser. It connects to your project SQL database through open source **Jet Bridge** backend application which you install on your side. So Integrating **Jet Admin** with your project requires installing only one component - **Jet Bridge**. Here how it should look like after installation:
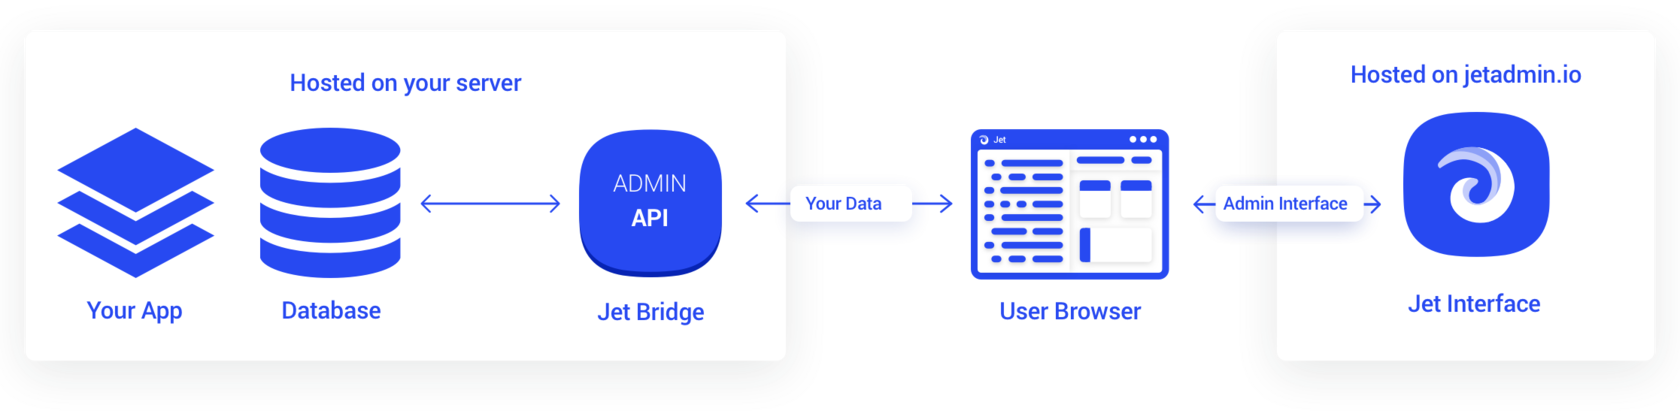
**Your App**
Any of your applications which works with your **Database**. **Jet Admin** does not interact with it directly.
**Database**
Your database **Jet Admin** has no direct access to.
**Jet Bridge**
An open source application installed on your server's side and connected to your database. It automatically generates REST API based on your database structure. **Jet Interface** works with **Database** through **Jet Bridge**.
**Jet Interface**
Web application accessible from any browser. Maintaining and updating of this web application is on **Jet Admin** team side. Your application data is transmitted directly from **Jet Bridge** to **Jet Interface** in your browser and remain invisible for the **Jet Admin** service.
Requirements
============
- **Python** 2.7 or 3.4+
- Any of the following **SQL Databases**:
- PostgreSQL
- MySQL
- SQLite
- Oracle
- Microsoft SQL Server
- Firebird
- Sybase
Installation
============
### Method 1. Using standalone Jet Bridge
1. Install **jet\_bridge** package using pip or update if you did it before
```bash
pip install jet_bridge -U
```
2. Install appropriate database adapter
```bash
# for PostgreSQL
pip install psycopg2
# for MySQL
pip install mysqlclient
```
3. Run **Jet Bridge** for your configuration.
You can read about all possible settings at [Configuration](https://docs.jetadmin.io/getting-started/configuration) page.
```bash
DATABASE_ENGINE=postgresql \
DATABASE_HOST=host.docker.internal \
DATABASE_PORT=5432 \
DATABASE_NAME=database \
DATABASE_USER=postgres \
DATABASE_PASSWORD=password \
jet_bridge
```

4. Register your project by opening in your browser:
**http://localhost:8888/** where **localhost** is your **Jet Bridge** HOST and **8888** is its PORT.
If you want to run Jet Bridge on different host/port you can configure it \(read more at [Configuration](https://docs.jetadmin.io/getting-started/configuration) page\).
> If you don't have **Jet** account yet you will be asked to create one and sign in with the existing account.
> After registering your project you will be redirected to your project and can start working with **Jet**
After registering your project you will be redirected to your project and can start working with **Jet**
### Method 2. Using Jet Bridge inside Docker
**Jet Bridge** has **Docker** image available on [Docker Hub](https://cloud.docker.com/u/jetadmin/repository/docker/jetadmin/jetbridge).
In order start it inside **Docker** for your configuration run the following command.
You can read about all possible settings at [Configuration](https://docs.jetadmin.io/getting-started/configuration) page.
1. Install **Docker** if you don't have it [https://docs.docker.com/install/](https://docs.docker.com/install/)
2. Make sure **Docker** is running
3. Update **Jet Bridge** image if downloaded it before
```text
docker pull jetadmin/jetbridge
```
4. Run **Docker** container. This will run Jet Bridge on **http://localhost:8888/.**
> If you want to run on different port change it here:
> ****`... -p 9000:8888 ...` – this will run on **9000**
```bash
docker run -p 8888:8888 \
-e DATABASE_ENGINE=postgresql \
-e DATABASE_HOST=host.docker.internal \
-e DATABASE_PORT=5432 \
-e DATABASE_NAME=database \
-e DATABASE_USER=postgres \
-e DATABASE_PASSWORD=password \
jetadmin/jetbridge
```
> If you are using **Docker before 18.03** you can't use `host.docker.internal` for DATABASE\_HOST
> **Docker 17.12 – 18.02** use `docker.for.mac.host.internal`
> **Docker 17.06 – 17.11** use `docker.for.mac.localhost`
> **Docker 17.05 and below** your `local host IP address` \(can be found using `ifconfig` command\)
5. Register your project by opening in your browser:
**http://localhost:8888/** where **localhost** is your **Jet Bridge** HOST and **8888** is its PORT.
If you want to run Jet Bridge on different host/port you can configure it by changing **Docker** container port in this command.
> If you don't have **Jet** account yet you will be asked to create one and sign in with the existing account.
> After registering your project you will be redirected to your project and can start working with **Jet**
Support
=======
Feel free to Email us – support@jetadmin.io
License
=======
This project (Jet Bridge) is **MIT** licensed - see the LICENCE file for details.
Raw data
{
"_id": null,
"home_page": "https://github.com/jet-admin/jet-bridge",
"name": "jet-bridge",
"maintainer": null,
"docs_url": null,
"requires_python": null,
"maintainer_email": null,
"keywords": null,
"author": "Denis Kildishev",
"author_email": "support@jetadmin.io",
"download_url": "https://files.pythonhosted.org/packages/c2/f0/5207efa5a7c898e2e7f054622540ec01e944cddefb51e4edfb1d3b26e8e1/jet-bridge-1.12.3.tar.gz",
"platform": null,
"description": "# [Jet Bridge](https://app.jetadmin.io/demo) [](https://twitter.com/intent/tweet?text=Language%20agnostic%20Bridge%20for%20Jet%20%E2%80%93%20Back%20office%20totally%20ready%20to%20run%20your%20service&url=https://github.com/jet-admin/jet-bridge/&via=Jet_Admin&hashtags=admin,interface,backoffice,developers,jetadmin)\n\nfor Jet Admin \u2013 Admin panel framework for your application \n\n\n\nDescription\n===========\n\n* About Jet Admin: https://www.jetadmin.io\n* **Live Demo**: https://app.jetadmin.io/demo\n* Documentation: https://docs.jetadmin.io/\n* Support: support@jetadmin.io\n\n**Jet Admin** is a SaaS service that automatically generates extendable back office for your application. <br />\n**Jet Bridge** is a standalone app which generates REST API thought which your SQL database is connected to **Jet Admin**. <br />\nThis project has been designed to fit requirements of small startups and mature companies.\n\n- **Data Privacy**. Jet does not access your data: its transferred directly from browser to your application.\n- **Customizable Interface**. With WYSIWYG interface customization your can change almost every part of interface.\n- **Extendable**. Flex Features allows you to create your custom Actions, Views, Fields and other.\n- **Works with any technology**. The interface is generated automatically based on an analysis of the data and data structure of your database.\n- **Quick installation**. All you need is to install Jet Bridge and connect it to your database.\n\nThis is a complete remake of our popular [Django Jet](https://github.com/geex-arts/django-jet) admin interface.\n\nFeatures\n========\n\n- **CRUD (create, read, update, delete)**\n\n All common operations to view, create, update or delete data. \n\n <img width=\"300px\" src=\"https://raw.githubusercontent.com/jet-admin/jet-bridge/dev/static/list.jpeg\" alt=\"CRUD (create, read, update, delete)\">\n\n- **Search and Filter**\n\n Filter data easily by any field with most common lookups and search them by text occurrence. For some specific cases you can create SQL Segment to filter with.\n\n <img width=\"300px\" src=\"https://raw.githubusercontent.com/jet-admin/jet-bridge/dev/static/filters.jpeg\" alt=\"Search and Filter\">\n\n- **Segments**\n\n Segments allow you to save applied set of filters as a Segment or create it from SQL query for quick use in future. \n\n <img width=\"300px\" src=\"https://raw.githubusercontent.com/jet-admin/jet-bridge/dev/static/segment.jpeg\" alt=\"Segments\">\n\n- **WYSIWYG Interface Customization**\n\n You can customize almost every part of interface visually \u2013 navigation menu, collection list views, record create/update forms.\n\n <img width=\"300px\" src=\"https://raw.githubusercontent.com/jet-admin/jet-bridge/dev/static/customize.jpg\" alt=\"WYSIWYG Interface Customization\">\n\n- **List View layout**\n\n A number of out-of-the-box list layouts except default Table View like Kanban Board and Map with markers.\n\n <img width=\"300px\" src=\"https://raw.githubusercontent.com/jet-admin/jet-bridge/dev/static/kanban.jpeg\" alt=\"List View layout\">\n\n- **Dashboards**\n\n Create different types of charts, tables and other widgets to visualize your KPIs or monitor data without programming \u2013 inside your visual interface. Complex data queries can be created with SQL.\n\n <img width=\"300px\" src=\"https://raw.githubusercontent.com/jet-admin/jet-bridge/dev/static/dashboard.jpeg\" alt=\"Dashboards\">\n\n- **Teams and Permissions**\n\n Invite users to collaborate on a project and assign access rights based on their team.\n\n <img width=\"300px\" src=\"https://raw.githubusercontent.com/jet-admin/jet-bridge/dev/static/users.jpeg\" alt=\"Teams and Permissions\">\n\n- **Export**\n\n You can export all collection data or part of it into the most common formats like CSV or Excel.\n\n <img width=\"300px\" src=\"https://raw.githubusercontent.com/jet-admin/jet-bridge/dev/static/export.jpeg\" alt=\"Export\">\n\n- **Responsive Layout**\n\n The interface is optimized for any device from phones to tablets to desktops.\n\nExtendability\n=============\n\nWhile we are trying to include most of important features out of the box sometimes its not enough. For any specific cases we offer Flex features to implement functionality not available with standard features:\n\n- **Custom Views**\n\n For very specific pages you can create your own custom FlexView based on React, Angular or any other framework and integrate it in Jet Admin interface. Writing your own custom JS/CSS/HTML has no limits in implementing any page you need.\n\n- **Custom Actions**\n\n If need to run some operations on records or any other business logic inside your Backend you can create FlexActions and run them directly from Jet Admin interface. Passing some additional parameters to your Backend is supported.\n\n- **Custom Fields**\n\n Sometimes using existing fields is not enough and you need to create custom which can be a combination of multiple fields, use fields from related collections and be result of some calculation. In this case you can use FlexField and write your custom JavaScript function which can format fields data any way you want.\n\nHow It Works\n============\n\n**Jet Admin** is a SaaS frontend application hosted on **Jet Admin** side that works in your browser. It connects to your project SQL database through open source **Jet Bridge** backend application which you install on your side. So Integrating **Jet Admin** with your project requires installing only one component - **Jet Bridge**. Here how it should look like after installation:\n\n\n\n**Your App**\n\nAny of your applications which works with your **Database**. **Jet Admin** does not interact with it directly.\n\n**Database**\n\nYour database **Jet Admin** has no direct access to.\n\n**Jet Bridge**\n\nAn open source application installed on your server's side and connected to your database. It automatically generates REST API based on your database structure. **Jet Interface** works with **Database** through **Jet Bridge**.\n\n**Jet Interface**\n\nWeb application accessible from any browser. Maintaining and updating of this web application is on **Jet Admin** team side. Your application data is transmitted directly from **Jet Bridge** to **Jet Interface** in your browser and remain invisible for the **Jet Admin** service.\n\nRequirements\n============\n\n- **Python** 2.7 or 3.4+\n- Any of the following **SQL Databases**:\n\n - PostgreSQL\n - MySQL\n - SQLite\n - Oracle\n - Microsoft SQL Server\n - Firebird\n - Sybase\n\nInstallation\n============\n\n### Method 1. Using standalone Jet Bridge\n\n1. Install **jet\\_bridge** package using pip or update if you did it before\n\n```bash\npip install jet_bridge -U\n```\n\n2. Install appropriate database adapter\n\n```bash\n# for PostgreSQL\npip install psycopg2\n# for MySQL\npip install mysqlclient\n```\n\n3. Run **Jet Bridge** for your configuration.\nYou can read about all possible settings at [Configuration](https://docs.jetadmin.io/getting-started/configuration) page.\n\n```bash\nDATABASE_ENGINE=postgresql \\\n DATABASE_HOST=host.docker.internal \\\n DATABASE_PORT=5432 \\\n DATABASE_NAME=database \\\n DATABASE_USER=postgres \\\n DATABASE_PASSWORD=password \\\n jet_bridge\n```\n\n\n\n4. Register your project by opening in your browser:\n**http://localhost:8888/** where **localhost** is your **Jet Bridge** HOST and **8888** is its PORT.\nIf you want to run Jet Bridge on different host/port you can configure it \\(read more at [Configuration](https://docs.jetadmin.io/getting-started/configuration) page\\).\n\n> If you don't have **Jet** account yet you will be asked to create one and sign in with the existing account.\n\n> After registering your project you will be redirected to your project and can start working with **Jet**\n\nAfter registering your project you will be redirected to your project and can start working with **Jet**\n\n### Method 2. Using Jet Bridge inside Docker\n\n**Jet Bridge** has **Docker** image available on [Docker Hub](https://cloud.docker.com/u/jetadmin/repository/docker/jetadmin/jetbridge).\nIn order start it inside **Docker** for your configuration run the following command.\nYou can read about all possible settings at [Configuration](https://docs.jetadmin.io/getting-started/configuration) page.\n\n1. Install **Docker** if you don't have it [https://docs.docker.com/install/](https://docs.docker.com/install/)\n2. Make sure **Docker** is running\n3. Update **Jet Bridge** image if downloaded it before\n\n```text\ndocker pull jetadmin/jetbridge\n```\n\n4. Run **Docker** container. This will run Jet Bridge on **http://localhost:8888/.**\n\n> If you want to run on different port change it here:\n> ****`... -p 9000:8888 ...` \u2013 this will run on **9000**\n\n```bash\ndocker run -p 8888:8888 \\\n -e DATABASE_ENGINE=postgresql \\\n -e DATABASE_HOST=host.docker.internal \\\n -e DATABASE_PORT=5432 \\\n -e DATABASE_NAME=database \\\n -e DATABASE_USER=postgres \\\n -e DATABASE_PASSWORD=password \\\n jetadmin/jetbridge\n```\n\n> If you are using **Docker before 18.03** you can't use `host.docker.internal` for DATABASE\\_HOST\n> **Docker 17.12 \u2013 18.02** use `docker.for.mac.host.internal`\n> **Docker 17.06 \u2013 17.11** use `docker.for.mac.localhost`\n> **Docker 17.05 and below** your `local host IP address` \\(can be found using `ifconfig` command\\)\n\n5. Register your project by opening in your browser:\n**http://localhost:8888/** where **localhost** is your **Jet Bridge** HOST and **8888** is its PORT.\nIf you want to run Jet Bridge on different host/port you can configure it by changing **Docker** container port in this command.\n\n> If you don't have **Jet** account yet you will be asked to create one and sign in with the existing account.\n\n> After registering your project you will be redirected to your project and can start working with **Jet**\n\nSupport\n=======\n\nFeel free to Email us \u2013 support@jetadmin.io\n\nLicense\n=======\n\nThis project (Jet Bridge) is **MIT** licensed - see the LICENCE file for details.\n\n\n",
"bugtrack_url": null,
"license": "MIT",
"summary": null,
"version": "1.12.3",
"project_urls": {
"Homepage": "https://github.com/jet-admin/jet-bridge"
},
"split_keywords": [],
"urls": [
{
"comment_text": "",
"digests": {
"blake2b_256": "07bd47defd8c9f75e5a417886c0e1b890a249d1f58774efef505e16bbf4f7c97",
"md5": "caccd3a0fb01147a36cc1f8f466c2aef",
"sha256": "047eba51124b93a815959f0626d9279945b9dda1d8c6dd469fb0eaeec71cb6b5"
},
"downloads": -1,
"filename": "jet_bridge-1.12.3-py3-none-any.whl",
"has_sig": false,
"md5_digest": "caccd3a0fb01147a36cc1f8f466c2aef",
"packagetype": "bdist_wheel",
"python_version": "py3",
"requires_python": null,
"size": 44582,
"upload_time": "2025-09-19T22:04:43",
"upload_time_iso_8601": "2025-09-19T22:04:43.025304Z",
"url": "https://files.pythonhosted.org/packages/07/bd/47defd8c9f75e5a417886c0e1b890a249d1f58774efef505e16bbf4f7c97/jet_bridge-1.12.3-py3-none-any.whl",
"yanked": false,
"yanked_reason": null
},
{
"comment_text": "",
"digests": {
"blake2b_256": "c2f05207efa5a7c898e2e7f054622540ec01e944cddefb51e4edfb1d3b26e8e1",
"md5": "a40cfdc6f3624851748af58b13feb349",
"sha256": "4a4d06692a83c95f2751ee6bff30345521f61719afd2aea74a19f0609d4136df"
},
"downloads": -1,
"filename": "jet-bridge-1.12.3.tar.gz",
"has_sig": false,
"md5_digest": "a40cfdc6f3624851748af58b13feb349",
"packagetype": "sdist",
"python_version": "source",
"requires_python": null,
"size": 37373,
"upload_time": "2025-09-19T22:04:44",
"upload_time_iso_8601": "2025-09-19T22:04:44.380451Z",
"url": "https://files.pythonhosted.org/packages/c2/f0/5207efa5a7c898e2e7f054622540ec01e944cddefb51e4edfb1d3b26e8e1/jet-bridge-1.12.3.tar.gz",
"yanked": false,
"yanked_reason": null
}
],
"upload_time": "2025-09-19 22:04:44",
"github": true,
"gitlab": false,
"bitbucket": false,
"codeberg": false,
"github_user": "jet-admin",
"github_project": "jet-bridge",
"travis_ci": false,
"coveralls": false,
"github_actions": false,
"requirements": [],
"lcname": "jet-bridge"
}

