# PB TESTING
Library for testing using Page Object Pattern and Behaviour Driven Development.
## Usage
This application is experimental and is used mainly for Engineer's Thesis.
It will be maintained for errors and probably in near future might get some new features.
## Before using
Before creating any tests, you need geckodriver.
It's crucial, because selenium, which is responsible for initializing the browser and doing actions,
need this driver to work.
Link for geckodriver: https://github.com/mozilla/geckodriver/releases.
There are several ways for preparing driver to coopearte with library, depending on Operating System.
On each of systems: Microsoft Windows, macOS and Linux it looks a bit different.
I was using Linux, so I will describe it here, but here are links for other OS:
Windows: http://www.learningaboutelectronics.com/Articles/How-to-install-geckodriver-Python-windows.php
macOS: https://medium.com/dropout-analytics/selenium-and-geckodriver-on-mac-b411dbfe61bc
On Linux you need to:
- download driver,
- unpack it with any tool,
- set execute rights for user __chmod <file> 700__,
- put library on path __/usr/local/bin__. It can be done by moving it to location(mv),
copying to location(cp) or linking to directory(ln). Each command will work
__<command> <geckodriver_name> /usr/local/bin__
It's worth mentioning that is not only working way to put geckodriver to work with selenium.
## Commands
All commands are typed into terminal, using venv
To activate venv type command
```bash
source venv/bin/activate
```
It will look like this. venv will show up next to your name
and command prompt

<hr style="border:2px solid gray"/>
```bash
prepare
```
It will create:
- directories: __resources_for_testing, features, steps, pages__
- configuration_file __config.ini__
- __common_steps.py__ file in steps,`` consisting basic commands used in testing
(selenium finding, clicking elements on site)
- database for keeping urls from your project
__This step is crucial, because it will setup all directoreies for using this library__
Available frameworks for url scan: rails, django
<hr style="border:2px solid gray"/>
```bash
pb_configuration
```
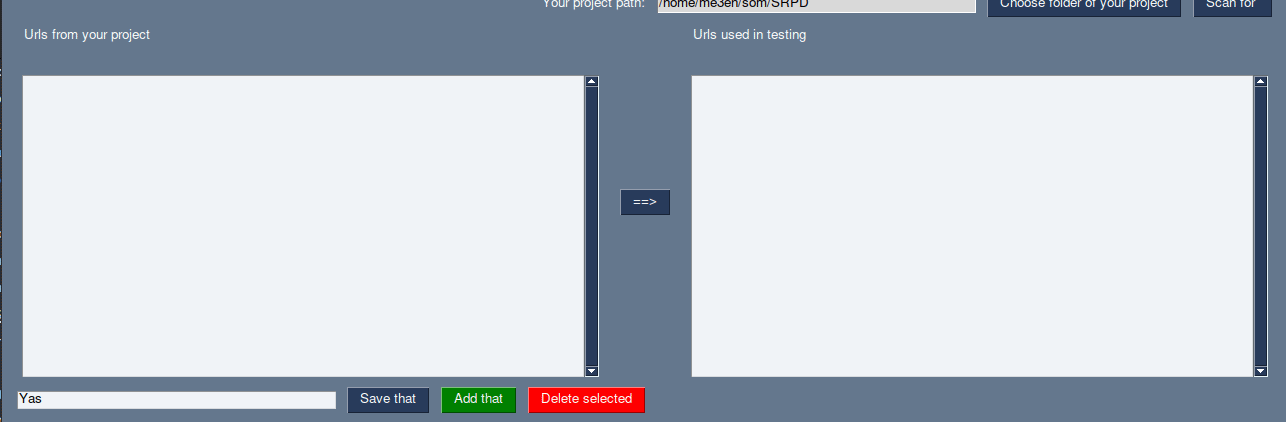
This method will pop gui with urls from your project and urls used in tests.
It will look like this:

On left we have urls scanned from project.
On the right side there are urls that will be used in testing.
Between listboxes is arrow, which let user pass value from one listbox to another
and at the bottom there are buttons, which also allow user to include new urls into testing.
Overall working:
<hr style="border:2px solid gray"/>
```bash
step_creator
```
This gui is responsible for creating tests, using scanning urls and
## OK, application is fine, but how to do testing?
Testing in this application is based on BDD. This means
Invocing tests
Use command behave <name_of_feature_file> -D headless
Raw data
{
"_id": null,
"home_page": "https://github.com/me3eh/POM_BiDiDi",
"name": "pb-testing",
"maintainer": "",
"docs_url": null,
"requires_python": ">=3.8",
"maintainer_email": "",
"keywords": "",
"author": "Me",
"author_email": "bociukmeeeh@gmail.com",
"download_url": "https://files.pythonhosted.org/packages/3b/48/2273046a3e03f9bb3a9fafef77fd77c78c2e09b324b80e9429194530353f/pb_testing-0.2.2.tar.gz",
"platform": null,
"description": "# PB TESTING\nLibrary for testing using Page Object Pattern and Behaviour Driven Development.\n\n## Usage\nThis application is experimental and is used mainly for Engineer's Thesis.\n\nIt will be maintained for errors and probably in near future might get some new features.\n## Before using\n\nBefore creating any tests, you need geckodriver.\nIt's crucial, because selenium, which is responsible for initializing the browser and doing actions,\nneed this driver to work.\nLink for geckodriver: https://github.com/mozilla/geckodriver/releases.\n\nThere are several ways for preparing driver to coopearte with library, depending on Operating System.\nOn each of systems: Microsoft Windows, macOS and Linux it looks a bit different.\nI was using Linux, so I will describe it here, but here are links for other OS:\n\nWindows: http://www.learningaboutelectronics.com/Articles/How-to-install-geckodriver-Python-windows.php\n\nmacOS: https://medium.com/dropout-analytics/selenium-and-geckodriver-on-mac-b411dbfe61bc\n\nOn Linux you need to:\n- download driver,\n- unpack it with any tool,\n- set execute rights for user __chmod <file> 700__,\n- put library on path __/usr/local/bin__. It can be done by moving it to location(mv),\ncopying to location(cp) or linking to directory(ln). Each command will work\n__<command> <geckodriver_name> /usr/local/bin__\n\nIt's worth mentioning that is not only working way to put geckodriver to work with selenium.\n\n## Commands\nAll commands are typed into terminal, using venv\n\nTo activate venv type command\n```bash\nsource venv/bin/activate\n```\nIt will look like this. venv will show up next to your name\nand command prompt\n\n<hr style=\"border:2px solid gray\"/>\n\n```bash\nprepare\n```\n\nIt will create:\n- directories: __resources_for_testing, features, steps, pages__\n- configuration_file __config.ini__\n- __common_steps.py__ file in steps,`` consisting basic commands used in testing\n(selenium finding, clicking elements on site)\n- database for keeping urls from your project\n\n__This step is crucial, because it will setup all directoreies for using this library__\n\nAvailable frameworks for url scan: rails, django\n<hr style=\"border:2px solid gray\"/>\n\n```bash\npb_configuration\n```\n\nThis method will pop gui with urls from your project and urls used in tests.\nIt will look like this:\n\n\nOn left we have urls scanned from project.\nOn the right side there are urls that will be used in testing.\n\nBetween listboxes is arrow, which let user pass value from one listbox to another\nand at the bottom there are buttons, which also allow user to include new urls into testing.\n\nOverall working:\n\n<hr style=\"border:2px solid gray\"/>\n\n```bash\nstep_creator\n```\nThis gui is responsible for creating tests, using scanning urls and \n## OK, application is fine, but how to do testing?\n\nTesting in this application is based on BDD. This means\n\nInvocing tests\nUse command behave <name_of_feature_file> -D headless\n",
"bugtrack_url": null,
"license": "MIT",
"summary": "Library for bdd testing",
"version": "0.2.2",
"split_keywords": [],
"urls": [
{
"comment_text": "",
"digests": {
"blake2b_256": "76b0ae6318e0459eed03d7561352beddec8ad2161b1d34e503d19e3fb8a6c30d",
"md5": "9b17c1d396d4cf08e919dd4021c51d61",
"sha256": "b0c9f6e6d0bce79f08679e61250f6e2f0b9bb9f7e5fee5ae554f484c7aa5a579"
},
"downloads": -1,
"filename": "pb_testing-0.2.2-py3-none-any.whl",
"has_sig": false,
"md5_digest": "9b17c1d396d4cf08e919dd4021c51d61",
"packagetype": "bdist_wheel",
"python_version": "py3",
"requires_python": ">=3.8",
"size": 51092,
"upload_time": "2023-01-19T12:44:37",
"upload_time_iso_8601": "2023-01-19T12:44:37.148681Z",
"url": "https://files.pythonhosted.org/packages/76/b0/ae6318e0459eed03d7561352beddec8ad2161b1d34e503d19e3fb8a6c30d/pb_testing-0.2.2-py3-none-any.whl",
"yanked": false,
"yanked_reason": null
},
{
"comment_text": "",
"digests": {
"blake2b_256": "3b482273046a3e03f9bb3a9fafef77fd77c78c2e09b324b80e9429194530353f",
"md5": "f6515b69f16b9e2a410c283177124719",
"sha256": "f0db06de932497a04b8d0e466698b356c1c76e2cbdc1a529e958d486249c4fbf"
},
"downloads": -1,
"filename": "pb_testing-0.2.2.tar.gz",
"has_sig": false,
"md5_digest": "f6515b69f16b9e2a410c283177124719",
"packagetype": "sdist",
"python_version": "source",
"requires_python": ">=3.8",
"size": 33522,
"upload_time": "2023-01-19T12:44:39",
"upload_time_iso_8601": "2023-01-19T12:44:39.224181Z",
"url": "https://files.pythonhosted.org/packages/3b/48/2273046a3e03f9bb3a9fafef77fd77c78c2e09b324b80e9429194530353f/pb_testing-0.2.2.tar.gz",
"yanked": false,
"yanked_reason": null
}
],
"upload_time": "2023-01-19 12:44:39",
"github": true,
"gitlab": false,
"bitbucket": false,
"github_user": "me3eh",
"github_project": "POM_BiDiDi",
"travis_ci": false,
"coveralls": false,
"github_actions": false,
"requirements": [],
"lcname": "pb-testing"
}

