<div align="center">
<picture>
<source media="(prefers-color-scheme: dark)" srcset="https://raw.githubusercontent.com/CM2S/piglot/main/docs/source/media/logo_dark.svg">
<source media="(prefers-color-scheme: light)" srcset="https://raw.githubusercontent.com/CM2S/piglot/main/docs/source/media/logo.svg">
<img alt="piglot logo" src="https://raw.githubusercontent.com/CM2S/piglot/main/docs/source/media/logo.svg" width="250">
</picture>
</div>
[](https://doi.org/10.21105/joss.06652)
[](https://github.com/CM2S/piglot/actions/workflows/test.yaml)
[](https://pypi.org/project/piglot/)
[](https://github.com/CM2S/piglot/blob/main/LICENSE)
[](https://www.codefactor.io/repository/github/cm2s/piglot)
[](https://codecov.io/github/CM2S/piglot)
[](https://piglot.readthedocs.io)
A package for the optimisation of numerical responses.
# Introduction
Welcome to `piglot`, a Python tool taylored for the automated optimisation of responses from numerical solvers.
We aim to provide a simple and user-friendly interface that is also easily extendable, allowing integration with other solvers within the community.
Whether you're working on structural analysis, material modelling, fluid dynamics, control systems or astrophysics (to name a few) using, for instance, finite element analysis, spectral methods or Monte Carlo methods, `piglot` provides a versatile solution for solving inverse problems.
The primary emphasis is on derivative-free optimisation, ensuring compatibility with black-box solvers in scenarios where gradient information is not available, and cases where the function evaluations may be noisy. We highlight:
* **Integration with solvers:** We provide an extensible interface for coupling with physics solvers. As long as your solver can return a time-response for the fields you are interested, you can optimise it with `piglot`.
* **Optimisation algorithms:** Off the shelf, there are several optimisers included in the package. Among them, we highlight our fully-fledged Bayesian optimisation (based on [BoTorch](https://botorch.org/)) that supports optimising stochastic and composite objectives and is highly customisable. Additional methods can also be easily implemented within `piglot`.
* **Visualisation tools:** You can use the built-in tool `piglot-plot` to visualise the results of the optimisation. There are native plotting utilities for the optimised responses, the parameter history, objective history and, for supported solvers, live plotting of the currently running case. Also, an animation of the optimisation process can be exported.
Feel free to explore, [contribute](CONTRIBUTING.md), and optimise with `piglot`!
We recommend starting by reading the [Getting started](#getting-started) section, and then checking the latest [documentation](https://piglot.readthedocs.io) for additional details.
You can use our [discussions](https://github.com/CM2S/piglot/discussions) page for help and our [issue tracker](https://github.com/CM2S/piglot/issues) for reporting problems and suggestions.
If you use this tool in your work, we encourage to open a PR to add it to our [list of papers](docs/source/papers.md).
# Getting started
We provide some examples to get you started with `piglot`.
There are two modes of operation available: running using the given `piglot` and `piglot-plot` tools and configuration files, or building the optimisation problem in a Python script.
## Using configuration files
We use YAML configuration files to specify the optimisation problem to solve.
This is the simplest form of using `piglot` and is the recommended approach unless you have a strong motive to use Python scripts (described [here](#using-python-scripts)).
A simple analytical curve fitting problem is included to showcase how to use configuration files.
To keep things simple, in this case, we fit a quadratic expression of the type $f(x) = a x^2$.
Note that this curve is generally obtained from a physics-based solver when solving an inverse problem.
As a reference, a numerically generated reference from the expression $f(x) = 2 x^2$ is used (provided in the `examples/sample_curve_fitting/reference_curve.txt` file).
We want to find the value for $a$ that better fits our reference (it should be 2).
The configuration file for this example is:
```yaml
iters: 10
optimiser: botorch
parameters:
a: [1, 0, 4]
objective:
name: fitting
solver:
name: curve
cases:
'case_1':
expression: <a> * x ** 2
parametric: x
bounds: [-5, 5]
points: 100
references:
'reference_curve.txt':
prediction: ['case_1']
```
You can find this file in `examples/sample_curve_fitting/config.yaml`
We run 10 iterations using the `botorch` optimiser (our interface for Bayesian optimisation), and set the parameter `a` for optimisation with bounds `[0,4]` and initial value 1.
Our optimisation objective is the fitting of an analytical curve, with the expression `<a> * x ** 2`.
The notation `<a>` indicates that this parameter should be optimised.
We also define a parameterisation using the variable $x$, where we sample the function between `[-5,5]` with 100 points.
Finally, we compare this generated response (with the label `case_1`) with our reference, given from the file `reference_curve.txt`
To run this example, open a terminal inside the `piglot` repository, enter the `examples/sample_curve_fitting` directory and run piglot with the given configuration file
```bash
cd examples/sample_curve_fitting
piglot config.yaml
```
You should see an output similar to
```
BoTorch: 100%|██████████████████████████████████████████████████████| 10/10 [00:00<00:00, 17.66it/s, Loss: 8.8505e-08]
Completed 10 iterations in 0.56614s
Best loss: 8.85050592e-08
Best parameters
- a: 1.999508
```
As you can see, piglot correctly identifies the `a` parameter close to the expected value of 2, and the error of the fitting is in the order of $10^{-8}$.
In addition to these outputs, `piglot` creates an output directory, with the same name as the configuration file (minus the extension), where it stores the optimisation data.
### Visualising results with `piglot-plot`
When using configuration files, the optimisation results can be quickly visualised with our `piglot-plot` utility.
With this tool, you can plot results for:
- response for a given case;
- response for best-observed objective;
- currently running response (for supported solvers and objectives);
- objective history;
- parameter history;
- cumulative regret;
- animation with the evaluated responses;
- Gaussian process regression for 1D optimisation problems.
Here we provide a brief overview over some of its features, but you can check out a more detailed description in our [post-processing example](https://github.com/CM2S/piglot/blob/main/docs/source/examples/post_processing/description.md).
In the same directory, run
```bash
piglot-plot best config.yaml
```
Which will display the best-observed value for the optimisation problem.
You should see the following output in the terminal
```
Best run:
Start Time /s 0.587397
Run Time /s 0.004439
a 1.999508
Name: 18, dtype: object
Hash: 2313718f75bc0445aa71df7d6d4e50ba82ad593d65f3762efdcbed01af338e30
Objective: 8.85050592e-08
```
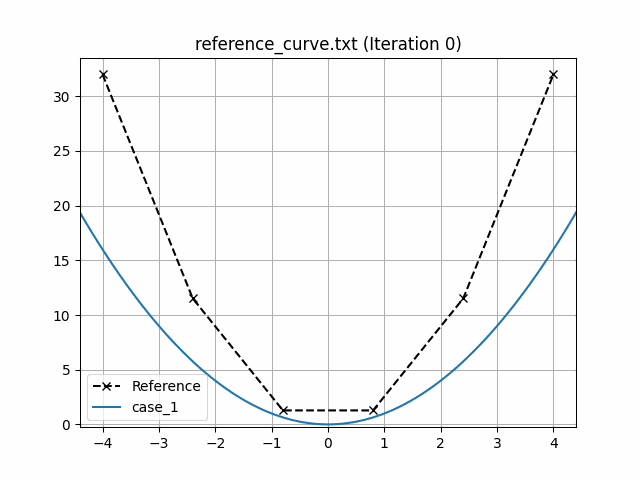
The script will also plot the best observed response, and its comparison with the reference response:

If you wish to directly save the figure without showing the GUI, you can also run
```bash
piglot-plot best config.yaml --save_fig fitting.png
```
which will save the image to the `fitting.png` file.
If you wish to see the objective convergence history, you can also use
```bash
piglot-plot history config.yaml --best --log
```
where the optional arguments `--best` and `--log` indicate to plot the best-observed objective in a logarithmic scale, which gives the following output:

Now, try running (this may take some time)
```bash
piglot-plot animation config.yaml
```
This generates an animation for all the function evaluations that have been made throughout the optimisation procedure.
You can find the `.gif` file(s) inside the output directory, which should give something like:
## Using Python scripts
Another way of using `piglot` is via its package and Python modules.
This approach may offer increased flexibility in the setup of the optimisation problem, at the cost of increased complexity and verbosity.
A sample script equivalent to the configuration file for the problem described in [the previous section](#using-configuration-files) is provided in `examples/sample_curve_fitting/config.py`, given by:
```python
import os
import shutil
from piglot.parameter import ParameterSet
from piglot.solver.solver import Case
from piglot.solver.curve.solver import CurveSolver
from piglot.solver.curve.fields import CurveInputData, Curve
from piglot.objectives.fitting import Reference, MSE
from piglot.objectives.fitting import FittingObjective, FittingSolver
from piglot.optimisers.botorch.bayes import BayesianBoTorch
# Set up output and temporary directories
output_dir = 'config'
tmp_dir = os.path.join(output_dir, 'tmp')
if os.path.isdir(output_dir):
shutil.rmtree(output_dir)
os.makedirs(output_dir, exist_ok=True)
# Set up optimisation parameters
parameters = ParameterSet()
parameters.add('a', 1.0, 0.0, 4.0)
# Set up the reference
reference = Reference('reference_curve.txt', ['case_1'], output_dir)
# Set up the solver to use
input_data = CurveInputData('case_1', '<a> * x ** 2', 'x', (-5.0, 5.0), 100)
case_1 = Case(input_data, {'case_1': Curve()})
solver = CurveSolver([case_1], parameters, output_dir, tmp_dir=tmp_dir)
# Set up the fitting objective
references = {reference: ['case_1']}
fitting_solver = FittingSolver(solver, references)
objective = FittingObjective(parameters, fitting_solver, output_dir, MSE())
# Set up the optimiser and run optimisation
optimiser = BayesianBoTorch(objective)
value, params = optimiser.optimise(10, parameters, output_dir)
print(f"Optimal value: {value}")
print(f"Optimal parameters: {params}")
```
Run with
```bash
python config.py
```
Example output
```
BoTorch: 100%|██████████████████████████████████████████████████████| 10/10 [00:00<00:00, 16.75it/s, Loss: 8.9167e-08]
Completed 10 iterations in 0.59692s
Best loss: 8.91673999e-08
Best parameters
- a: 1.999506
Optimal value: 8.916739991036405e-08
Optimal parameters: [1.99950592]
```
## Installation
You can install `piglot` by only installing the main scripts or as a standard Python package.
If you only intend to use the `piglot` and `piglot-plot` binaries, we strongly recommend the first option, as it avoids having to manage the dependencies in your Python environment.
However, if you wish to use the tools in the `piglot` package, you may have to resort to the second option.
Currently, we require Python 3.9 onwards.
### Option 1: Install binaries
This option is recommended for end-users that only need to interact with the provided `piglot` and `piglot-plot` scripts.
We use [`pipx`](https://github.com/pypa/pipx) to install the package in an isolated environment with the required dependencies (we recommend reading the pipx documentation to check the advantages of using this approach).
1. Install `pipx` in your system using the instructions [here](https://github.com/pypa/pipx#install-pipx);
2. In your favourite terminal, run: `pipx install piglot`;
3. Confirm the package is correctly installed by calling the `piglot` and `piglot-plot` executables.
### Option 2: Install package
We recommend this option for users aiming to use the `piglot` package directly.
Note that this option also provides the `piglot` and `piglot-plot` scripts, but requires manual handling of the installation environment.
1. In your favourite terminal, run: `pip install piglot`;
2. Confirm the package is correctly installed by calling the `piglot` and `piglot-plot` executables.
### Installing additional optimisers
We also support some optional external optimisers, which are not automatically installed along with `piglot` to reduce the number of dependencies and the installation cost.
You can either install them along with `piglot`, or manually using your package manager.
Their detection is done at runtime and, if not installed, an error will be raised.
Currently, the following optional optimisers are supported:
- `lipo` - LIPO optimiser
- `geneticalgorithm` - Genetic algorithm
- `pyswarms` - Particle swarm optimiser
These can be installed directly from PyPI (with the package names above).
If you wish to install `piglot` with one of these optimisers (which may be required when using a `pipx` install), you can run the following commands:
- `pip install piglot[lipo]` for the LIPO optimiser
- `pip install piglot[genetic]` for the Genetic algorithm
- `pip install piglot[pso]` for the Particle swarm optimiser optimiser
To simultaneously install more than one optimiser, for instance, the LIPO and the Particle swarm optimisers, run `pip install piglot[lipo,pso]`.
If you wish to install all optimisers at once, you can run `pip install piglot[full]`.
Raw data
{
"_id": null,
"home_page": null,
"name": "piglot",
"maintainer": null,
"docs_url": null,
"requires_python": ">=3.9",
"maintainer_email": "Rui Coelho <ruicoelhopedro@gmail.com>, Ana Francisca Alves <afalves@fe.up.pt>",
"keywords": "optimisation, parameter identification, constitutive modelling",
"author": "CM2S",
"author_email": null,
"download_url": "https://files.pythonhosted.org/packages/5d/1d/5299624e5409094787118c6679085866b27d189306901303e448471b1a29/piglot-0.5.1.tar.gz",
"platform": null,
"description": "<div align=\"center\">\n <picture>\n <source media=\"(prefers-color-scheme: dark)\" srcset=\"https://raw.githubusercontent.com/CM2S/piglot/main/docs/source/media/logo_dark.svg\">\n <source media=\"(prefers-color-scheme: light)\" srcset=\"https://raw.githubusercontent.com/CM2S/piglot/main/docs/source/media/logo.svg\">\n <img alt=\"piglot logo\" src=\"https://raw.githubusercontent.com/CM2S/piglot/main/docs/source/media/logo.svg\" width=\"250\">\n </picture>\n</div>\n\n[](https://doi.org/10.21105/joss.06652)\n[](https://github.com/CM2S/piglot/actions/workflows/test.yaml)\n[](https://pypi.org/project/piglot/)\n[](https://github.com/CM2S/piglot/blob/main/LICENSE)\n[](https://www.codefactor.io/repository/github/cm2s/piglot)\n[](https://codecov.io/github/CM2S/piglot)\n[](https://piglot.readthedocs.io)\n\nA package for the optimisation of numerical responses.\n\n\n# Introduction\n\nWelcome to `piglot`, a Python tool taylored for the automated optimisation of responses from numerical solvers.\nWe aim to provide a simple and user-friendly interface that is also easily extendable, allowing integration with other solvers within the community.\nWhether you're working on structural analysis, material modelling, fluid dynamics, control systems or astrophysics (to name a few) using, for instance, finite element analysis, spectral methods or Monte Carlo methods, `piglot` provides a versatile solution for solving inverse problems.\nThe primary emphasis is on derivative-free optimisation, ensuring compatibility with black-box solvers in scenarios where gradient information is not available, and cases where the function evaluations may be noisy. We highlight:\n* **Integration with solvers:** We provide an extensible interface for coupling with physics solvers. As long as your solver can return a time-response for the fields you are interested, you can optimise it with `piglot`.\n* **Optimisation algorithms:** Off the shelf, there are several optimisers included in the package. Among them, we highlight our fully-fledged Bayesian optimisation (based on [BoTorch](https://botorch.org/)) that supports optimising stochastic and composite objectives and is highly customisable. Additional methods can also be easily implemented within `piglot`.\n* **Visualisation tools:** You can use the built-in tool `piglot-plot` to visualise the results of the optimisation. There are native plotting utilities for the optimised responses, the parameter history, objective history and, for supported solvers, live plotting of the currently running case. Also, an animation of the optimisation process can be exported.\n\nFeel free to explore, [contribute](CONTRIBUTING.md), and optimise with `piglot`!\nWe recommend starting by reading the [Getting started](#getting-started) section, and then checking the latest [documentation](https://piglot.readthedocs.io) for additional details.\nYou can use our [discussions](https://github.com/CM2S/piglot/discussions) page for help and our [issue tracker](https://github.com/CM2S/piglot/issues) for reporting problems and suggestions.\nIf you use this tool in your work, we encourage to open a PR to add it to our [list of papers](docs/source/papers.md).\n\n\n# Getting started\n\nWe provide some examples to get you started with `piglot`.\nThere are two modes of operation available: running using the given `piglot` and `piglot-plot` tools and configuration files, or building the optimisation problem in a Python script.\n\n## Using configuration files\n\nWe use YAML configuration files to specify the optimisation problem to solve.\nThis is the simplest form of using `piglot` and is the recommended approach unless you have a strong motive to use Python scripts (described [here](#using-python-scripts)).\nA simple analytical curve fitting problem is included to showcase how to use configuration files.\n\nTo keep things simple, in this case, we fit a quadratic expression of the type $f(x) = a x^2$.\nNote that this curve is generally obtained from a physics-based solver when solving an inverse problem.\nAs a reference, a numerically generated reference from the expression $f(x) = 2 x^2$ is used (provided in the `examples/sample_curve_fitting/reference_curve.txt` file).\nWe want to find the value for $a$ that better fits our reference (it should be 2).\nThe configuration file for this example is:\n```yaml\niters: 10\n\noptimiser: botorch\n\nparameters:\n a: [1, 0, 4]\n\nobjective:\n name: fitting\n solver:\n name: curve\n cases:\n 'case_1':\n expression: <a> * x ** 2\n parametric: x\n bounds: [-5, 5]\n points: 100\n references:\n 'reference_curve.txt':\n prediction: ['case_1']\n```\nYou can find this file in `examples/sample_curve_fitting/config.yaml`\nWe run 10 iterations using the `botorch` optimiser (our interface for Bayesian optimisation), and set the parameter `a` for optimisation with bounds `[0,4]` and initial value 1.\nOur optimisation objective is the fitting of an analytical curve, with the expression `<a> * x ** 2`.\nThe notation `<a>` indicates that this parameter should be optimised.\nWe also define a parameterisation using the variable $x$, where we sample the function between `[-5,5]` with 100 points.\nFinally, we compare this generated response (with the label `case_1`) with our reference, given from the file `reference_curve.txt`\n\nTo run this example, open a terminal inside the `piglot` repository, enter the `examples/sample_curve_fitting` directory and run piglot with the given configuration file\n```bash\ncd examples/sample_curve_fitting\npiglot config.yaml\n```\nYou should see an output similar to\n```\nBoTorch: 100%|\u2588\u2588\u2588\u2588\u2588\u2588\u2588\u2588\u2588\u2588\u2588\u2588\u2588\u2588\u2588\u2588\u2588\u2588\u2588\u2588\u2588\u2588\u2588\u2588\u2588\u2588\u2588\u2588\u2588\u2588\u2588\u2588\u2588\u2588\u2588\u2588\u2588\u2588\u2588\u2588\u2588\u2588\u2588\u2588\u2588\u2588\u2588\u2588\u2588\u2588\u2588\u2588\u2588\u2588| 10/10 [00:00<00:00, 17.66it/s, Loss: 8.8505e-08]\nCompleted 10 iterations in 0.56614s\nBest loss: 8.85050592e-08\nBest parameters\n- a: 1.999508\n```\nAs you can see, piglot correctly identifies the `a` parameter close to the expected value of 2, and the error of the fitting is in the order of $10^{-8}$.\nIn addition to these outputs, `piglot` creates an output directory, with the same name as the configuration file (minus the extension), where it stores the optimisation data.\n\n### Visualising results with `piglot-plot`\n\nWhen using configuration files, the optimisation results can be quickly visualised with our `piglot-plot` utility.\nWith this tool, you can plot results for:\n- response for a given case;\n- response for best-observed objective;\n- currently running response (for supported solvers and objectives);\n- objective history;\n- parameter history;\n- cumulative regret;\n- animation with the evaluated responses;\n- Gaussian process regression for 1D optimisation problems.\n\nHere we provide a brief overview over some of its features, but you can check out a more detailed description in our [post-processing example](https://github.com/CM2S/piglot/blob/main/docs/source/examples/post_processing/description.md).\nIn the same directory, run\n```bash\npiglot-plot best config.yaml\n```\nWhich will display the best-observed value for the optimisation problem.\nYou should see the following output in the terminal\n```\nBest run:\nStart Time /s 0.587397\nRun Time /s 0.004439\na 1.999508\nName: 18, dtype: object\nHash: 2313718f75bc0445aa71df7d6d4e50ba82ad593d65f3762efdcbed01af338e30\nObjective: 8.85050592e-08\n```\nThe script will also plot the best observed response, and its comparison with the reference response:\n\n\nIf you wish to directly save the figure without showing the GUI, you can also run\n```bash\npiglot-plot best config.yaml --save_fig fitting.png\n```\nwhich will save the image to the `fitting.png` file.\n\nIf you wish to see the objective convergence history, you can also use\n```bash\npiglot-plot history config.yaml --best --log\n```\nwhere the optional arguments `--best` and `--log` indicate to plot the best-observed objective in a logarithmic scale, which gives the following output:\n\n\nNow, try running (this may take some time)\n```bash\npiglot-plot animation config.yaml\n```\nThis generates an animation for all the function evaluations that have been made throughout the optimisation procedure.\nYou can find the `.gif` file(s) inside the output directory, which should give something like:\n\n\n\n## Using Python scripts\n\nAnother way of using `piglot` is via its package and Python modules.\nThis approach may offer increased flexibility in the setup of the optimisation problem, at the cost of increased complexity and verbosity.\nA sample script equivalent to the configuration file for the problem described in [the previous section](#using-configuration-files) is provided in `examples/sample_curve_fitting/config.py`, given by:\n```python\nimport os\nimport shutil\nfrom piglot.parameter import ParameterSet\nfrom piglot.solver.solver import Case\nfrom piglot.solver.curve.solver import CurveSolver\nfrom piglot.solver.curve.fields import CurveInputData, Curve\nfrom piglot.objectives.fitting import Reference, MSE\nfrom piglot.objectives.fitting import FittingObjective, FittingSolver\nfrom piglot.optimisers.botorch.bayes import BayesianBoTorch\n\n# Set up output and temporary directories\noutput_dir = 'config'\ntmp_dir = os.path.join(output_dir, 'tmp')\nif os.path.isdir(output_dir):\n shutil.rmtree(output_dir)\nos.makedirs(output_dir, exist_ok=True)\n\n# Set up optimisation parameters\nparameters = ParameterSet()\nparameters.add('a', 1.0, 0.0, 4.0)\n\n# Set up the reference\nreference = Reference('reference_curve.txt', ['case_1'], output_dir)\n\n# Set up the solver to use\ninput_data = CurveInputData('case_1', '<a> * x ** 2', 'x', (-5.0, 5.0), 100)\ncase_1 = Case(input_data, {'case_1': Curve()})\nsolver = CurveSolver([case_1], parameters, output_dir, tmp_dir=tmp_dir)\n\n# Set up the fitting objective\nreferences = {reference: ['case_1']}\nfitting_solver = FittingSolver(solver, references)\nobjective = FittingObjective(parameters, fitting_solver, output_dir, MSE())\n\n# Set up the optimiser and run optimisation\noptimiser = BayesianBoTorch(objective)\nvalue, params = optimiser.optimise(10, parameters, output_dir)\nprint(f\"Optimal value: {value}\")\nprint(f\"Optimal parameters: {params}\")\n```\nRun with\n```bash\npython config.py\n```\nExample output\n```\nBoTorch: 100%|\u2588\u2588\u2588\u2588\u2588\u2588\u2588\u2588\u2588\u2588\u2588\u2588\u2588\u2588\u2588\u2588\u2588\u2588\u2588\u2588\u2588\u2588\u2588\u2588\u2588\u2588\u2588\u2588\u2588\u2588\u2588\u2588\u2588\u2588\u2588\u2588\u2588\u2588\u2588\u2588\u2588\u2588\u2588\u2588\u2588\u2588\u2588\u2588\u2588\u2588\u2588\u2588\u2588\u2588| 10/10 [00:00<00:00, 16.75it/s, Loss: 8.9167e-08]\nCompleted 10 iterations in 0.59692s\nBest loss: 8.91673999e-08\nBest parameters\n- a: 1.999506\nOptimal value: 8.916739991036405e-08\nOptimal parameters: [1.99950592]\n```\n\n\n## Installation\n\nYou can install `piglot` by only installing the main scripts or as a standard Python package.\nIf you only intend to use the `piglot` and `piglot-plot` binaries, we strongly recommend the first option, as it avoids having to manage the dependencies in your Python environment.\nHowever, if you wish to use the tools in the `piglot` package, you may have to resort to the second option.\nCurrently, we require Python 3.9 onwards.\n\n### Option 1: Install binaries\n\nThis option is recommended for end-users that only need to interact with the provided `piglot` and `piglot-plot` scripts.\nWe use [`pipx`](https://github.com/pypa/pipx) to install the package in an isolated environment with the required dependencies (we recommend reading the pipx documentation to check the advantages of using this approach).\n 1. Install `pipx` in your system using the instructions [here](https://github.com/pypa/pipx#install-pipx);\n 2. In your favourite terminal, run: `pipx install piglot`;\n 3. Confirm the package is correctly installed by calling the `piglot` and `piglot-plot` executables.\n\n\n### Option 2: Install package\n\nWe recommend this option for users aiming to use the `piglot` package directly.\nNote that this option also provides the `piglot` and `piglot-plot` scripts, but requires manual handling of the installation environment.\n 1. In your favourite terminal, run: `pip install piglot`;\n 2. Confirm the package is correctly installed by calling the `piglot` and `piglot-plot` executables.\n\n### Installing additional optimisers\n\nWe also support some optional external optimisers, which are not automatically installed along with `piglot` to reduce the number of dependencies and the installation cost.\nYou can either install them along with `piglot`, or manually using your package manager.\nTheir detection is done at runtime and, if not installed, an error will be raised.\nCurrently, the following optional optimisers are supported:\n- `lipo` - LIPO optimiser\n- `geneticalgorithm` - Genetic algorithm\n- `pyswarms` - Particle swarm optimiser\n\nThese can be installed directly from PyPI (with the package names above).\nIf you wish to install `piglot` with one of these optimisers (which may be required when using a `pipx` install), you can run the following commands:\n- `pip install piglot[lipo]` for the LIPO optimiser\n- `pip install piglot[genetic]` for the Genetic algorithm\n- `pip install piglot[pso]` for the Particle swarm optimiser optimiser\n\nTo simultaneously install more than one optimiser, for instance, the LIPO and the Particle swarm optimisers, run `pip install piglot[lipo,pso]`.\nIf you wish to install all optimisers at once, you can run `pip install piglot[full]`.\n",
"bugtrack_url": null,
"license": null,
"summary": "A package for the optimisation of numerical responses",
"version": "0.5.1",
"project_urls": {
"Bug Reports": "https://github.com/CM2S/piglot/issues",
"Documentation": "https://piglot.readthedocs.io/en/latest/",
"Homepage": "https://github.com/CM2S/piglot",
"Source": "https://github.com/CM2S/piglot/"
},
"split_keywords": [
"optimisation",
" parameter identification",
" constitutive modelling"
],
"urls": [
{
"comment_text": null,
"digests": {
"blake2b_256": "3f272754c806badb01e62317337873b227bd0e7635cad4b609a48b9db122c105",
"md5": "383d15a85f9bb81498d0fe77f8c43c85",
"sha256": "cbed4153eec9a5846579599a85bef48f0df057883d12830f07e744f34a3c0a09"
},
"downloads": -1,
"filename": "piglot-0.5.1-py3-none-any.whl",
"has_sig": false,
"md5_digest": "383d15a85f9bb81498d0fe77f8c43c85",
"packagetype": "bdist_wheel",
"python_version": "py3",
"requires_python": ">=3.9",
"size": 110458,
"upload_time": "2025-02-24T19:35:45",
"upload_time_iso_8601": "2025-02-24T19:35:45.994437Z",
"url": "https://files.pythonhosted.org/packages/3f/27/2754c806badb01e62317337873b227bd0e7635cad4b609a48b9db122c105/piglot-0.5.1-py3-none-any.whl",
"yanked": false,
"yanked_reason": null
},
{
"comment_text": null,
"digests": {
"blake2b_256": "5d1d5299624e5409094787118c6679085866b27d189306901303e448471b1a29",
"md5": "a6a85c6375840e6e0210e2e59154f8c3",
"sha256": "58160e05edf302f01b97cd3c50933afde2890d77b58d5b666c1d8eb7df0d7d5c"
},
"downloads": -1,
"filename": "piglot-0.5.1.tar.gz",
"has_sig": false,
"md5_digest": "a6a85c6375840e6e0210e2e59154f8c3",
"packagetype": "sdist",
"python_version": "source",
"requires_python": ">=3.9",
"size": 92330,
"upload_time": "2025-02-24T19:35:48",
"upload_time_iso_8601": "2025-02-24T19:35:48.189090Z",
"url": "https://files.pythonhosted.org/packages/5d/1d/5299624e5409094787118c6679085866b27d189306901303e448471b1a29/piglot-0.5.1.tar.gz",
"yanked": false,
"yanked_reason": null
}
],
"upload_time": "2025-02-24 19:35:48",
"github": true,
"gitlab": false,
"bitbucket": false,
"codeberg": false,
"github_user": "CM2S",
"github_project": "piglot",
"travis_ci": false,
"coveralls": false,
"github_actions": true,
"lcname": "piglot"
}

