## NOTICE
Pyhidra has been integrated into Ghidra under the name "PyGhidra". Pyhidra will continue to support up to Ghidra 11.3/12.0 whichever comes first.
# pyhidra
Pyhidra is a Python library that provides direct access to the Ghidra API within a native CPython interpreter using [jpype](https://jpype.readthedocs.io/en/latest). As well, Pyhidra contains some conveniences for setting up analysis on a given sample and running a Ghidra script locally. It also contains a Ghidra plugin to allow the use of CPython from the
Ghidra user interface.
Pyhidra was initially developed for use with Dragodis and is designed to be installable without requiring Java or Ghidra. Due to this restriction, the Java plugin for Pyhidra is compiled and installed automatically during first use. The Java plugin is managed by Pyhidra and will automatically be rebuilt as necessary.
## Install
1. Download and install [Ghidra](https://github.com/NationalSecurityAgency/ghidra/releases) to a desired location.
1. Set the `GHIDRA_INSTALL_DIR` environment variable to point to the directory where Ghidra is installed.
1. Install pyhidra.
```console
pip install pyhidra
```
### Enabling the Ghidra User Interface Plugin
1. Run `pyhidraw` from a terminal of your choice.
2. Open the Code Browser Tool.
3. From the `File` toolbar menu, select `Configure...`.
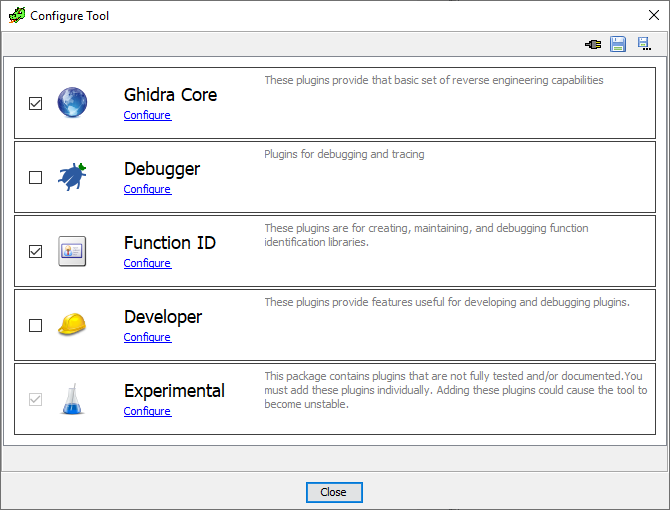
4. From the menu in the image below select `configure` under `Experimental`.
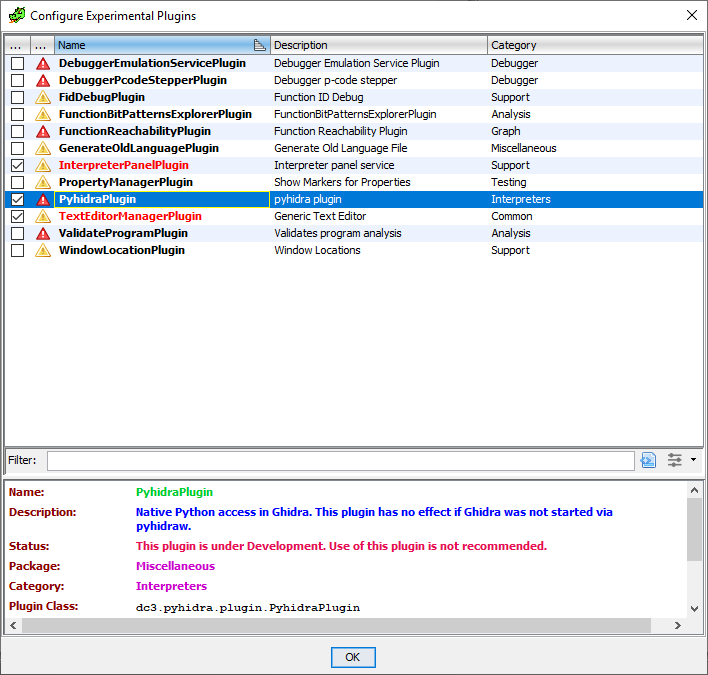
5. Check and enable Pyhidra as seen in the image below.
### Desktop Entry
If on linux, mac or windows, a desktop entry can be created to launch an instance of Ghidra with pyhidra attached.
When this script is run from a virtual environment (ie. venv), pyhidra will be started in this virtual environment
when launched.
```console
python -m pyhidra.install_desktop
```
On windows, this will install a shortcut file on the user's desktop. On linux, this will create an entry
that can be found in the applications launcher. On mac this will create an entry that can be found in
the Launchpad.
To remove, run the following:
```console
python -m pyhidra.uninstall_desktop
```
### Manual Plugin Installation
If pyhidra is planned to be used in a multiprocessing deployed server, the following must be run to allow the Ghidra plugins to be compiled and installed before use.
```console
python -m pyhidra.install_plugins
```
### Manual Plugin Uninstallation
If a plugin is misbehaving, the plugin can be manually uninstalled to allow recompilation on the next startup of pyhidra's launcher.
```console
python -m pyhidra.uninstall_plugin pyhidra
```
## Usage
### Raw Connection
To get just a raw connection to Ghidra use the `start()` function.
This will setup a Jpype connection and initialize Ghidra in headless mode,
which will allow you to directly import `ghidra` and `java`.
*NOTE: No projects or programs get setup in this mode.*
```python
import pyhidra
pyhidra.start()
import ghidra
from ghidra.app.util.headless import HeadlessAnalyzer
from ghidra.program.flatapi import FlatProgramAPI
from ghidra.base.project import GhidraProject
from java.lang import String
# do things
```
### Customizing Java and Ghidra initialization
JVM configuration for the classpath and vmargs may be done through a `PyhidraLauncher`.
```python
from pyhidra.launcher import HeadlessPyhidraLauncher
launcher = HeadlessPyhidraLauncher()
launcher.add_classpaths("log4j-core-2.17.1.jar", "log4j-api-2.17.1.jar")
launcher.add_vmargs("-Dlog4j2.formatMsgNoLookups=true")
launcher.start()
```
### Registering an Entry Point
The `PyhidraLauncher` can also be configured through the use of a registered entry point on your own python project.
This is useful for installing your own Ghidra plugin which uses pyhidra and self-compiles.
First create an [entry_point](https://setuptools.pypa.io/en/latest/userguide/entry_point.html) for `pyhidra.setup`
pointing to a single argument function which accepts the launcher instance.
```python
# setup.py
from setuptools import setup
setup(
# ...,
entry_points={
'pyhidra.setup': [
'acme_plugin = acme.ghidra_plugin.install:setup',
]
}
)
```
Then we create the target function.
This function will be called every time a user starts a pyhidra launcher.
In the same fashion, another entry point `pyhidra.pre_launch` may be registered and will be called after Ghidra and all
plugins have been loaded.
```python
# acme/ghidra_plugin/install.py
from pathlib import Path
import pyhidra
def setup(launcher):
"""
Run by pyhidra launcher to install our plugin.
"""
launcher.add_classpaths("log4j-core-2.17.1.jar", "log4j-api-2.17.1.jar")
launcher.add_vmargs("-Dlog4j2.formatMsgNoLookups=true")
# Install our plugin.
source_path = Path(__file__).parent / "java" / "plugin" # path to uncompiled .java code
details = pyhidra.ExtensionDetails(
name="acme_plugin",
description="My Cool Plugin",
author="acme",
plugin_version="1.2",
)
launcher.install_plugin(source_path, details) # install plugin (if not already)
```
### Analyze a File
To have pyhidra setup a binary file for you, use the `open_program()` function.
This will setup a Ghidra project and import the given binary file as a program for you.
Again, this will also allow you to import `ghidra` and `java` to perform more advanced processing.
```python
import pyhidra
with pyhidra.open_program("binary_file.exe") as flat_api:
program = flat_api.getCurrentProgram()
listing = program.getListing()
print(listing.getCodeUnitAt(flat_api.toAddr(0x1234)))
# We are also free to import ghidra while in this context to do more advanced things.
from ghidra.app.decompiler.flatapi import FlatDecompilerAPI
decomp_api = FlatDecompilerAPI(flat_api)
# ...
decomp_api.dispose()
```
By default, pyhidra will run analysis for you. If you would like to do this yourself, set `analyze` to `False`.
```python
import pyhidra
with pyhidra.open_program("binary_file.exe", analyze=False) as flat_api:
from ghidra.program.util import GhidraProgramUtilities
program = flat_api.getCurrentProgram()
if GhidraProgramUtilities.shouldAskToAnalyze(program):
flat_api.analyzeAll(program)
```
The `open_program()` function can also accept optional arguments to control the project name and location that gets created.
(Helpful for opening up a sample in an already existing project.)
```python
import pyhidra
with pyhidra.open_program("binary_file.exe", project_name="EXAM_231", project_location=r"C:\exams\231") as flat_api:
...
```
### Run a Script
Pyhidra can also be used to run an existing Ghidra Python script directly in your native python interpreter
using the `run_script()` command.
However, while you can technically run an existing Ghidra script unmodified, you may
run into issues due to differences between Jython 2 and CPython 3.
Therefore, some modification to the script may be needed.
```python
import pyhidra
pyhidra.run_script(r"C:\input.exe", r"C:\some_ghidra_script.py")
```
This can also be done on the command line using `pyhidra`.
```console
> pyhidra C:\input.exe C:\some_ghidra_script.py <CLI ARGS PASSED TO SCRIPT>
```
### Ghidra User Interface
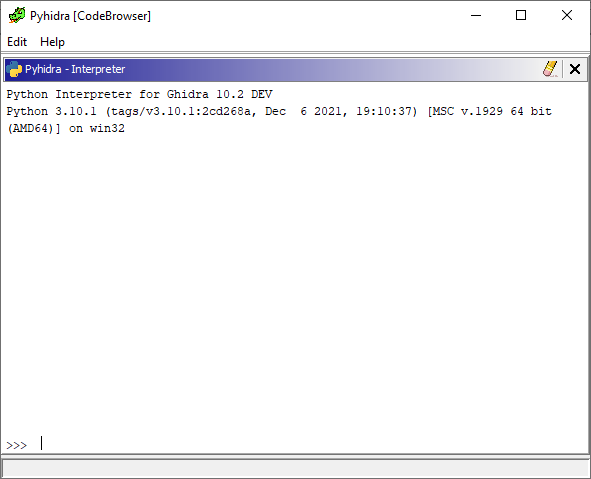
Ghidra **must** be started via `pyhidraw` and the plugin must be enabled for the user interface features to be present. Once these prerequisites are met the `pyhidra` menu item will be available in the `Window` toolbar menu and all Python scripts outside of the Ghidra installation will automatically be run with CPython. Any Python script found within the Ghidra installation will be run using Jython to prevent causing issues with any analyzers or Ghidra internals that use them. Below is a screenshot of the standard Python interpreter in Ghidra which is using CPython instead of Jython. It will appear when `pyhidra` is opened from the `Window` toolbar menu.
### Handling Package Name Conflicts
There may be some Python modules and Java packages with the same import path. When this occurs the Python module takes precedence.
While jpype has its own mechanism for handling this situation, pyhidra automatically makes the Java package accessible by allowing
it to be imported with an underscore appended to the package name.
```python
import pdb # imports Python's pdb
import pdb_ # imports Ghidra's pdb
```
Raw data
{
"_id": null,
"home_page": "https://github.com/Defense-Cyber-Crime-Center/pyhidra",
"name": "pyhidra",
"maintainer": null,
"docs_url": null,
"requires_python": ">=3.9",
"maintainer_email": null,
"keywords": "ghidra",
"author": "DC3",
"author_email": "dcci@dc3.mil",
"download_url": "https://files.pythonhosted.org/packages/87/7f/1de83b2299371f013196d044cfc95d48116a4067f4ff9d5197eb509dc9f5/pyhidra-1.3.0.tar.gz",
"platform": "any",
"description": "## NOTICE\n\nPyhidra has been integrated into Ghidra under the name \"PyGhidra\". Pyhidra will continue to support up to Ghidra 11.3/12.0 whichever comes first.\n\n# pyhidra\n\nPyhidra is a Python library that provides direct access to the Ghidra API within a native CPython interpreter using [jpype](https://jpype.readthedocs.io/en/latest). As well, Pyhidra contains some conveniences for setting up analysis on a given sample and running a Ghidra script locally. It also contains a Ghidra plugin to allow the use of CPython from the\nGhidra user interface.\n\nPyhidra was initially developed for use with Dragodis and is designed to be installable without requiring Java or Ghidra. Due to this restriction, the Java plugin for Pyhidra is compiled and installed automatically during first use. The Java plugin is managed by Pyhidra and will automatically be rebuilt as necessary.\n\n## Install\n\n1. Download and install [Ghidra](https://github.com/NationalSecurityAgency/ghidra/releases) to a desired location.\n\n1. Set the `GHIDRA_INSTALL_DIR` environment variable to point to the directory where Ghidra is installed.\n\n1. Install pyhidra.\n\n```console\npip install pyhidra\n```\n### Enabling the Ghidra User Interface Plugin\n\n1. Run `pyhidraw` from a terminal of your choice.\n2. Open the Code Browser Tool.\n3. From the `File` toolbar menu, select `Configure...`.\n4. From the menu in the image below select `configure` under `Experimental`.\n \n5. Check and enable Pyhidra as seen in the image below.\n \n\n### Desktop Entry\n\nIf on linux, mac or windows, a desktop entry can be created to launch an instance of Ghidra with pyhidra attached.\nWhen this script is run from a virtual environment (ie. venv), pyhidra will be started in this virtual environment\nwhen launched.\n\n```console\npython -m pyhidra.install_desktop\n```\n\nOn windows, this will install a shortcut file on the user's desktop. On linux, this will create an entry \nthat can be found in the applications launcher. On mac this will create an entry that can be found in \nthe Launchpad.\n\n\nTo remove, run the following:\n\n```console\npython -m pyhidra.uninstall_desktop\n```\n\n### Manual Plugin Installation\n\nIf pyhidra is planned to be used in a multiprocessing deployed server, the following must be run to allow the Ghidra plugins to be compiled and installed before use.\n\n```console\npython -m pyhidra.install_plugins\n```\n\n\n### Manual Plugin Uninstallation\n\nIf a plugin is misbehaving, the plugin can be manually uninstalled to allow recompilation on the next startup of pyhidra's launcher.\n\n```console\npython -m pyhidra.uninstall_plugin pyhidra\n```\n\n\n## Usage\n\n\n### Raw Connection\n\nTo get just a raw connection to Ghidra use the `start()` function.\nThis will setup a Jpype connection and initialize Ghidra in headless mode,\nwhich will allow you to directly import `ghidra` and `java`.\n\n*NOTE: No projects or programs get setup in this mode.*\n\n```python\nimport pyhidra\npyhidra.start()\n\nimport ghidra\nfrom ghidra.app.util.headless import HeadlessAnalyzer\nfrom ghidra.program.flatapi import FlatProgramAPI\nfrom ghidra.base.project import GhidraProject\nfrom java.lang import String\n\n# do things\n```\n\n### Customizing Java and Ghidra initialization\n\nJVM configuration for the classpath and vmargs may be done through a `PyhidraLauncher`.\n\n```python\nfrom pyhidra.launcher import HeadlessPyhidraLauncher\n\nlauncher = HeadlessPyhidraLauncher()\nlauncher.add_classpaths(\"log4j-core-2.17.1.jar\", \"log4j-api-2.17.1.jar\")\nlauncher.add_vmargs(\"-Dlog4j2.formatMsgNoLookups=true\")\nlauncher.start()\n```\n\n### Registering an Entry Point\n\nThe `PyhidraLauncher` can also be configured through the use of a registered entry point on your own python project.\nThis is useful for installing your own Ghidra plugin which uses pyhidra and self-compiles.\n\nFirst create an [entry_point](https://setuptools.pypa.io/en/latest/userguide/entry_point.html) for `pyhidra.setup`\npointing to a single argument function which accepts the launcher instance.\n\n```python\n# setup.py\nfrom setuptools import setup\n\nsetup(\n # ...,\n entry_points={\n 'pyhidra.setup': [\n 'acme_plugin = acme.ghidra_plugin.install:setup',\n ]\n }\n)\n```\n\n\nThen we create the target function.\nThis function will be called every time a user starts a pyhidra launcher.\nIn the same fashion, another entry point `pyhidra.pre_launch` may be registered and will be called after Ghidra and all\nplugins have been loaded.\n\n```python\n# acme/ghidra_plugin/install.py\nfrom pathlib import Path\nimport pyhidra\n\ndef setup(launcher):\n \"\"\"\n Run by pyhidra launcher to install our plugin.\n \"\"\"\n launcher.add_classpaths(\"log4j-core-2.17.1.jar\", \"log4j-api-2.17.1.jar\")\n launcher.add_vmargs(\"-Dlog4j2.formatMsgNoLookups=true\")\n\n # Install our plugin.\n source_path = Path(__file__).parent / \"java\" / \"plugin\" # path to uncompiled .java code\n details = pyhidra.ExtensionDetails(\n name=\"acme_plugin\",\n description=\"My Cool Plugin\",\n author=\"acme\",\n plugin_version=\"1.2\",\n )\n launcher.install_plugin(source_path, details) # install plugin (if not already)\n```\n\n\n### Analyze a File\n\nTo have pyhidra setup a binary file for you, use the `open_program()` function.\nThis will setup a Ghidra project and import the given binary file as a program for you.\n\nAgain, this will also allow you to import `ghidra` and `java` to perform more advanced processing.\n\n```python\nimport pyhidra\n\nwith pyhidra.open_program(\"binary_file.exe\") as flat_api:\n program = flat_api.getCurrentProgram()\n listing = program.getListing()\n print(listing.getCodeUnitAt(flat_api.toAddr(0x1234)))\n\n # We are also free to import ghidra while in this context to do more advanced things.\n from ghidra.app.decompiler.flatapi import FlatDecompilerAPI\n decomp_api = FlatDecompilerAPI(flat_api)\n # ...\n decomp_api.dispose()\n```\n\nBy default, pyhidra will run analysis for you. If you would like to do this yourself, set `analyze` to `False`.\n\n```python\nimport pyhidra\n\nwith pyhidra.open_program(\"binary_file.exe\", analyze=False) as flat_api:\n from ghidra.program.util import GhidraProgramUtilities\n\n program = flat_api.getCurrentProgram()\n if GhidraProgramUtilities.shouldAskToAnalyze(program):\n flat_api.analyzeAll(program)\n```\n\n\nThe `open_program()` function can also accept optional arguments to control the project name and location that gets created.\n(Helpful for opening up a sample in an already existing project.)\n\n```python\nimport pyhidra\n\nwith pyhidra.open_program(\"binary_file.exe\", project_name=\"EXAM_231\", project_location=r\"C:\\exams\\231\") as flat_api:\n ...\n```\n\n\n### Run a Script\n\nPyhidra can also be used to run an existing Ghidra Python script directly in your native python interpreter\nusing the `run_script()` command.\nHowever, while you can technically run an existing Ghidra script unmodified, you may\nrun into issues due to differences between Jython 2 and CPython 3.\nTherefore, some modification to the script may be needed.\n\n```python\n\nimport pyhidra\n\npyhidra.run_script(r\"C:\\input.exe\", r\"C:\\some_ghidra_script.py\")\n```\n\nThis can also be done on the command line using `pyhidra`.\n\n```console\n> pyhidra C:\\input.exe C:\\some_ghidra_script.py <CLI ARGS PASSED TO SCRIPT>\n```\n\n### Ghidra User Interface\n\nGhidra **must** be started via `pyhidraw` and the plugin must be enabled for the user interface features to be present. Once these prerequisites are met the `pyhidra` menu item will be available in the `Window` toolbar menu and all Python scripts outside of the Ghidra installation will automatically be run with CPython. Any Python script found within the Ghidra installation will be run using Jython to prevent causing issues with any analyzers or Ghidra internals that use them. Below is a screenshot of the standard Python interpreter in Ghidra which is using CPython instead of Jython. It will appear when `pyhidra` is opened from the `Window` toolbar menu.\n\n\n\n### Handling Package Name Conflicts\n\nThere may be some Python modules and Java packages with the same import path. When this occurs the Python module takes precedence.\nWhile jpype has its own mechanism for handling this situation, pyhidra automatically makes the Java package accessible by allowing\nit to be imported with an underscore appended to the package name.\n\n```python\nimport pdb # imports Python's pdb\nimport pdb_ # imports Ghidra's pdb\n```\n",
"bugtrack_url": null,
"license": "MIT",
"summary": "Native CPython for Ghidra",
"version": "1.3.0",
"project_urls": {
"Homepage": "https://github.com/Defense-Cyber-Crime-Center/pyhidra"
},
"split_keywords": [
"ghidra"
],
"urls": [
{
"comment_text": "",
"digests": {
"blake2b_256": "0b7142b696a1e5a81f12a27898b1f83f16b5109f3702e884248d75238e4ab92e",
"md5": "e274fb22783d472dd1246e399fb83f70",
"sha256": "768b5199cf94bafe33bfa64c836380c976dad68db937e1feefb5b5e8f8035c73"
},
"downloads": -1,
"filename": "pyhidra-1.3.0-py3-none-any.whl",
"has_sig": false,
"md5_digest": "e274fb22783d472dd1246e399fb83f70",
"packagetype": "bdist_wheel",
"python_version": "py3",
"requires_python": ">=3.9",
"size": 56999,
"upload_time": "2024-10-04T16:25:17",
"upload_time_iso_8601": "2024-10-04T16:25:17.754903Z",
"url": "https://files.pythonhosted.org/packages/0b/71/42b696a1e5a81f12a27898b1f83f16b5109f3702e884248d75238e4ab92e/pyhidra-1.3.0-py3-none-any.whl",
"yanked": false,
"yanked_reason": null
},
{
"comment_text": "",
"digests": {
"blake2b_256": "877f1de83b2299371f013196d044cfc95d48116a4067f4ff9d5197eb509dc9f5",
"md5": "8e5cf26a2c93257ad42c780cd8d1ee8d",
"sha256": "1fae93db37000b7b12d8011500d9367a904fafb09476190e519f61b013d440e4"
},
"downloads": -1,
"filename": "pyhidra-1.3.0.tar.gz",
"has_sig": false,
"md5_digest": "8e5cf26a2c93257ad42c780cd8d1ee8d",
"packagetype": "sdist",
"python_version": "source",
"requires_python": ">=3.9",
"size": 47568,
"upload_time": "2024-10-04T16:25:19",
"upload_time_iso_8601": "2024-10-04T16:25:19.260136Z",
"url": "https://files.pythonhosted.org/packages/87/7f/1de83b2299371f013196d044cfc95d48116a4067f4ff9d5197eb509dc9f5/pyhidra-1.3.0.tar.gz",
"yanked": false,
"yanked_reason": null
}
],
"upload_time": "2024-10-04 16:25:19",
"github": true,
"gitlab": false,
"bitbucket": false,
"codeberg": false,
"github_user": "Defense-Cyber-Crime-Center",
"github_project": "pyhidra",
"travis_ci": false,
"coveralls": false,
"github_actions": true,
"lcname": "pyhidra"
}

