<div align="center">
<img src="https://github.com/star-whale/docs/raw/main/static/img/starwhale.png" width="600" style="max-width: 600px;">
<h1 align="center" style="margin-top: 10px">An MLOps/LLMOps Platform</h1>
🚀 ️☁️ [Starwhale Cloud](https://cloud.starwhale.cn) is now open to the public, try it! 🎉🍻
</div>
<p align="center">
<a href="https://pypi.org/project/starwhale/">
<img src="https://img.shields.io/pypi/v/starwhale?style=flat">
</a>
<a href='https://artifacthub.io/packages/helm/starwhale/starwhale'>
<img src='https://img.shields.io/endpoint?url=https://artifacthub.io/badge/repository/starwhale' alt='Artifact Hub'/>
</a>
<a href="https://pypi.org/project/starwhale/">
<img alt="PyPI - Python Version" src="https://img.shields.io/pypi/pyversions/starwhale">
</a>
<a href="https://github.com/star-whale/starwhale/actions/workflows/client.yml">
<img src="https://github.com/star-whale/starwhale/actions/workflows/client.yml/badge.svg" alt="Client/SDK UT">
</a>
<a href="https://github.com/star-whale/starwhale/actions/workflows/server-ut-report.yml">
<img src="https://github.com/star-whale/starwhale/actions/workflows/server-ut-report.yml/badge.svg" alt="Server UT">
</a>
<a href="https://github.com/star-whale/starwhale/actions/workflows/console.yml">
<img src="https://github.com/star-whale/starwhale/actions/workflows/console.yml/badge.svg">
</a>
<a href="https://github.com/star-whale/starwhale/actions/workflows/e2e-test.yml">
<img src='https://github.com/star-whale/starwhale/actions/workflows/e2e-test.yml/badge.svg' alt='Starwhale E2E Test'>
</a>
<a href='https://app.codecov.io/gh/star-whale/starwhale'>
<img alt="Codecov" src="https://img.shields.io/codecov/c/github/star-whale/starwhale?flag=controller&label=Java%20Cov">
</a>
<a href="https://app.codecov.io/gh/star-whale/starwhale">
<img alt="Codecov" src="https://img.shields.io/codecov/c/github/star-whale/starwhale?flag=standalone&label=Python%20cov">
</a>
</p>
<h4 align="center">
<p>
<b>English</b> |
<a href="https://github.com/star-whale/starwhale/blob/main/README_ZH.md">中文</a>
<p>
</h4>
## What is Starwhale
Starwhale is an MLOps/LLMOps platform that brings efficiency and standardization to machine learning operations. It streamlines the model development liftcycle, enabling teams to optimize their workflows around key areas like model building, evaluation, release and fine-tuning.

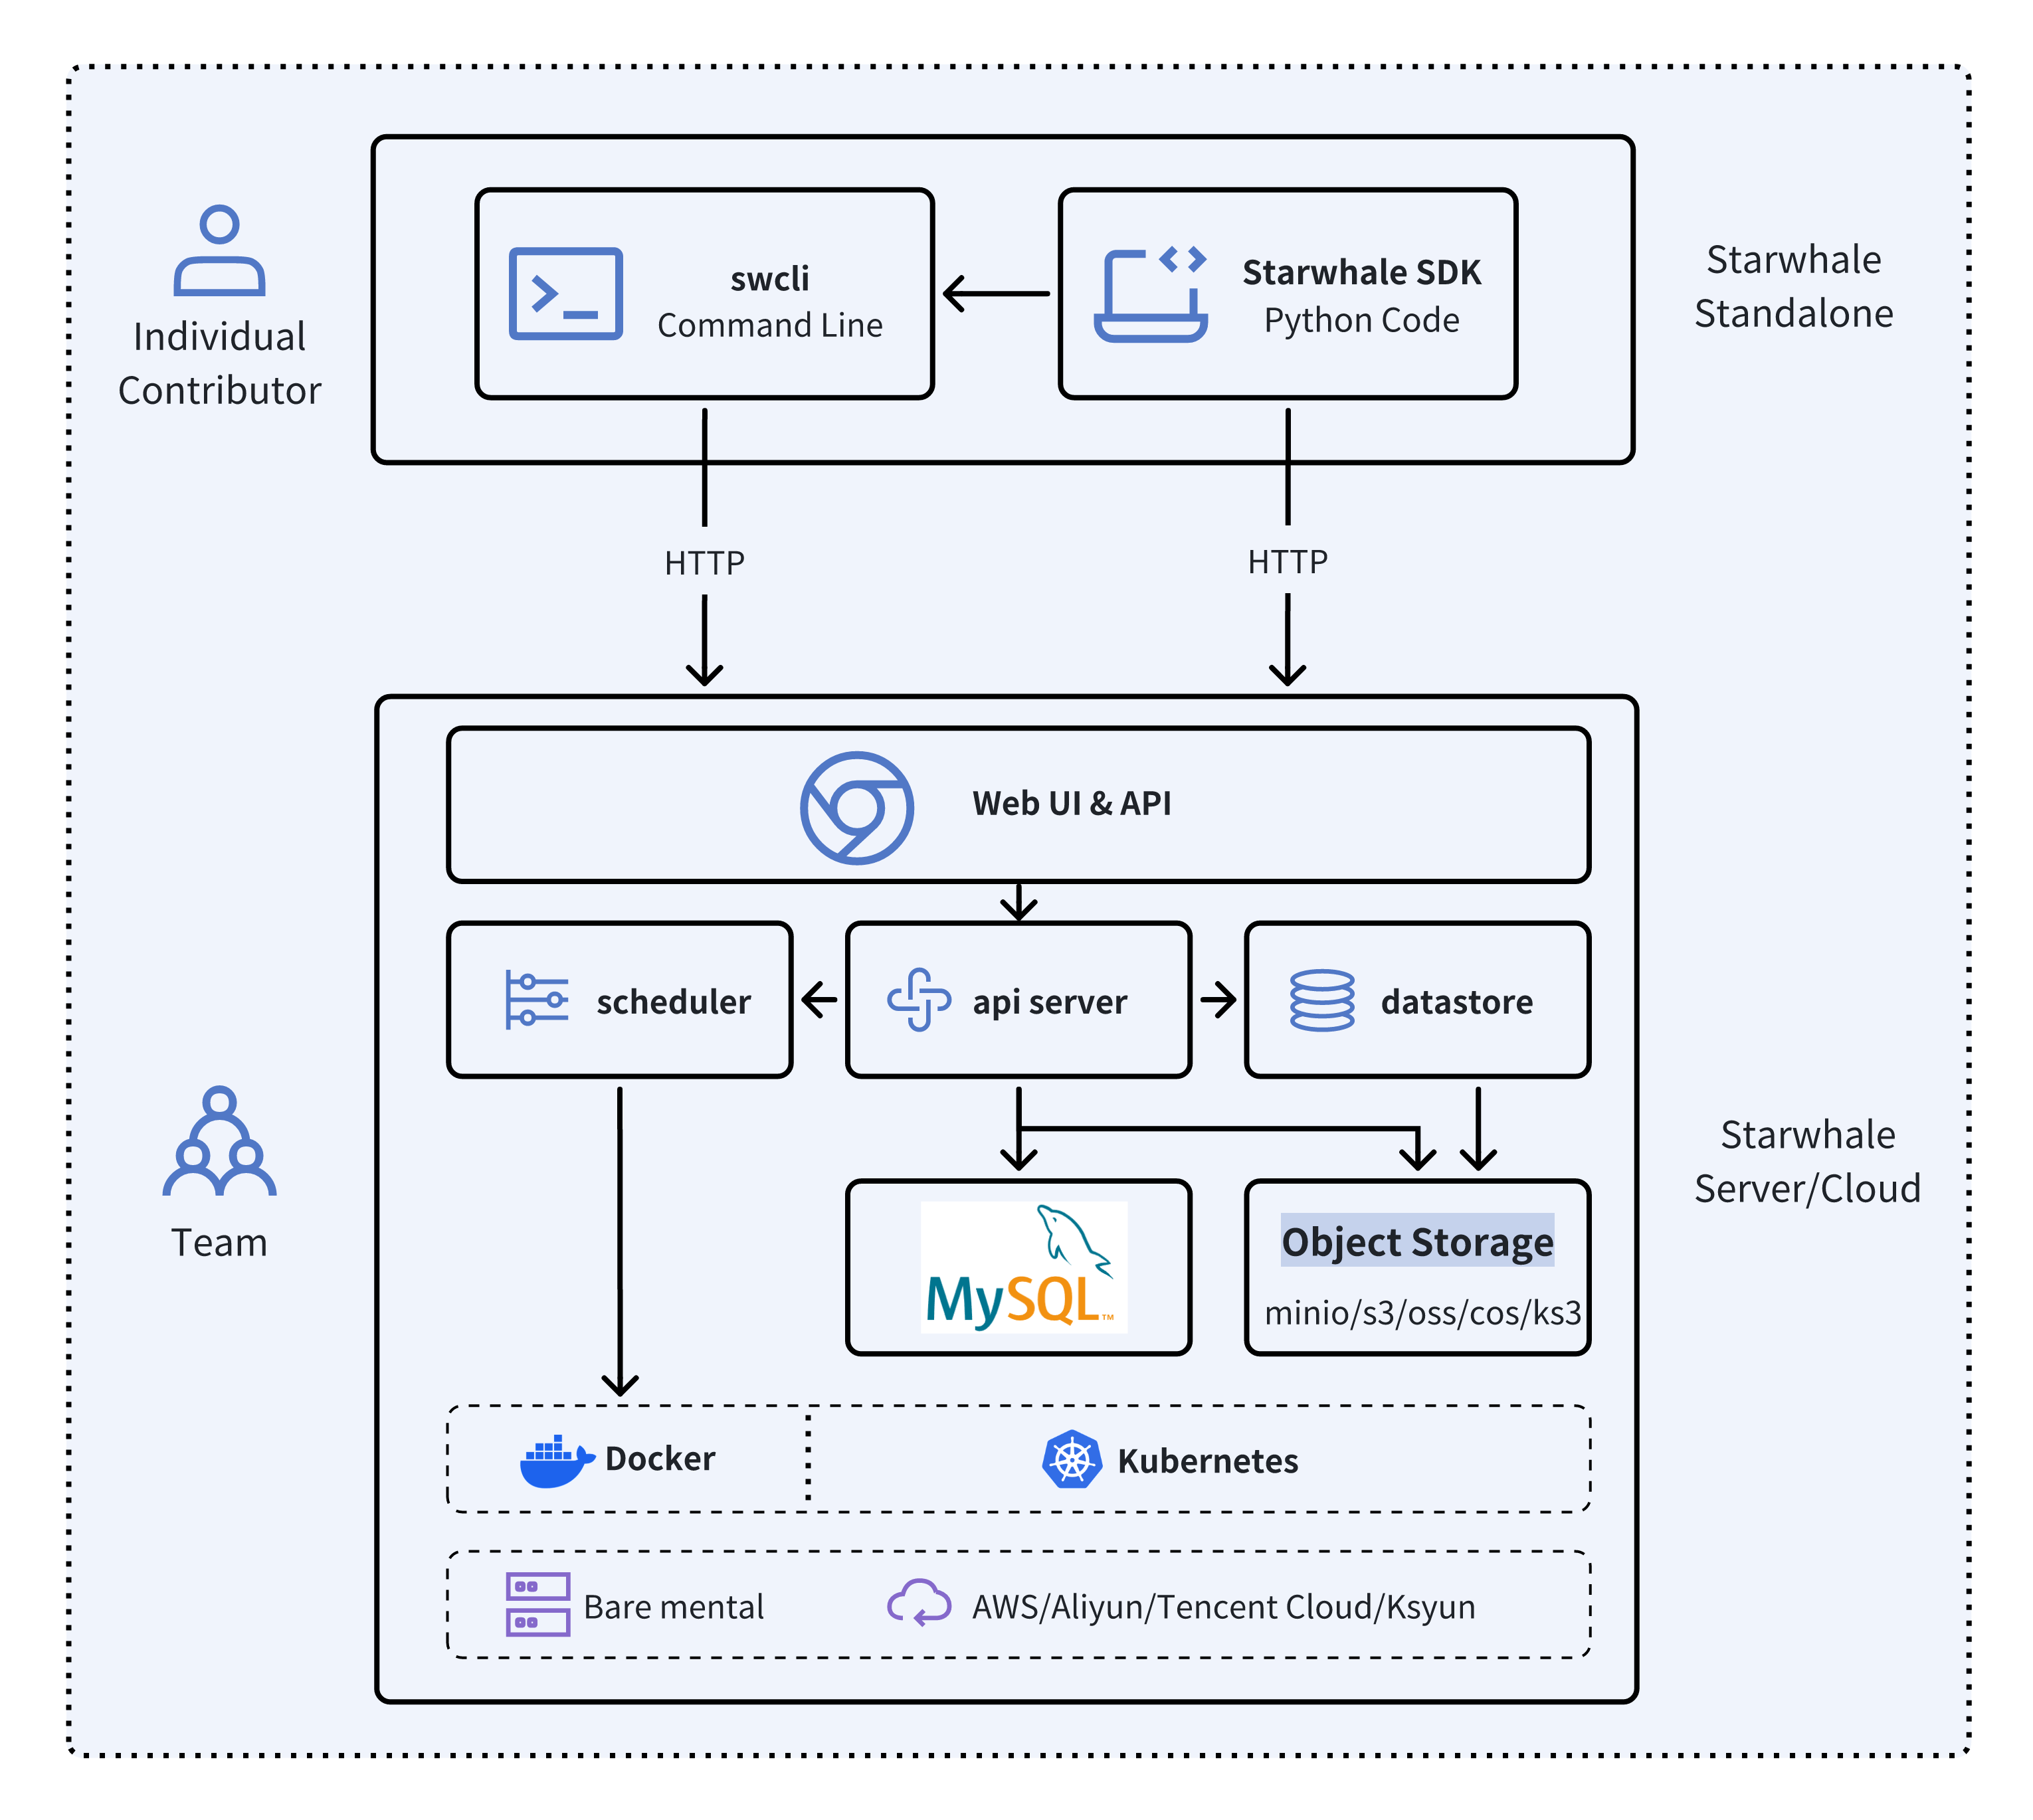
Starwhale meets diverse deployment needs with three flexible configurations:
- 🐥 **Standalone** - Deployed in a local development environment, managed by the `swcli` command-line tool, meeting development and debugging needs.
- 🦅 **Server** - Deployed in a private data center, relying on a Kubernetes cluster, providing centralized, web-based, and secure services.
- 🦉 **Cloud** - Hosted on a public cloud, with the access address <https://cloud.starwhale.cn>. The Starwhale team is responsible for maintenance, and no installation is required. You can start using it after registering an account.
As its core, Starwhale abstracts **Model**, **Runtime** and **Dataset** as first-class citizens - providing the fundamentals for streamlined operations. Starwhale further delivers tailored capabilities for common workflow scenarios including:
- 🔥 **Models Evaluation** - Implement robust, production-scale evaluations with minimal coding through the Python SDK.
- 🌟 **Live Demo** - Interactively assess model performance through user-friendly web interfaces.
- 🌊 **LLM Fine-tuning** - End-to-end toolchain from efficient fine-tuning to comparative benchmarking and publishing.
Starwhale is also an open source platform, using the [Apache-2.0 license](https://github.com/star-whale/starwhale/blob/main/LICENSE). The Starwhale framework is designed for clarity and ease of use, empowering developers to build customized MLOps features tailored to their needs.
## Key Concepts
### 🐘 Starwhale Dataset
Starwhale Dataset offers efficient data storage, loading, and visualization capabilities, making it a dedicated data management tool tailored for the field of machine learning and deep learning

```python
import torch
from starwhale import dataset, Image
# build dataset for starwhale cloud instance
with dataset("https://cloud.starwhale.cn/project/starwhale:public/dataset/test-image", create="empty") as ds:
for i in range(100):
ds.append({"image": Image(f"{i}.png"), "label": i})
ds.commit()
# load dataset
ds = dataset("https://cloud.starwhale.cn/project/starwhale:public/dataset/test-image")
print(len(ds))
print(ds[0].features.image.to_pil())
print(ds[0].features.label)
torch_ds = ds.to_pytorch()
torch_loader = torch.utils.data.DataLoader(torch_ds, batch_size=5)
print(next(iter(torch_loader)))
```
### 🐇 Starwhale Model
Starwhale Model is a standard format for packaging machine learning models that can be used for various purposes, like model fine-tuning, model evaluation, and online serving. A Starwhale Model contains the model file, inference codes, configuration files, and any other files required to run the model.

```bash
# model build
swcli model build . --module mnist.evaluate --runtime pytorch/version/v1 --name mnist
# model copy from standalone to cloud
swcli model cp mnist https://cloud.starwhale.cn/project/starwhale:public
# model run
swcli model run --uri mnist --runtime pytorch --dataset mnist
swcli model run --workdir . --module mnist.evaluator --handler mnist.evaluator:MNISTInference.cmp
```
### 🐌 Starwhale Runtime
Starwhale Runtime aims to provide a reproducible and sharable running environment for python programs. You can easily share your working environment with your teammates or outsiders, and vice versa. Furthermore, you can run your programs on Starwhale Server or Starwhale Cloud without bothering with the dependencies.

```bash
# build from runtime.yaml, conda env, docker image or shell
swcli runtime build --yaml runtime.yaml
swcli runtime build --conda pytorch --name pytorch-runtime --cuda 11.4
swcli runtime build --docker pytorch/pytorch:1.9.0-cuda11.1-cudnn8-runtime
swcli runtime build --shell --name pytorch-runtime
# runtime activate
swcli runtime activate pytorch
# integrated with model and dataset
swcli model run --uri test --runtime pytorch
swcli model build . --runtime pytorch
swcli dataset build --runtime pytorch
```
### 🐄 Starwhale Evaluation
Starwhale Evaluation enables users to evaluate sophisticated, production-ready distributed models by writing just a few lines of code with Starwhale Python SDK.
```python
import typing as t
import gradio
from starwhale import evaluation
from starwhale.api.service import api
def model_generate(image):
...
return predict_value, probability_matrix
@evaluation.predict(
resources={"nvidia.com/gpu": 1},
replicas=4,
)
def predict_image(data: dict, external: dict) -> None:
return model_generate(data["image"])
@evaluation.evaluate(use_predict_auto_log=True, needs=[predict_image])
def evaluate_results(predict_result_iter: t.Iterator):
for _data in predict_result_iter:
...
evaluation.log_summary({"accuracy": 0.95, "benchmark": "test"})
@api(gradio.File(), gradio.Label())
def predict_view(file: t.Any) -> t.Any:
with open(file.name, "rb") as f:
data = Image(f.read(), shape=(28, 28, 1))
_, prob = predict_image({"image": data})
return {i: p for i, p in enumerate(prob)}
```
### 🦍 Starwhale Fine-tuning
Starwhale Fine-tuning provides a full workflow for Large Language Model(LLM) tuning, including batch model evaluation, live demo and model release capabilities. Starwhale Fine-tuning Python SDK is very simple.
```python
import typing as t
from starwhale import finetune, Dataset
from transformers import Trainer
@finetune(
resources={"nvidia.com/gpu":4, "memory": "32G"},
require_train_datasets=True,
require_validation_datasets=True,
model_modules=["evaluation", "finetune"],
)
def lora_finetune(train_datasets: t.List[Dataset], val_datasets: t.List[Dataset]) -> None:
# init model and tokenizer
trainer = Trainer(
model=model, tokenizer=tokenizer,
train_dataset=train_datasets[0].to_pytorch(), # convert Starwhale Dataset into Pytorch Dataset
eval_dataset=val_datasets[0].to_pytorch())
trainer.train()
trainer.save_state()
trainer.save_model()
# save weights, then Starwhale SDK will package them into Starwhale Model
```
## Installation
### 🍉 Starwhale Standalone
Requirements: Python 3.7~3.11 in the Linux or macOS os.
```bash
python3 -m pip install starwhale
```
### 🥭 Starwhale Server
Starwhale Server is delivered as a Docker image, which can be run with Docker directly or deployed to a Kubernetes cluster. For the laptop environment, using `swcli server start` command is a appropriate choice that depends on Docker and Docker-Compose.
```bash
swcli server start
```
## Quick Tour
We use [MNIST](https://paperswithcode.com/dataset/mnist) as the hello world example to show the basic Starwhale Model workflow.
### 🪅 MNIST Evaluation in Starwhale Standalone
- Use your own Python environment, follow the [Standalone quickstart doc](https://starwhale.cn/docs/en/next/getting-started/standalone/).
- Use Google Colab environment, follow the [Jupyter notebook example](https://colab.research.google.com/github/star-whale/starwhale/blob/main/example/notebooks/quickstart-standalone.ipynb).
### 🪆 MNIST Evaluation in Starwhale Server
- Run it in the your private Starwhale Server instance, please read [Server installation(minikube)](https://starwhale.cn/docs/en/next/server/installation/minikube) and [Server quickstart](https://starwhale.cn/docs/en/next/getting-started/server) docs.
- Run it in the [Starwhale Cloud](https://cloud.starwhale.cn), please read [Cloud quickstart doc](https://starwhale.cn/docs/en/next/getting-started/cloud).
## Examples
- 🔥 Helloworld: [Cloud](https://cloud.starwhale.cn/projects/15/evaluations), [Code](https://github.com/star-whale/starwhale/tree/main/example/helloworld).
- 🚀 LLM:
- 🐊 OpenSource LLMs Leaderboard: [Evaluation](https://cloud.starwhale.cn/projects/349/evaluations), [Code](https://github.com/star-whale/starwhale/tree/main/example/llm-leaderboard)
- 🐢 Llama2: [Run llama2 chat in five minutes](https://starwhale.cn/docs/en/blog/run-llama2-chat-in-five-minutes/), [Code](https://github.com/star-whale/starwhale/tree/main/example/LLM/llama2)
- 🦎 Stable Diffusion: [Cloud Demo](https://cloud.starwhale.cn/projects/374/models), [Code](https://github.com/star-whale/stable-diffusion-webui)
- 🦙 LLAMA [evaluation and fine-tune](https://github.com/star-whale/starwhale/tree/main/example/LLM/llama)
- 🎹 Text-to-Music: [Cloud Demo](https://cloud.starwhale.cn/projects/400/overview), [Code](https://github.com/star-whale/starwhale/tree/main/example/LLM/musicgen)
- 🍏 Code Generation: [Cloud Demo](https://cloud.starwhale.cn/projects/404/overview), [Code](https://github.com/star-whale/starwhale/tree/main/example/code-generation/code-llama)
- 🌋 Fine-tuning:
- 🐏 Baichuan2: [Cloud Demo](https://cloud.starwhale.cn/projects/401/overview), [Code](https://github.com/star-whale/starwhale/tree/main/example/llm-finetune/models/baichuan2)
- 🐫 ChatGLM3: [Cloud Demo](https://cloud.starwhale.cn/projects/401/overview), [Code](https://github.com/star-whale/starwhale/tree/main/example/llm-finetune/models/chatglm3)
- 🦏 Stable Diffusion: [Cloud Demo](https://cloud.starwhale.cn/projects/374/spaces/3/fine-tune-runs), [Code](https://github.com/star-whale/starwhale/tree/main/example/stable-diffusion/txt2img-ft)
- 🦦 Image Classification:
- 🐻❄️ MNIST: [Cloud Demo](https://cloud.starwhale.cn/projects/392/evaluations), [Code](https://github.com/star-whale/starwhale/tree/main/example/mnist).
- 🦫 [CIFAR10](https://github.com/star-whale/starwhale/tree/main/example/cifar10)
- 🦓 Vision Transformer(ViT): [Cloud Demo](https://cloud.starwhale.cn/projects/399/overview), [Code](https://github.com/star-whale/starwhale/tree/main/example/image-classification)
- 🐃 Image Segmentation:
- Segment Anything(SAM): [Cloud Demo](https://cloud.starwhale.cn/projects/398/overview), [Code](https://github.com/star-whale/starwhale/tree/main/example/image-segmentation)
- 🐦 Object Detection:
- 🦊 YOLO: [Cloud Demo](https://cloud.starwhale.cn/projects/397/overview), [Code](https://github.com/star-whale/starwhale/tree/main/example/object-detection)
- 🐯 [Pedestrian Detection](https://github.com/star-whale/starwhale/tree/main/example/PennFudanPed)
- 📽️ Video Recognition: [UCF101](https://github.com/star-whale/starwhale/tree/main/example/ucf101)
- 🦋 Machine Translation: [Neural machine translation](https://github.com/star-whale/starwhale/tree/main/example/nmt)
- 🐜 Text Classification: [AG News](https://github.com/star-whale/starwhale/tree/main/example/text_cls_AG_NEWS)
- 🎙️ Speech Recognition: [Speech Command](https://github.com/star-whale/starwhale/tree/main/example/speech_command)
## Documentation, Community, and Support
- Visit [Starwhale HomePage](https://starwhale.ai).
- More information in the [official documentation](https://doc.starwhale.ai).
- For general questions and support, join the [Slack](https://starwhale.slack.com/).
- For bug reports and feature requests, please use [Github Issue](https://github.com/star-whale/starwhale/issues).
- To get community updates, follow [@starwhaleai](https://twitter.com/starwhaleai) on Twitter.
- For Starwhale artifacts, please visit:
- Python Package on [Pypi](https://pypi.org/project/starwhale/).
- Helm Charts on [Artifacthub](https://artifacthub.io/packages/helm/starwhale/starwhale).
- Docker Images on [Docker Hub](https://hub.docker.com/u/starwhaleai), [Github Packages](https://github.com/orgs/star-whale/packages) and [Starwhale Registry](https://docker-registry.starwhale.cn/).
- Additionally, you can always find us at *developer@starwhale.ai*.
## Contributing
🌼👏**PRs are always welcomed** 👍🍺. See [Contribution to Starwhale](https://doc.starwhale.ai/community/contribute) for more details.
## License
Starwhale is licensed under the [Apache License 2.0](https://github.com/star-whale/starwhale/blob/main/LICENSE).
Raw data
{
"_id": null,
"home_page": "https://github.com/star-whale/starwhale",
"name": "starwhale",
"maintainer": null,
"docs_url": null,
"requires_python": "<3.12,>=3.7",
"maintainer_email": null,
"keywords": "MLOps, AI, Starwhale, Model Evaluation",
"author": "Starwhale Team",
"author_email": "developer@starwhale.ai",
"download_url": "https://files.pythonhosted.org/packages/9f/48/9d672554741e030e725fe08bdd23b89e940281d93bb9e1f055faa8cb2bbe/starwhale-0.6.15.tar.gz",
"platform": null,
"description": "<div align=\"center\">\n <img src=\"https://github.com/star-whale/docs/raw/main/static/img/starwhale.png\" width=\"600\" style=\"max-width: 600px;\">\n <h1 align=\"center\" style=\"margin-top: 10px\">An MLOps/LLMOps Platform</h1>\n\n\ud83d\ude80 \ufe0f\u2601\ufe0f [Starwhale Cloud](https://cloud.starwhale.cn) is now open to the public, try it! \ud83c\udf89\ud83c\udf7b\n</div>\n\n<p align=\"center\">\n\n<a href=\"https://pypi.org/project/starwhale/\">\n <img src=\"https://img.shields.io/pypi/v/starwhale?style=flat\">\n</a>\n\n<a href='https://artifacthub.io/packages/helm/starwhale/starwhale'>\n <img src='https://img.shields.io/endpoint?url=https://artifacthub.io/badge/repository/starwhale' alt='Artifact Hub'/>\n</a>\n\n<a href=\"https://pypi.org/project/starwhale/\">\n <img alt=\"PyPI - Python Version\" src=\"https://img.shields.io/pypi/pyversions/starwhale\">\n</a>\n\n<a href=\"https://github.com/star-whale/starwhale/actions/workflows/client.yml\">\n <img src=\"https://github.com/star-whale/starwhale/actions/workflows/client.yml/badge.svg\" alt=\"Client/SDK UT\">\n</a>\n\n<a href=\"https://github.com/star-whale/starwhale/actions/workflows/server-ut-report.yml\">\n <img src=\"https://github.com/star-whale/starwhale/actions/workflows/server-ut-report.yml/badge.svg\" alt=\"Server UT\">\n</a>\n\n<a href=\"https://github.com/star-whale/starwhale/actions/workflows/console.yml\">\n <img src=\"https://github.com/star-whale/starwhale/actions/workflows/console.yml/badge.svg\">\n</a>\n\n<a href=\"https://github.com/star-whale/starwhale/actions/workflows/e2e-test.yml\">\n <img src='https://github.com/star-whale/starwhale/actions/workflows/e2e-test.yml/badge.svg' alt='Starwhale E2E Test'>\n</a>\n\n<a href='https://app.codecov.io/gh/star-whale/starwhale'>\n <img alt=\"Codecov\" src=\"https://img.shields.io/codecov/c/github/star-whale/starwhale?flag=controller&label=Java%20Cov\">\n</a>\n\n<a href=\"https://app.codecov.io/gh/star-whale/starwhale\">\n <img alt=\"Codecov\" src=\"https://img.shields.io/codecov/c/github/star-whale/starwhale?flag=standalone&label=Python%20cov\">\n</a>\n</p>\n\n<h4 align=\"center\">\n <p>\n <b>English</b> |\n <a href=\"https://github.com/star-whale/starwhale/blob/main/README_ZH.md\">\u4e2d\u6587</a>\n <p>\n</h4>\n\n## What is Starwhale\n\nStarwhale is an MLOps/LLMOps platform that brings efficiency and standardization to machine learning operations. It streamlines the model development liftcycle, enabling teams to optimize their workflows around key areas like model building, evaluation, release and fine-tuning.\n\n\n\nStarwhale meets diverse deployment needs with three flexible configurations:\n\n- \ud83d\udc25 **Standalone** - Deployed in a local development environment, managed by the `swcli` command-line tool, meeting development and debugging needs.\n- \ud83e\udd85 **Server** - Deployed in a private data center, relying on a Kubernetes cluster, providing centralized, web-based, and secure services.\n- \ud83e\udd89 **Cloud** - Hosted on a public cloud, with the access address <https://cloud.starwhale.cn>. The Starwhale team is responsible for maintenance, and no installation is required. You can start using it after registering an account.\n\nAs its core, Starwhale abstracts **Model**, **Runtime** and **Dataset** as first-class citizens - providing the fundamentals for streamlined operations. Starwhale further delivers tailored capabilities for common workflow scenarios including:\n\n- \ud83d\udd25 **Models Evaluation** - Implement robust, production-scale evaluations with minimal coding through the Python SDK.\n- \ud83c\udf1f **Live Demo** - Interactively assess model performance through user-friendly web interfaces.\n- \ud83c\udf0a **LLM Fine-tuning** - End-to-end toolchain from efficient fine-tuning to comparative benchmarking and publishing.\n\nStarwhale is also an open source platform, using the [Apache-2.0 license](https://github.com/star-whale/starwhale/blob/main/LICENSE). The Starwhale framework is designed for clarity and ease of use, empowering developers to build customized MLOps features tailored to their needs.\n\n\n\n## Key Concepts\n\n### \ud83d\udc18 Starwhale Dataset\n\nStarwhale Dataset offers efficient data storage, loading, and visualization capabilities, making it a dedicated data management tool tailored for the field of machine learning and deep learning\n\n\n\n```python\nimport torch\nfrom starwhale import dataset, Image\n\n# build dataset for starwhale cloud instance\nwith dataset(\"https://cloud.starwhale.cn/project/starwhale:public/dataset/test-image\", create=\"empty\") as ds:\n for i in range(100):\n ds.append({\"image\": Image(f\"{i}.png\"), \"label\": i})\n ds.commit()\n\n# load dataset\nds = dataset(\"https://cloud.starwhale.cn/project/starwhale:public/dataset/test-image\")\nprint(len(ds))\nprint(ds[0].features.image.to_pil())\nprint(ds[0].features.label)\n\ntorch_ds = ds.to_pytorch()\ntorch_loader = torch.utils.data.DataLoader(torch_ds, batch_size=5)\nprint(next(iter(torch_loader)))\n```\n\n### \ud83d\udc07 Starwhale Model\n\nStarwhale Model is a standard format for packaging machine learning models that can be used for various purposes, like model fine-tuning, model evaluation, and online serving. A Starwhale Model contains the model file, inference codes, configuration files, and any other files required to run the model.\n\n\n\n```bash\n# model build\nswcli model build . --module mnist.evaluate --runtime pytorch/version/v1 --name mnist\n\n# model copy from standalone to cloud\nswcli model cp mnist https://cloud.starwhale.cn/project/starwhale:public\n\n# model run\nswcli model run --uri mnist --runtime pytorch --dataset mnist\nswcli model run --workdir . --module mnist.evaluator --handler mnist.evaluator:MNISTInference.cmp\n```\n\n### \ud83d\udc0c Starwhale Runtime\n\nStarwhale Runtime aims to provide a reproducible and sharable running environment for python programs. You can easily share your working environment with your teammates or outsiders, and vice versa. Furthermore, you can run your programs on Starwhale Server or Starwhale Cloud without bothering with the dependencies.\n\n\n\n```bash\n# build from runtime.yaml, conda env, docker image or shell\nswcli runtime build --yaml runtime.yaml\nswcli runtime build --conda pytorch --name pytorch-runtime --cuda 11.4\nswcli runtime build --docker pytorch/pytorch:1.9.0-cuda11.1-cudnn8-runtime\nswcli runtime build --shell --name pytorch-runtime\n\n# runtime activate\nswcli runtime activate pytorch\n\n# integrated with model and dataset\nswcli model run --uri test --runtime pytorch\nswcli model build . --runtime pytorch\nswcli dataset build --runtime pytorch\n```\n\n### \ud83d\udc04 Starwhale Evaluation\n\nStarwhale Evaluation enables users to evaluate sophisticated, production-ready distributed models by writing just a few lines of code with Starwhale Python SDK.\n\n```python\nimport typing as t\nimport gradio\nfrom starwhale import evaluation\nfrom starwhale.api.service import api\n\ndef model_generate(image):\n ...\n return predict_value, probability_matrix\n\n@evaluation.predict(\n resources={\"nvidia.com/gpu\": 1},\n replicas=4,\n)\ndef predict_image(data: dict, external: dict) -> None:\n return model_generate(data[\"image\"])\n\n@evaluation.evaluate(use_predict_auto_log=True, needs=[predict_image])\ndef evaluate_results(predict_result_iter: t.Iterator):\n for _data in predict_result_iter:\n ...\n evaluation.log_summary({\"accuracy\": 0.95, \"benchmark\": \"test\"})\n\n@api(gradio.File(), gradio.Label())\ndef predict_view(file: t.Any) -> t.Any:\n with open(file.name, \"rb\") as f:\n data = Image(f.read(), shape=(28, 28, 1))\n _, prob = predict_image({\"image\": data})\n return {i: p for i, p in enumerate(prob)}\n```\n\n### \ud83e\udd8d Starwhale Fine-tuning\n\nStarwhale Fine-tuning provides a full workflow for Large Language Model(LLM) tuning, including batch model evaluation, live demo and model release capabilities. Starwhale Fine-tuning Python SDK is very simple.\n\n```python\nimport typing as t\nfrom starwhale import finetune, Dataset\nfrom transformers import Trainer\n\n@finetune(\n resources={\"nvidia.com/gpu\":4, \"memory\": \"32G\"},\n require_train_datasets=True,\n require_validation_datasets=True,\n model_modules=[\"evaluation\", \"finetune\"],\n)\ndef lora_finetune(train_datasets: t.List[Dataset], val_datasets: t.List[Dataset]) -> None:\n # init model and tokenizer\n trainer = Trainer(\n model=model, tokenizer=tokenizer,\n train_dataset=train_datasets[0].to_pytorch(), # convert Starwhale Dataset into Pytorch Dataset\n eval_dataset=val_datasets[0].to_pytorch())\n trainer.train()\n trainer.save_state()\n trainer.save_model()\n # save weights, then Starwhale SDK will package them into Starwhale Model\n```\n\n## Installation\n\n### \ud83c\udf49 Starwhale Standalone\n\nRequirements: Python 3.7~3.11 in the Linux or macOS os.\n\n```bash\npython3 -m pip install starwhale\n```\n\n### \ud83e\udd6d Starwhale Server\n\nStarwhale Server is delivered as a Docker image, which can be run with Docker directly or deployed to a Kubernetes cluster. For the laptop environment, using `swcli server start` command is a appropriate choice that depends on Docker and Docker-Compose.\n\n```bash\nswcli server start\n```\n\n## Quick Tour\n\nWe use [MNIST](https://paperswithcode.com/dataset/mnist) as the hello world example to show the basic Starwhale Model workflow.\n\n### \ud83e\ude85 MNIST Evaluation in Starwhale Standalone\n\n- Use your own Python environment, follow the [Standalone quickstart doc](https://starwhale.cn/docs/en/next/getting-started/standalone/).\n- Use Google Colab environment, follow the [Jupyter notebook example](https://colab.research.google.com/github/star-whale/starwhale/blob/main/example/notebooks/quickstart-standalone.ipynb).\n\n### \ud83e\ude86 MNIST Evaluation in Starwhale Server\n\n- Run it in the your private Starwhale Server instance, please read [Server installation(minikube)](https://starwhale.cn/docs/en/next/server/installation/minikube) and [Server quickstart](https://starwhale.cn/docs/en/next/getting-started/server) docs.\n- Run it in the [Starwhale Cloud](https://cloud.starwhale.cn), please read [Cloud quickstart doc](https://starwhale.cn/docs/en/next/getting-started/cloud).\n\n## Examples\n\n- \ud83d\udd25 Helloworld: [Cloud](https://cloud.starwhale.cn/projects/15/evaluations), [Code](https://github.com/star-whale/starwhale/tree/main/example/helloworld).\n- \ud83d\ude80 LLM:\n - \ud83d\udc0a OpenSource LLMs Leaderboard: [Evaluation](https://cloud.starwhale.cn/projects/349/evaluations), [Code](https://github.com/star-whale/starwhale/tree/main/example/llm-leaderboard)\n - \ud83d\udc22 Llama2: [Run llama2 chat in five minutes](https://starwhale.cn/docs/en/blog/run-llama2-chat-in-five-minutes/), [Code](https://github.com/star-whale/starwhale/tree/main/example/LLM/llama2)\n - \ud83e\udd8e Stable Diffusion: [Cloud Demo](https://cloud.starwhale.cn/projects/374/models), [Code](https://github.com/star-whale/stable-diffusion-webui)\n - \ud83e\udd99 LLAMA [evaluation and fine-tune](https://github.com/star-whale/starwhale/tree/main/example/LLM/llama)\n - \ud83c\udfb9 Text-to-Music: [Cloud Demo](https://cloud.starwhale.cn/projects/400/overview), [Code](https://github.com/star-whale/starwhale/tree/main/example/LLM/musicgen)\n - \ud83c\udf4f Code Generation: [Cloud Demo](https://cloud.starwhale.cn/projects/404/overview), [Code](https://github.com/star-whale/starwhale/tree/main/example/code-generation/code-llama)\n\n- \ud83c\udf0b Fine-tuning:\n - \ud83d\udc0f Baichuan2: [Cloud Demo](https://cloud.starwhale.cn/projects/401/overview), [Code](https://github.com/star-whale/starwhale/tree/main/example/llm-finetune/models/baichuan2)\n - \ud83d\udc2b ChatGLM3: [Cloud Demo](https://cloud.starwhale.cn/projects/401/overview), [Code](https://github.com/star-whale/starwhale/tree/main/example/llm-finetune/models/chatglm3)\n - \ud83e\udd8f Stable Diffusion: [Cloud Demo](https://cloud.starwhale.cn/projects/374/spaces/3/fine-tune-runs), [Code](https://github.com/star-whale/starwhale/tree/main/example/stable-diffusion/txt2img-ft)\n\n- \ud83e\udda6 Image Classification:\n - \ud83d\udc3b\u200d\u2744\ufe0f MNIST: [Cloud Demo](https://cloud.starwhale.cn/projects/392/evaluations), [Code](https://github.com/star-whale/starwhale/tree/main/example/mnist).\n - \ud83e\uddab [CIFAR10](https://github.com/star-whale/starwhale/tree/main/example/cifar10)\n - \ud83e\udd93 Vision Transformer(ViT): [Cloud Demo](https://cloud.starwhale.cn/projects/399/overview), [Code](https://github.com/star-whale/starwhale/tree/main/example/image-classification)\n- \ud83d\udc03 Image Segmentation:\n - Segment Anything(SAM): [Cloud Demo](https://cloud.starwhale.cn/projects/398/overview), [Code](https://github.com/star-whale/starwhale/tree/main/example/image-segmentation)\n- \ud83d\udc26 Object Detection:\n - \ud83e\udd8a YOLO: [Cloud Demo](https://cloud.starwhale.cn/projects/397/overview), [Code](https://github.com/star-whale/starwhale/tree/main/example/object-detection)\n - \ud83d\udc2f [Pedestrian Detection](https://github.com/star-whale/starwhale/tree/main/example/PennFudanPed)\n- \ud83d\udcfd\ufe0f Video Recognition: [UCF101](https://github.com/star-whale/starwhale/tree/main/example/ucf101)\n- \ud83e\udd8b Machine Translation: [Neural machine translation](https://github.com/star-whale/starwhale/tree/main/example/nmt)\n- \ud83d\udc1c Text Classification: [AG News](https://github.com/star-whale/starwhale/tree/main/example/text_cls_AG_NEWS)\n- \ud83c\udf99\ufe0f Speech Recognition: [Speech Command](https://github.com/star-whale/starwhale/tree/main/example/speech_command)\n\n## Documentation, Community, and Support\n\n- Visit [Starwhale HomePage](https://starwhale.ai).\n- More information in the [official documentation](https://doc.starwhale.ai).\n- For general questions and support, join the [Slack](https://starwhale.slack.com/).\n- For bug reports and feature requests, please use [Github Issue](https://github.com/star-whale/starwhale/issues).\n- To get community updates, follow [@starwhaleai](https://twitter.com/starwhaleai) on Twitter.\n- For Starwhale artifacts, please visit:\n\n - Python Package on [Pypi](https://pypi.org/project/starwhale/).\n - Helm Charts on [Artifacthub](https://artifacthub.io/packages/helm/starwhale/starwhale).\n - Docker Images on [Docker Hub](https://hub.docker.com/u/starwhaleai), [Github Packages](https://github.com/orgs/star-whale/packages) and [Starwhale Registry](https://docker-registry.starwhale.cn/).\n\n- Additionally, you can always find us at *developer@starwhale.ai*.\n\n## Contributing\n\n\ud83c\udf3c\ud83d\udc4f**PRs are always welcomed** \ud83d\udc4d\ud83c\udf7a. See [Contribution to Starwhale](https://doc.starwhale.ai/community/contribute) for more details.\n\n## License\n\nStarwhale is licensed under the [Apache License 2.0](https://github.com/star-whale/starwhale/blob/main/LICENSE).\n",
"bugtrack_url": null,
"license": "Apache License 2.0",
"summary": "An MLOps Platform for Model Evaluation",
"version": "0.6.15",
"project_urls": {
"Homepage": "https://github.com/star-whale/starwhale"
},
"split_keywords": [
"mlops",
" ai",
" starwhale",
" model evaluation"
],
"urls": [
{
"comment_text": "",
"digests": {
"blake2b_256": "34bb16b3e8f3d26b65308f4840a578f19a707868f2321b2fc60f805ddb3c2280",
"md5": "6e3303976f46a114d02ea0bcd1481ede",
"sha256": "517e53d68687692061e6ba2e1396aa42549cb789671e720344c9562f432412a4"
},
"downloads": -1,
"filename": "starwhale-0.6.15-py3-none-any.whl",
"has_sig": false,
"md5_digest": "6e3303976f46a114d02ea0bcd1481ede",
"packagetype": "bdist_wheel",
"python_version": "py3",
"requires_python": "<3.12,>=3.7",
"size": 8632402,
"upload_time": "2024-07-25T06:03:00",
"upload_time_iso_8601": "2024-07-25T06:03:00.767102Z",
"url": "https://files.pythonhosted.org/packages/34/bb/16b3e8f3d26b65308f4840a578f19a707868f2321b2fc60f805ddb3c2280/starwhale-0.6.15-py3-none-any.whl",
"yanked": false,
"yanked_reason": null
},
{
"comment_text": "",
"digests": {
"blake2b_256": "9f489d672554741e030e725fe08bdd23b89e940281d93bb9e1f055faa8cb2bbe",
"md5": "a9e474a2084f0098112d4f5d63988589",
"sha256": "21f84e4a175c1b3854b872500db4bbfa9350707fca3c906d8dec0700cab11603"
},
"downloads": -1,
"filename": "starwhale-0.6.15.tar.gz",
"has_sig": false,
"md5_digest": "a9e474a2084f0098112d4f5d63988589",
"packagetype": "sdist",
"python_version": "source",
"requires_python": "<3.12,>=3.7",
"size": 8489213,
"upload_time": "2024-07-25T06:03:05",
"upload_time_iso_8601": "2024-07-25T06:03:05.835463Z",
"url": "https://files.pythonhosted.org/packages/9f/48/9d672554741e030e725fe08bdd23b89e940281d93bb9e1f055faa8cb2bbe/starwhale-0.6.15.tar.gz",
"yanked": false,
"yanked_reason": null
}
],
"upload_time": "2024-07-25 06:03:05",
"github": true,
"gitlab": false,
"bitbucket": false,
"codeberg": false,
"github_user": "star-whale",
"github_project": "starwhale",
"travis_ci": false,
"coveralls": false,
"github_actions": true,
"lcname": "starwhale"
}

