| Name | ubo-app JSON |
| Version |
1.6.0
 JSON
JSON |
| download |
| home_page | None |
| Summary | Ubo main app, running on device initialization. A platform for running other apps. |
| upload_time | 2025-08-24 23:15:48 |
| maintainer | None |
| docs_url | None |
| author | None |
| requires_python | <3.12,>=3.11 |
| license | None |
| keywords |
home assistance
raspberry pi
rpi
ubo
ubo-pod
|
| VCS |
|
| bugtrack_url |
|
| requirements |
No requirements were recorded.
|
| Travis-CI |
No Travis.
|
| coveralls test coverage |
No coveralls.
|
# ☯️ Ubo App
[](https://pypi.python.org/pypi/ubo-app)
[](https://github.com/ubopod/ubo-app/LICENSE)
[](https://pypi.python.org/pypi/ubo-app)
[](https://github.com/ubopod/ubo-app/actions)
[](https://codecov.io/gh/ubopod/ubo-app)
[](https://deepwiki.com/ubopod/ubo_app)
## 📑 Table of Contents
- [🌟 Overview](#🌟-overview)
- [🚧 Disclaimer](#🚧-disclaimer)
- [⚙️ Notable Features](#⚙️-notable-features)
- [📋 Requirements](#📋-requirements)
- [ Installation](#-installation)
- [Pre-packaged image](#pre-packaged-image)
- [Install on existing OS](#install-on-existing-os)
- [🤝 Contributing](#🤝-contributing)
- [ℹ️️ Conventions](#ℹ️️-conventions)
- [Development](#development)
- [🛠️ Hardware](#🛠️-hardware)
- [Emulation](#emulation)
- [Ubo Pod](#ubo-pod)
- [DIY Path](#diy-path)
- [🏗️ Architecture](#🏗️-architecture)
- [📦 Notable dependencies](#📦-notable-dependencies)
- [🗺️ Roadmap](#🗺️-roadmap)
- [🔒 License](#🔒-license)
## 🌟 Overview
Ubo App is a Python application that provides a unified interface and tools for developing and running hardware-integrated apps.
It offers a minimalistic, yet intuitive UI for end-users to install and interact with developer apps. It is optimized for Raspberry Pi (4 & 5) devices.
Hardware specific capabilities such as infrared send/receive, sensing, LED ring, etc. are supported by Ubo Pod hardware.
It is also possible to DIY your own hardware, see the [hardware DIY section](#diy-path) below.
### Goals
The design is centered around the following goals:
- Making hardware-integarted app development easier
- Offer no-code/no-terminal UI/UX optionsto both developers and end-users of their apps
- Give developers tools to build apps with multi-modal UX
- Leverage tight hardware and software co-development to unlock new potentials
- Let users focus on their app logic while Ubo app handles the rest (hardware abstractions, UI, etc.)
- Hot-pluggable services
- Modular and friendly to AI tool-calling
- Remote API access (gRPC)
⚠️ Due to limited development resources, we are not able to support every single board computer (SBC), operating system, and hardware configuration.
If you are willing to supporting other SBCs or operating systems, please consider contributing to the project.
<b>Example GUI screenshots</b>
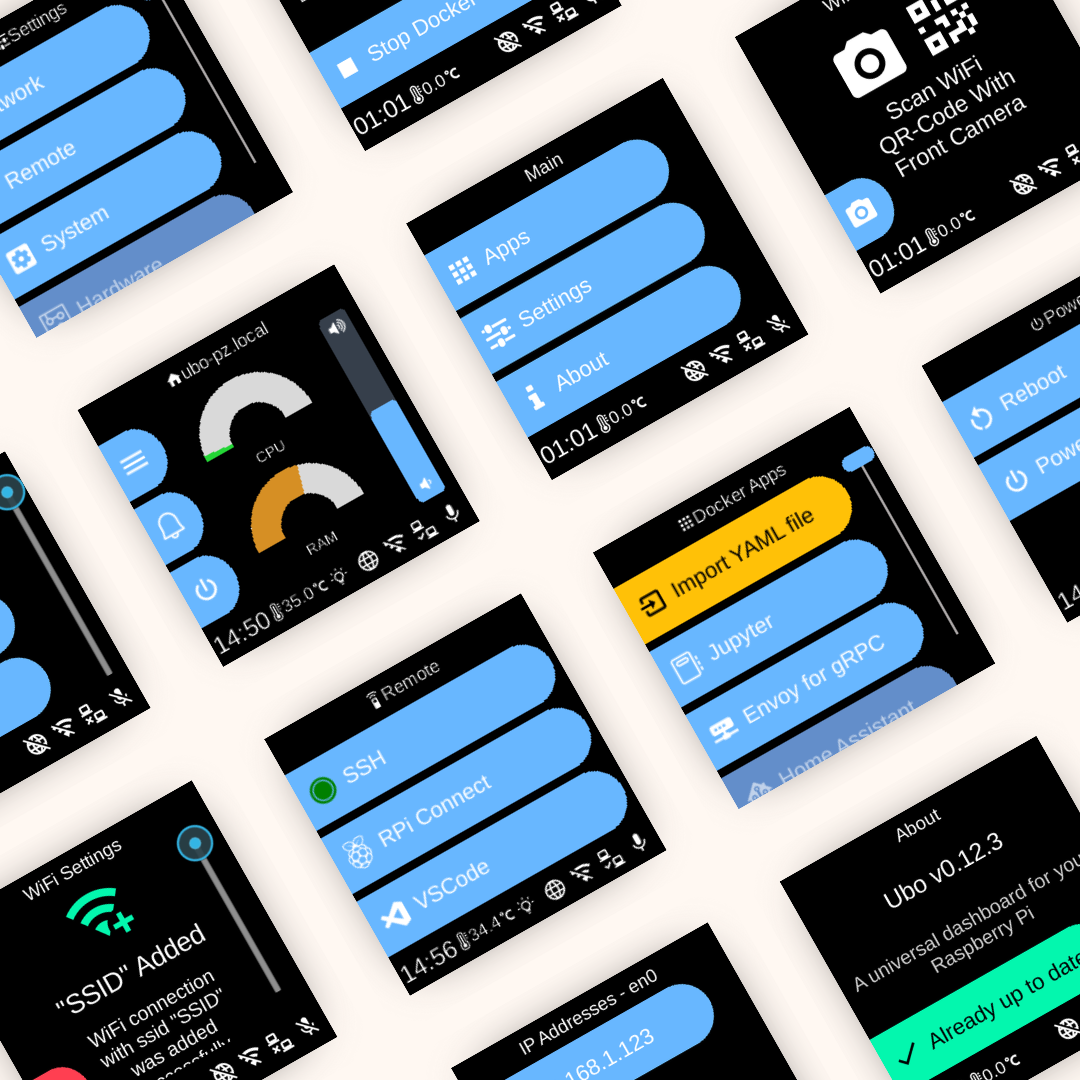)
## 🚧 Disclaimer
Be aware that at the moment, Ubo app sends crash reports to Sentry. Soon we will limit this to beta versions only.
## ⚙️ Notable Features
- Easy WiFi on-boarding with QR code or hotspot
- Headless (no monitor/keyboard) remote access setup
- SSH
- VS Code tunnel
- Raspberry Pi Connect
- Install and run Dockerized apps headlessly
- One-click install for pre-configured apps
- Access and control basic Linux utilities and settings
- User management
- Network management
- File system operations
- Natural language interactions for tool calling (voice AI) (experimental)
- Web UI
- Infrared remote control (send/receive)
- gRPC API for remote control - find sample clients [here](https://github.com/ubopod/ubo-grpc-clients)
Check [roadmap section](#🗺️-roadmap) below for upcoming features.
## 📋 Requirements
At minimum you need a Raspberry Pi 4 or 5 to run Ubo App.
To run LLM models locally, we recommend a Raspberry Pi 5 with at least 8GB of RAM.
For features that require add-on hardware that is not natively supported by Raspberry Pi (such as audio, infrared rx/tx, sensors, etc), you can:
1. Purchase an Ubo Pod Development Kit
2. DIY the hardware
3. Use only subset of hardware features emulated in the browser
For more details check out the [hardware section](#🛠️-hardware) below.
🙏 Please consider supporting this project by pre-ordering an Ubo Pod Dev Edition on [Kickstarter](https://www.kickstarter.com/projects/ubopod/ubo-pod-dev-edition).
The sales proceeds from the hardware will be used to support continued development and maintenance of Ubo App and its open source dependencies.
<b> Note </b>:
The app still functions even if some special hardware elements (audio, infrared rx/tx, sensors, etc) are not provided. The features that rely on these hardware components just won't function. For example, WiFi onboarding with QR code requires a camera onboard.
## Installation
### Pre-packaged image
Ubo Pod ships with a pre-flashed MicroSD card that has the app installed on it by default.
If you don't have it, or you just want to set up a fresh device, then:
1. Download one of the images from the release section
1. Use Raspberry Pi Images and choose `custom image` to provide the download image file.
1. Write to the image
1. Use the image to boot your Ubo Pod or Raspberry Pi
This is the fastest, easiest, and recommended way to get started with Ubo App.
🙋♂️If this is the first time you are flashing an image for Raspberry Pi, I recommend following the more detailed steps [here](https://github.com/ubopod/ubo-image).
To run the app on bare Raspberry Pi, you can watch this short [demo video](https://www.youtube.com/watch?v=Rro3YLVIUx4).
### Install on existing OS
If you want to install the image on an existing operating system, then read on. Otherwise, skip this section.
---
⚠️ **Executing scripts directly from the internet with root privileges poses a significant security risk. It's generally a good practice to ensure you understand the script's content before running it. You can check the content of this particular script [here](https://raw.githubusercontent.com/ubopod/ubo-app/main/ubo_app/system/install.sh) before running it.**
---
To install ubo, run this command in a terminal shell:
```bash
curl -sSL https://raw.githubusercontent.com/ubopod/ubo-app/main/ubo_app/system/scripts/install.sh | sudo bash
```
If you don't want to install docker service you can set the `WITH_DOCKER` environment variable to `false`:
```bash
curl -sSL https://raw.githubusercontent.com/ubopod/ubo-app/main/ubo_app/system/scripts/install.sh | sudo WITHOUT_DOCKER=true bash
```
To install a specific version of ubo, you can set the `TARGET_VERSION` environment variable to the desired version:
```bash
curl -sSL https://raw.githubusercontent.com/ubopod/ubo-app/main/ubo_app/system/scripts/install.sh | sudo TARGET_VERSION=0.0.1 bash
```
Note that as part of the installation process, these debian packages are installed:
- accountsservice
- dhcpcd
- dnsmasq
- git
- hostapd
- i2c-tools
- ir-keytable
- libasound2-dev
- libcap-dev
- libegl1
- libgl1
- libmtdev1
- libzbar0
- python3-alsaaudio
- python3-apt
- python3-dev
- python3-gpiozero
- python3-libcamera
- python3-picamera2
- python3-pip
- python3-virtualenv
- rpi-lgpio
Also be aware that ubo-app only installs in `/opt/ubo` and it is not customizable
at the moment.
## 🤝 Contributing
Contributions following Python best practices are welcome.
### ℹ️️ Conventions
- Use `UBO_` prefix for environment variables.
- Use `ubo:` prefix for notification ids used in ubo core and `<service_name>:` prefix for notification ids used in services.
- Use `ubo:` prefix for icon ids used in ubo core and `<service_name>:` prefix for icon ids used in services.
### Development
#### Setting up the development environment
To set up the development environment, you need to [have `uv` installed](https://docs.astral.sh/uv/).
First, clone the repository (you need to have [git-lfs installed](https://docs.github.com/en/repositories/working-with-files/managing-large-files/installing-git-large-file-storage)):
```bash
git clone https://github.com/ubopod/ubo_app.git
git lfs install
git lfs pull
```
In environments where some python packages are installed system-wide, like Raspberry Pi OS, you need to run the following command to create a virtual environment with system site packages enabled:
```bash
uv venv --system-site-packages
```
Then, navigate to the project directory and install the dependencies:
```bash
uv sync --dev
```
Now you can run the app with:
```bash
HEADLESS_KIVY_DEBUG=true uv run ubo
```
#### Run the app on the physical device
Add `ubo-development-pod` host in your ssh config at `~/.ssh/config`:
```plaintext
Host ubo-development-pod
HostName <ubopod IP here>
User pi
```
⚠️*Note: You may want to add the ssh public key to the device's authorized keys (`~/.ssh/authorized_keys`) so that you don't need to enter the password each time you ssh into the device. If you decide to use password instead, you need to reset the password for Pi user first using the GUI on the device by going to Hamburger Menu -> Settings -> System -> Users and select pi user*
Before you deploy the code onto the pod, you have to run the following command to generate the protobuf files and compile the web application.
##### Generating the protobuf files
Please make sure you have [buf](https://github.com/bufbuild/buf) library installed locally. If you are developing on a Mac or Linux, you can install it using Homebrew:
```bash
brew install bufbuild/buf/buf
```
Then, run the following command to generate the protobuf files whenever an action or
```bash
uv run poe proto
```
This is a shortcut for running the following commands:
```bash
uv run poe proto:generate # generate the protobuf files based on the actions/events defined in python files
uv run poe proto:compile # compile the protobuf files to python files
```
##### Building the web application
If you are running it for the firt time, you first need to install the dependencies for the web application:
```bash
cd ubo_app/services/090-web-ui/web-app
npm install # Only needed the first time or when dependencies change
```
Then, you need to compile the protobuf files and build the web application:
```bash
cd ubo_app/services/090-web-ui/web-app
npm run proto:compile
npm run build
```
If you are modifying web-app typescript files, run `npm run build:watch` and let it stay running in a terminal. This way, whenever you modify web-app files, it will automatically update the built files in `dist` directory as long as it’s running.
If you ever add, modify or remove an action or an event you need to run `poe proto` and `npm run proto:compile` again manually.
---
Then you need to run this command once to set up the pod for development:
```bash
uv run poe device:deploy:complete
```
After that, you can deploy the app to the device with:
```bash
uv run poe device:deploy
```
To run the app on the device, you can use either of these commands:
```bash
uv run poe device:deploy:restart # gracefully restart the app with systemctl
uv run poe device:deploy:kill # kill the process, which will be restarted by systemd if the service is not stopped
```
#### Running tests on desktop
Easiest way to run tests is to use the provided `Dockerfile`s. To run the tests in a container, you first need to create the development images by running:
```bash
uv run poe build-docker-images
```
Then you can run the tests with:
```bash
docker run --rm -it --name ubo-app-test -v .:/ubo-app -v ubo-app-dev-uv-cache:/root/.cache/uv ubo-app-test
```
You can add arguments to the `pytest` command to run specific tests like this:
```bash
docker run --rm -it --name ubo-app-test -v .:/ubo-app -v ubo-app-dev-uv-cache:/root/.cache/uv ubo-app-test -- <pytest-args>
```
For example, to run only the tests in the `tests/integration/test_core.py` file, you can run:
```bash
docker run --rm -it -v .:/ubo-app -v ubo-app-dev-uv-cache:/root/.cache/uv -v uvo-app-dev-uv-local:/root/.local/share/uv -v ubo-app-dev-uv-venv:/ubo-app/.venv ubo-app-test
```
To pass it command line options add a double-dash before the options:
```bash
docker run --rm -it -v .:/ubo-app -v ubo-app-dev-uv-cache:/root/.cache/uv -v uvo-app-dev-uv-local:/root/.local/share/uv -v ubo-app-dev-uv-venv:/ubo-app/.venv ubo-app-test -- -svv --make-screenshots --override-store-snapshots --override-window-snapshots
```
You can also run the tests in your local environment by running:
```bash
uv run poe test
```
⚠️**Note:** When running the tests in your local environment, the window snapshots produced by tests may mismatch the expected snapshots. This is because the snapshots are taken with a certain DPI and some environments may have different DPI settings. For example, we are aware that the snapshots taken in macOS have different DPI settings. If you encounter this issue, you should run the tests in a Docker container as described above.
#### Running tests on the device
You need to install dependencies with following commands once:
```bash
uv run poe device:test:copy
uv run poe device:test:deps
```
Then you can use the following command each time you want to run the tests:
```bash
uv run poe device:test
```
#### Running linter
To run the linter run the following command:
```bash
uv run poe lint
```
To automatically fix the linting issues run:
```bash
uv run poe lint --fix
```
#### Running type checker
To run the type checker run the following command on the pod:
```bash
uv run poe typecheck
```
⚠️*Note: Please note typecheck needs all packages to be present. To run the above command on the pod, you need to clone the ubo-app repository on the pod, apply your changes on it, have uv installed on the pod and install the dependencies.*
If you prefer to run typecheck on the local machine, clone [stubs repository](https://github.com/ubopod/ubo-non-rpi-stubs) (which includes typing stubs for third-party packages) and place the files under `typings` directory. Then run `poe typecheck` command.
#### Adding new services
It is not documented at the moment, but you can see examples in `ubo_app/services` directory.
⚠️*Note: To make sure your async tasks are running in your service's event loop and not in the main event loop, you should use the `create_task` function imported from `ubo_app.utils.async_` to create a new task. Using `await` inside `async` functions is always fine and doesn't need any special attention.*
⚠️*Note: Your service's setup function, if async, should finish at some point, this is needed so that ubo can know the service has finished its initialization and ready to be used. So it should not run forever, by having a loop at the end, or awaiting an ongoing async function or similar patterns. Running a never-ending async function using `create_task` imported from `ubo_app.utils.async_` is alright.
#### QR code
In development environment, the camera is probably not working, as it is relying on `picamera2`, so it may become challenging to test the flows relying on QR code input.
To address this, the camera module, in not-RPi environments, will try reading from `/tmp/qrcode_input.txt` and `/tmp/qrcode_input.png` too. So, whenever you encounter a QR code input, you can write the content of the QR code in the text file path or put the qrcode image itself in the image file path and the application will read it from there and continue the flow.
Alternatively you may be able to provide the input in the web-ui (needs refresh at the moment) or provide it by `InputProvideAction` in grpc channel.
## 🛠️ Hardware
This section presents different hardware or emulation options that you can use with Ubo app.
### Emulation
To remove barriers to adoption as much as possible and allow developers use Ubo app without hardware depenencies, we are currently emulating the physical GUI in the browser.
The audio playback is also streamed through the broswer.
We plan to emulate camera and microphone with WebRTC in the future.
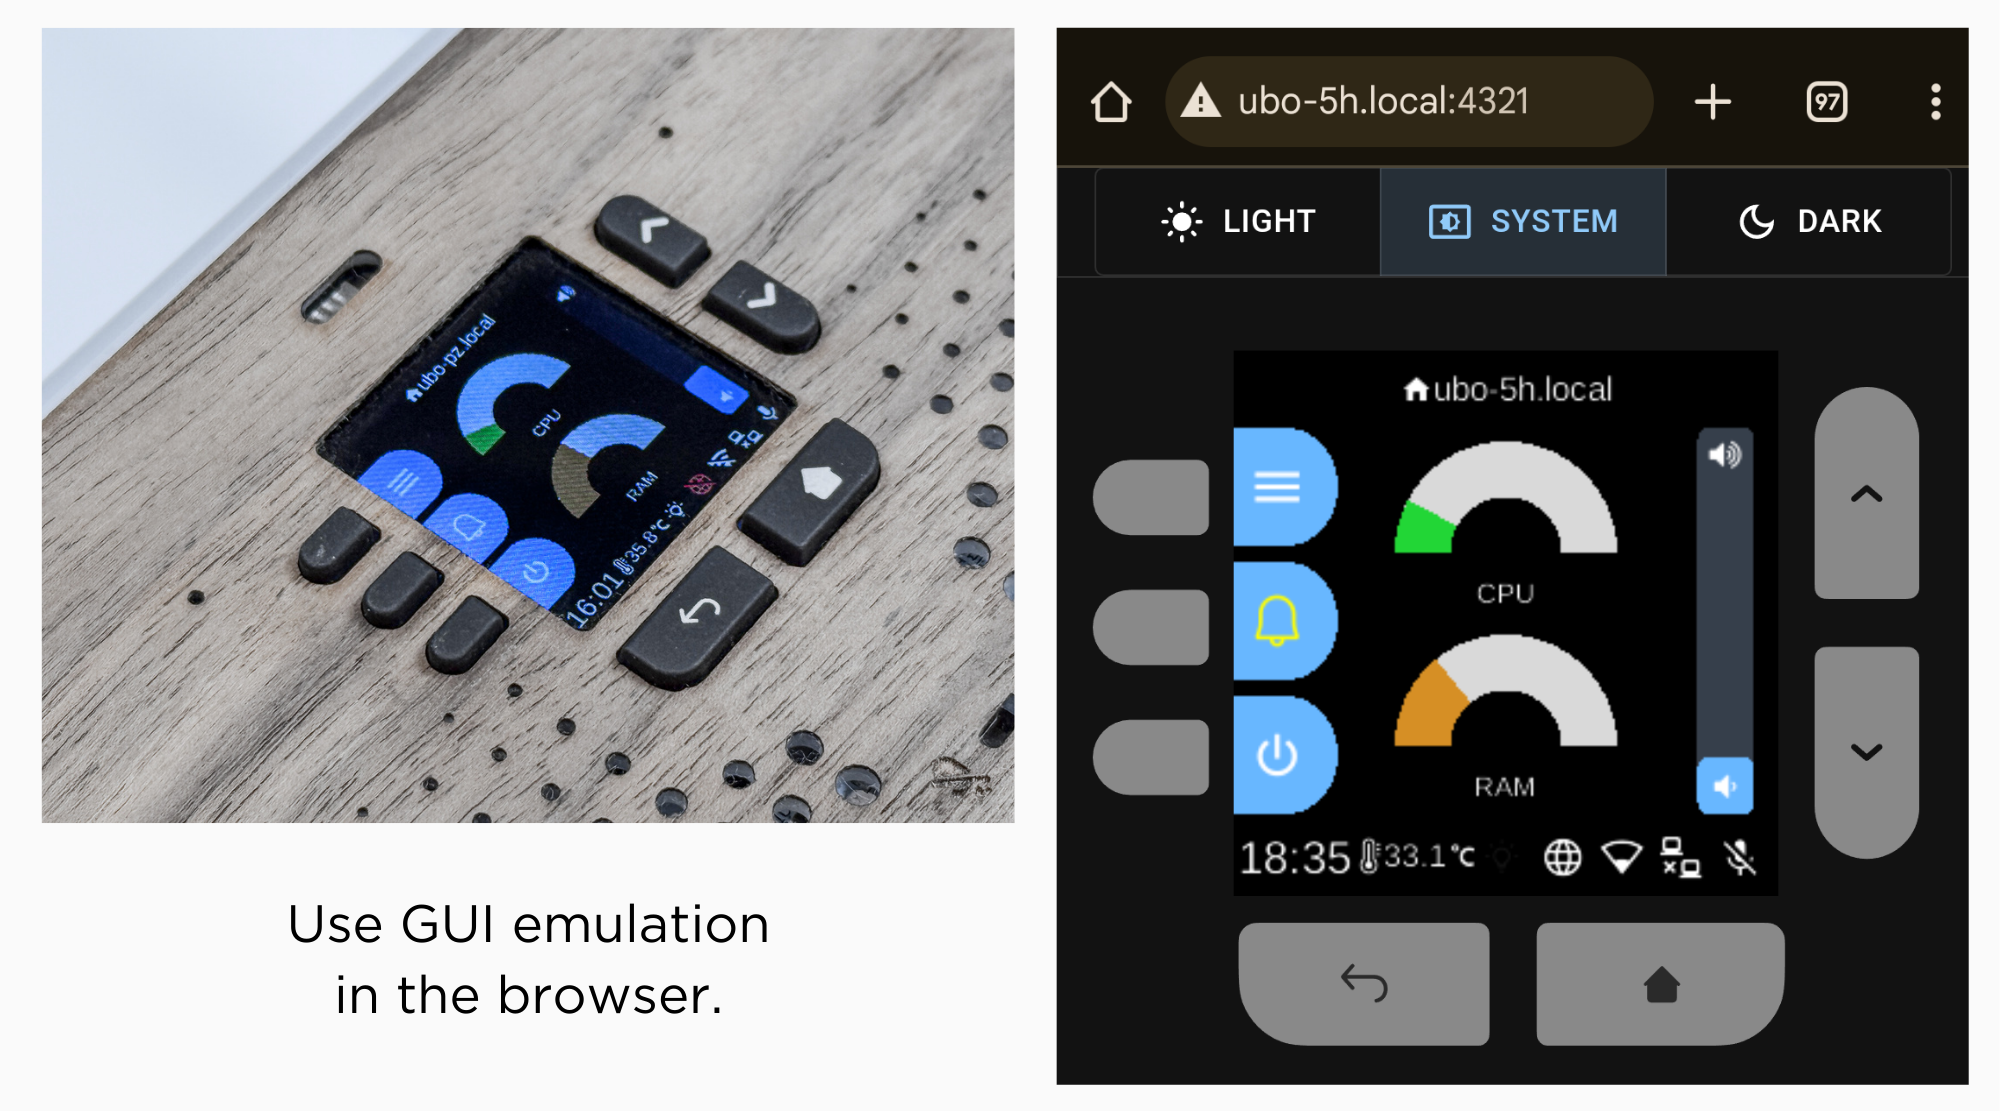
However, other specialized hardware components (sensors, infrared rx/tx, etc) cannot be emulated.
### Ubo Pod
Ubo pod is an open hardware that includes the following additional hardware capabilities that is supported by Ubo app out of the box:
- A built-in minimal GUI (color LCD display and keypad)
- Stereo microphone and speakers (2W)
- Camera (5MP)
- LED ring (27 addressable RGB LEDs)
- Sensors
- Ambient light sensor
- Temperature sensor
- STEMMA QT / Qwiic connector for additional sensors
- Infrared
- Receiver (wideband)
- Transmitter (4 high power LEDs)
- 2 full HDMI ports
- Power/reset button
- NVMe storage (Pi 5 only)
For more information on hardware spec, see the website [getubo.com](https://getubo.com).
This is an open hardware. You can access mechanical design files [here](https://github.com/ubopod/ubo-mechanical) and electrical design files [here](https://github.com/ubopod/ubo-pcb).
### DIY path
You can also buy different HATs from different vendors to DIY the hardware. Future plans include supporting USB microphone, speakers, cameras as well with headless setup.
This however involves having to purchase multiple HATs from different vendors and the process may not be the easiest and most frictionless. You may have to dig into the code and make some small changes to certain setups and configurations.
I made the table below that shows options for audio, cameras, and other sub-components:
| Function | Options |
| --- | --- |
| Audio | [Respeaker 2-Mic Audio HAT](https://www.seeedstudio.com/ReSpeaker-2-Mics-Pi-HAT.html), [Adafruit Voice Bonnet](https://www.adafruit.com/product/4757), [Waveshare WM8960 Hat](https://www.waveshare.com/wm8960-audio-hat.htm), [Adafruit BrainCraft HAT](https://www.adafruit.com/product/4374) |
| Speakers | [1 or 2W, 8 Ohm](https://www.adafruit.com/product/1669) |
| Camera | Raspberry Pi Camera Modules V1.3, [V2](https://www.raspberrypi.com/products/camera-module-v2/), or [V3](https://www.raspberrypi.com/products/camera-module-3/) |
| LCD (also emulated in the browser) | [240x240 TFT Display](https://www.adafruit.com/product/4421), [Adafruit BrainCraft HAT](https://www.adafruit.com/product/4374) |
| Keypad | [AW9523 GPIO Expander](https://www.adafruit.com/product/4886) |
| LED ring | [Neopixel LED ring](https://www.adafruit.com/product/1586) |
| Ambient Light Sensor | [VEML7700 Lux Sensor](https://www.adafruit.com/product/4162) |
| Temperature Sensor | [PCT2075 Temperature Sensor](https://www.adafruit.com/product/4369) |
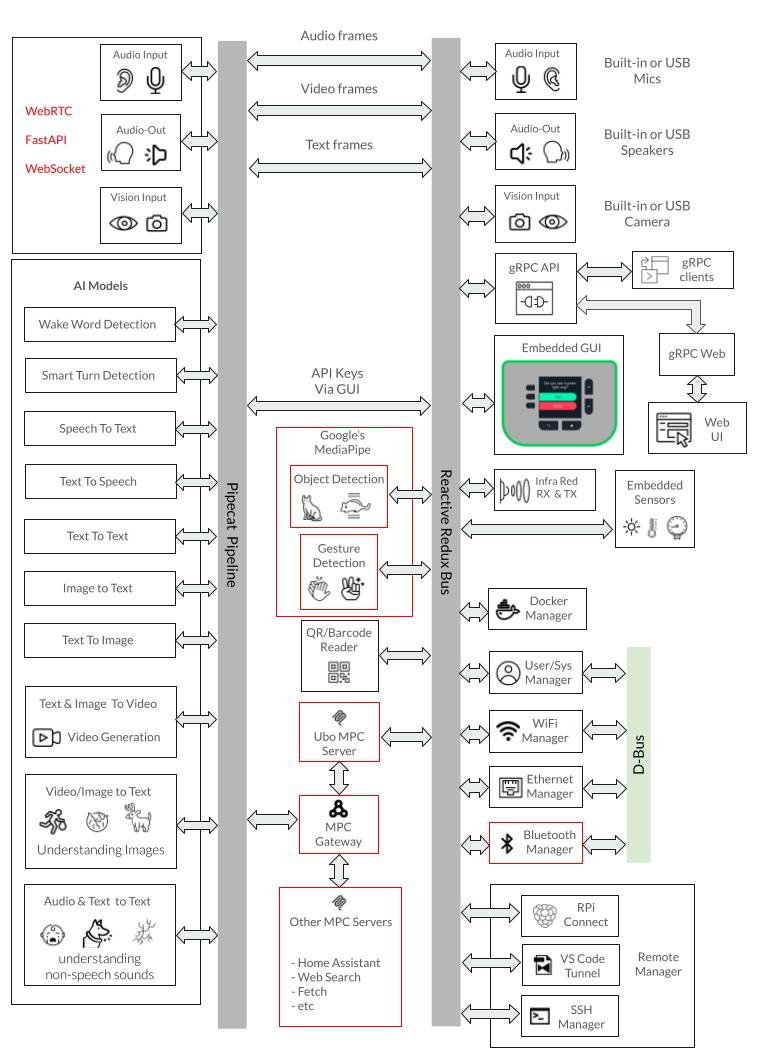
## 🏗️ Architecture
The architecture is fundamentally event-driven and reactive, built around a centralized Redux store that coordinates all system interactions through immutable state updates and event dispatching.
Services communicate exclusively through Redux actions and events rather than direct method calls, with each service running in its own isolated thread while subscribing to relevant state changes and events.
The system uses custom event handlers that automatically route events to the appropriate service threads, enabling reactive responses to state changes across hardware interfaces, user interactions, and system events.
This reactive architecture allows components like the web UI to subscribe to display render events and audio playback events in real-time, creating a responsive system where changes propagate automatically through the event stream without tight coupling between components.
The following is a summary of key architecture components.
- <b>Redux-Based State Management</b>: Central `UboStore` manages all application state through immutable state trees, with each service contributing its own state slice (audio, camera, display, docker, wifi, etc.) and communicating via actions and events.
- <b>Modular Service Architecture</b>: 21+ core services run in isolated threads with dedicated event loops, organized by priority (`000-0xx` for hardware, `030-0xx` for networking, `080-0xx` for applications, `090-0xx` for UI), each with their own setup.py, reducer.py, and ubo_handle.py files.
- <b>Hardware Abstraction Layer</b>: Comprehensive abstraction for Raspberry Pi components (ST7789 LCD, WM8960 audio, GPIO keypad, sensors, camera, RGB ring) with automatic environment detection and mock implementations for development on non-RPi systems.
- <b>Multi-Interface Access</b>: Supports web browser access (port 4321), gRPC API (port 50051), SSH access, and direct hardware interaction, with a web UI service providing hotspot configuration and dashboard functionality.
- <b>System Integration</b>: Integrates with `systemd` and `d-bus` for service management, Docker for container runtime, and `NetworkManager` for network configuration, with a separate system manager process handling root-privilege operations via Unix sockets.
<b>Notes:</b>
The application follows a structured initialization sequence through `ubo_app/main.py` and uses the `uv` package manager for dependency management.
The architecture supports both production deployment on Raspberry Pi devices and development environments with comprehensive mocking systems, making it suitable for cross-platform development while maintaining hardware-specific capabilities.
DeepWiki pages you might want to explore:
- [Overview](https://deepwiki.com/ubopod/ubo_app/1-overview)
- [Architecture](https://deepwiki.com/ubopod/ubo_app/2-architecture)
## Notable dependencies
Here are the key dependencies organized by category:
### Core Framework & State Management
- `python-redux`: Redux-based state management system for the entire app
- `ubo-gui`: Custom GUI framework built on Kivy for the user interface
- `headless-kivy`: Headless Kivy implementation for supporting LCD display over SPI
### Hardware Control (Raspberry Pi)
- `adafruit-circuitpython-rgb-display`: ST7789 LCD display driver
- `adafruit-circuitpython-neopixel`: RGB LED ring control
- `adafruit-circuitpython-aw9523`: I2C GPIO expander for keypad
- `adafruit-circuitpython-pct2075`: Temperature sensor driver
- `adafruit-circuitpython-veml7700`: Light sensor driver
- `rpi-lgpio`: Low-level GPIO access for Raspberry Pi
- `gpiozero`: GPIO abstraction layer
- `rpi-ws281x`: WS281x LED strip control library
- `pyalsaaudio`: ALSA audio interface for Linux audio control
- `pulsectl`: PulseAudio control for audio management
- `simpleaudio`: Simple audio playback functionality
### Voice AI
- `piper-tts`: Text-to-speech synthesis engine
- `vosk`: Speech recognition library
- `pvorca`: Picovoice Text-to-speech synthesis engine
- `pipecat-ai`: framework for building real-time voice and multimodal conversational agents
### Networking & Services
- `aiohttp`: Async HTTP client/server for web services
- `quart`: Async web framework for the web UI service
- `sdbus-networkmanager`: NetworkManager D-Bus interface for WiFi
- `netifaces`: Network interface enumeration
- `docker`: Docker API client for container management
### QR Codes
- `pyzbar`: QR code and barcode scanning library
### System Utilities
- `psutil`: System and process monitoring utilities
- `platformdirs`: Platform-specific directory paths
- `tenacity`: Retry logic and error handling
- `fasteners`: File locking and synchronization
### Development Environment Abstraction
- `python-fake`: Mock hardware components for development
### gRPC Communication
- `betterproto`: Protocol buffer compiler and runtime
<b>Notes:</b>
The project uses platform-specific dependencies with markers like `platform_machine=='aarch64'` for Raspberry Pi-specific libraries and `sys_platform=='linux'` for Linux-only components. The python-fake library enables development on non-Raspberry Pi systems by providing mock implementations of hardware components.
## 🗺️ Roadmap
This is a tentative roadmap for future features. It is subject to change.
- Emulation for camera and microphone inside browser (requires SSL certificate for browser permissions)
- Allow users to pick their soundcard for play and record via GUI (e.g. USB audio)
- Allow users to pick their camera for video via GUI (e.g. USB camera)
- Option to turn Ubo pod into a voice satellite with wyoming protocol with Home Assistant
- Make all on-board sensors and infrared discoverable and accessible by Home Assistant
- Let users record Infrared signals and assign them to trigger custom actions
- Expose `pipecat-ai` preset pipeline configuration via GUI
- Support for Debian Trixie (13)
If you have any suggestions or feature requests, please open a discussion [here](https://github.com/ubopod/ubo_app/discussions).
## 🔒 License
This project is released under the Apache-2.0 License. See the [LICENSE](./LICENSE) file for more details.
Raw data
{
"_id": null,
"home_page": null,
"name": "ubo-app",
"maintainer": null,
"docs_url": null,
"requires_python": "<3.12,>=3.11",
"maintainer_email": "Sassan Haradji <me@sassanh.com>",
"keywords": "home assistance, raspberry pi, rpi, ubo, ubo-pod",
"author": null,
"author_email": "Sassan Haradji <me@sassanh.com>",
"download_url": "https://files.pythonhosted.org/packages/c4/e8/ff0e5b3f8bdefb77dbdd46fbe6ffdbc5779435c6da7f9a2a6af39c264783/ubo_app-1.6.0.tar.gz",
"platform": null,
"description": "# \u262f\ufe0f Ubo App\n\n[](https://pypi.python.org/pypi/ubo-app)\n[](https://github.com/ubopod/ubo-app/LICENSE)\n[](https://pypi.python.org/pypi/ubo-app)\n[](https://github.com/ubopod/ubo-app/actions)\n[](https://codecov.io/gh/ubopod/ubo-app)\n[](https://deepwiki.com/ubopod/ubo_app)\n\n## \ud83d\udcd1 Table of Contents\n\n- [\ud83c\udf1f Overview](#\ud83c\udf1f-overview)\n- [\ud83d\udea7 Disclaimer](#\ud83d\udea7-disclaimer)\n- [\u2699\ufe0f Notable Features](#\u2699\ufe0f-notable-features)\n- [\ud83d\udccb Requirements](#\ud83d\udccb-requirements)\n- [\ud83e\ude8f Installation](#\ud83e\ude8f-installation)\n - [Pre-packaged image](#pre-packaged-image)\n - [Install on existing OS](#install-on-existing-os)\n- [\ud83e\udd1d Contributing](#\ud83e\udd1d-contributing)\n - [\u2139\ufe0f\ufe0f Conventions](#\u2139\ufe0f\ufe0f-conventions)\n - [Development](#development)\n- [\ud83d\udee0\ufe0f Hardware](#\ud83d\udee0\ufe0f-hardware)\n - [Emulation](#emulation)\n - [Ubo Pod](#ubo-pod)\n - [DIY Path](#diy-path)\n- [\ud83c\udfd7\ufe0f Architecture](#\ud83c\udfd7\ufe0f-architecture)\n- [\ud83d\udce6 Notable dependencies](#\ud83d\udce6-notable-dependencies)\n- [\ud83d\uddfa\ufe0f Roadmap](#\ud83d\uddfa\ufe0f-roadmap)\n- [\ud83d\udd12 License](#\ud83d\udd12-license)\n\n## \ud83c\udf1f Overview\n\nUbo App is a Python application that provides a unified interface and tools for developing and running hardware-integrated apps. \n\nIt offers a minimalistic, yet intuitive UI for end-users to install and interact with developer apps. It is optimized for Raspberry Pi (4 & 5) devices. \n\nHardware specific capabilities such as infrared send/receive, sensing, LED ring, etc. are supported by Ubo Pod hardware. \n\nIt is also possible to DIY your own hardware, see the [hardware DIY section](#diy-path) below.\n\n### Goals\n\nThe design is centered around the following goals:\n\n - Making hardware-integarted app development easier \n - Offer no-code/no-terminal UI/UX optionsto both developers and end-users of their apps\n - Give developers tools to build apps with multi-modal UX\n - Leverage tight hardware and software co-development to unlock new potentials\n - Let users focus on their app logic while Ubo app handles the rest (hardware abstractions, UI, etc.)\n - Hot-pluggable services\n - Modular and friendly to AI tool-calling\n - Remote API access (gRPC)\n\n\u26a0\ufe0f Due to limited development resources, we are not able to support every single board computer (SBC), operating system, and hardware configuration. \n\nIf you are willing to supporting other SBCs or operating systems, please consider contributing to the project.\n\n<b>Example GUI screenshots</b>\n\n)\n\n## \ud83d\udea7 Disclaimer\n\nBe aware that at the moment, Ubo app sends crash reports to Sentry. Soon we will limit this to beta versions only.\n\n## \u2699\ufe0f Notable Features\n\n- Easy WiFi on-boarding with QR code or hotspot \n- Headless (no monitor/keyboard) remote access setup \n - SSH\n - VS Code tunnel\n - Raspberry Pi Connect\n- Install and run Dockerized apps headlessly\n- One-click install for pre-configured apps\n- Access and control basic Linux utilities and settings\n - User management\n - Network management\n - File system operations\n- Natural language interactions for tool calling (voice AI) (experimental)\n- Web UI\n- Infrared remote control (send/receive)\n- gRPC API for remote control - find sample clients [here](https://github.com/ubopod/ubo-grpc-clients)\n\nCheck [roadmap section](#\ud83d\uddfa\ufe0f-roadmap) below for upcoming features.\n\n## \ud83d\udccb Requirements\n\nAt minimum you need a Raspberry Pi 4 or 5 to run Ubo App. \n\nTo run LLM models locally, we recommend a Raspberry Pi 5 with at least 8GB of RAM.\n\nFor features that require add-on hardware that is not natively supported by Raspberry Pi (such as audio, infrared rx/tx, sensors, etc), you can:\n\n1. Purchase an Ubo Pod Development Kit \n2. DIY the hardware\n3. Use only subset of hardware features emulated in the browser\n\nFor more details check out the [hardware section](#\ud83d\udee0\ufe0f-hardware) below.\n\n\ud83d\ude4f Please consider supporting this project by pre-ordering an Ubo Pod Dev Edition on [Kickstarter](https://www.kickstarter.com/projects/ubopod/ubo-pod-dev-edition). \n\nThe sales proceeds from the hardware will be used to support continued development and maintenance of Ubo App and its open source dependencies.\n\n<b> Note </b>: \nThe app still functions even if some special hardware elements (audio, infrared rx/tx, sensors, etc) are not provided. The features that rely on these hardware components just won't function. For example, WiFi onboarding with QR code requires a camera onboard. \n\n## \ud83e\ude8f Installation\n\n### Pre-packaged image\n\nUbo Pod ships with a pre-flashed MicroSD card that has the app installed on it by default.\n\nIf you don't have it, or you just want to set up a fresh device, then:\n\n1. Download one of the images from the release section\n1. Use Raspberry Pi Images and choose `custom image` to provide the download image file.\n1. Write to the image\n1. Use the image to boot your Ubo Pod or Raspberry Pi\n\nThis is the fastest, easiest, and recommended way to get started with Ubo App. \n\n\ud83d\ude4b\u200d\u2642\ufe0fIf this is the first time you are flashing an image for Raspberry Pi, I recommend following the more detailed steps [here](https://github.com/ubopod/ubo-image).\n\nTo run the app on bare Raspberry Pi, you can watch this short [demo video](https://www.youtube.com/watch?v=Rro3YLVIUx4).\n\n### Install on existing OS\n\nIf you want to install the image on an existing operating system, then read on. Otherwise, skip this section.\n\n---\n\n\u26a0\ufe0f **Executing scripts directly from the internet with root privileges poses a significant security risk. It's generally a good practice to ensure you understand the script's content before running it. You can check the content of this particular script [here](https://raw.githubusercontent.com/ubopod/ubo-app/main/ubo_app/system/install.sh) before running it.**\n\n---\n\nTo install ubo, run this command in a terminal shell:\n\n```bash\ncurl -sSL https://raw.githubusercontent.com/ubopod/ubo-app/main/ubo_app/system/scripts/install.sh | sudo bash\n```\n\nIf you don't want to install docker service you can set the `WITH_DOCKER` environment variable to `false`:\n\n```bash\ncurl -sSL https://raw.githubusercontent.com/ubopod/ubo-app/main/ubo_app/system/scripts/install.sh | sudo WITHOUT_DOCKER=true bash\n```\n\nTo install a specific version of ubo, you can set the `TARGET_VERSION` environment variable to the desired version:\n\n```bash\ncurl -sSL https://raw.githubusercontent.com/ubopod/ubo-app/main/ubo_app/system/scripts/install.sh | sudo TARGET_VERSION=0.0.1 bash\n```\n\nNote that as part of the installation process, these debian packages are installed:\n\n- accountsservice\n- dhcpcd\n- dnsmasq\n- git\n- hostapd\n- i2c-tools\n- ir-keytable\n- libasound2-dev\n- libcap-dev\n- libegl1\n- libgl1\n- libmtdev1\n- libzbar0\n- python3-alsaaudio\n- python3-apt\n- python3-dev\n- python3-gpiozero\n- python3-libcamera\n- python3-picamera2\n- python3-pip\n- python3-virtualenv\n- rpi-lgpio\n\nAlso be aware that ubo-app only installs in `/opt/ubo` and it is not customizable\nat the moment.\n\n## \ud83e\udd1d Contributing\n\nContributions following Python best practices are welcome.\n\n### \u2139\ufe0f\ufe0f Conventions\n\n- Use `UBO_` prefix for environment variables.\n- Use `ubo:` prefix for notification ids used in ubo core and `<service_name>:` prefix for notification ids used in services.\n- Use `ubo:` prefix for icon ids used in ubo core and `<service_name>:` prefix for icon ids used in services.\n\n### Development\n\n#### Setting up the development environment\n\nTo set up the development environment, you need to [have `uv` installed](https://docs.astral.sh/uv/).\n\nFirst, clone the repository (you need to have [git-lfs installed](https://docs.github.com/en/repositories/working-with-files/managing-large-files/installing-git-large-file-storage)):\n\n```bash\ngit clone https://github.com/ubopod/ubo_app.git\ngit lfs install\ngit lfs pull\n```\n\nIn environments where some python packages are installed system-wide, like Raspberry Pi OS, you need to run the following command to create a virtual environment with system site packages enabled:\n\n```bash\nuv venv --system-site-packages\n```\n\nThen, navigate to the project directory and install the dependencies:\n\n```bash\nuv sync --dev\n```\n\nNow you can run the app with:\n\n```bash\nHEADLESS_KIVY_DEBUG=true uv run ubo\n```\n\n#### Run the app on the physical device\n\nAdd `ubo-development-pod` host in your ssh config at `~/.ssh/config`:\n\n```plaintext\nHost ubo-development-pod\n HostName <ubopod IP here>\n User pi\n```\n\n\u26a0\ufe0f*Note: You may want to add the ssh public key to the device's authorized keys (`~/.ssh/authorized_keys`) so that you don't need to enter the password each time you ssh into the device. If you decide to use password instead, you need to reset the password for Pi user first using the GUI on the device by going to Hamburger Menu -> Settings -> System -> Users and select pi user*\n\nBefore you deploy the code onto the pod, you have to run the following command to generate the protobuf files and compile the web application.\n\n##### Generating the protobuf files\n\nPlease make sure you have [buf](https://github.com/bufbuild/buf) library installed locally. If you are developing on a Mac or Linux, you can install it using Homebrew:\n\n```bash\nbrew install bufbuild/buf/buf\n```\n\nThen, run the following command to generate the protobuf files whenever an action or\n\n```bash\nuv run poe proto\n```\n\nThis is a shortcut for running the following commands:\n\n```bash\nuv run poe proto:generate # generate the protobuf files based on the actions/events defined in python files\nuv run poe proto:compile # compile the protobuf files to python files\n```\n\n##### Building the web application\n\nIf you are running it for the firt time, you first need to install the dependencies for the web application:\n\n```bash\ncd ubo_app/services/090-web-ui/web-app\nnpm install # Only needed the first time or when dependencies change\n```\n\nThen, you need to compile the protobuf files and build the web application:\n\n```bash\ncd ubo_app/services/090-web-ui/web-app\nnpm run proto:compile\nnpm run build\n```\n\nIf you are modifying web-app typescript files, run `npm run build:watch` and let it stay running in a terminal. This way, whenever you modify web-app files, it will automatically update the built files in `dist` directory as long as it\u2019s running.\n\nIf you ever add, modify or remove an action or an event you need to run `poe proto` and `npm run proto:compile` again manually.\n\n---\n\nThen you need to run this command once to set up the pod for development:\n\n```bash\nuv run poe device:deploy:complete\n```\n\nAfter that, you can deploy the app to the device with:\n\n```bash\nuv run poe device:deploy\n```\n\nTo run the app on the device, you can use either of these commands:\n\n```bash\nuv run poe device:deploy:restart # gracefully restart the app with systemctl\nuv run poe device:deploy:kill # kill the process, which will be restarted by systemd if the service is not stopped\n```\n\n#### Running tests on desktop\n\nEasiest way to run tests is to use the provided `Dockerfile`s. To run the tests in a container, you first need to create the development images by running:\n\n```bash\nuv run poe build-docker-images\n```\n\nThen you can run the tests with:\n\n```bash\ndocker run --rm -it --name ubo-app-test -v .:/ubo-app -v ubo-app-dev-uv-cache:/root/.cache/uv ubo-app-test\n```\n\nYou can add arguments to the `pytest` command to run specific tests like this:\n\n```bash\ndocker run --rm -it --name ubo-app-test -v .:/ubo-app -v ubo-app-dev-uv-cache:/root/.cache/uv ubo-app-test -- <pytest-args>\n```\n\nFor example, to run only the tests in the `tests/integration/test_core.py` file, you can run:\n\n```bash\ndocker run --rm -it -v .:/ubo-app -v ubo-app-dev-uv-cache:/root/.cache/uv -v uvo-app-dev-uv-local:/root/.local/share/uv -v ubo-app-dev-uv-venv:/ubo-app/.venv ubo-app-test\n```\n\nTo pass it command line options add a double-dash before the options:\n\n```bash\ndocker run --rm -it -v .:/ubo-app -v ubo-app-dev-uv-cache:/root/.cache/uv -v uvo-app-dev-uv-local:/root/.local/share/uv -v ubo-app-dev-uv-venv:/ubo-app/.venv ubo-app-test -- -svv --make-screenshots --override-store-snapshots --override-window-snapshots\n```\n\nYou can also run the tests in your local environment by running:\n\n```bash\nuv run poe test\n```\n\n\u26a0\ufe0f**Note:** When running the tests in your local environment, the window snapshots produced by tests may mismatch the expected snapshots. This is because the snapshots are taken with a certain DPI and some environments may have different DPI settings. For example, we are aware that the snapshots taken in macOS have different DPI settings. If you encounter this issue, you should run the tests in a Docker container as described above.\n\n#### Running tests on the device\n\nYou need to install dependencies with following commands once:\n\n```bash\nuv run poe device:test:copy\nuv run poe device:test:deps\n```\n\nThen you can use the following command each time you want to run the tests:\n\n```bash\nuv run poe device:test\n```\n\n#### Running linter\n\nTo run the linter run the following command:\n\n```bash\nuv run poe lint\n```\n\nTo automatically fix the linting issues run:\n\n```bash\nuv run poe lint --fix\n```\n\n#### Running type checker\n\nTo run the type checker run the following command on the pod:\n\n```bash\nuv run poe typecheck\n```\n\n\u26a0\ufe0f*Note: Please note typecheck needs all packages to be present. To run the above command on the pod, you need to clone the ubo-app repository on the pod, apply your changes on it, have uv installed on the pod and install the dependencies.*\n\nIf you prefer to run typecheck on the local machine, clone [stubs repository](https://github.com/ubopod/ubo-non-rpi-stubs) (which includes typing stubs for third-party packages) and place the files under `typings` directory. Then run `poe typecheck` command.\n\n#### Adding new services\n\nIt is not documented at the moment, but you can see examples in `ubo_app/services` directory.\n\n\u26a0\ufe0f*Note: To make sure your async tasks are running in your service's event loop and not in the main event loop, you should use the `create_task` function imported from `ubo_app.utils.async_` to create a new task. Using `await` inside `async` functions is always fine and doesn't need any special attention.*\n\n\u26a0\ufe0f*Note: Your service's setup function, if async, should finish at some point, this is needed so that ubo can know the service has finished its initialization and ready to be used. So it should not run forever, by having a loop at the end, or awaiting an ongoing async function or similar patterns. Running a never-ending async function using `create_task` imported from `ubo_app.utils.async_` is alright.\n\n#### QR code\n\nIn development environment, the camera is probably not working, as it is relying on `picamera2`, so it may become challenging to test the flows relying on QR code input.\n\nTo address this, the camera module, in not-RPi environments, will try reading from `/tmp/qrcode_input.txt` and `/tmp/qrcode_input.png` too. So, whenever you encounter a QR code input, you can write the content of the QR code in the text file path or put the qrcode image itself in the image file path and the application will read it from there and continue the flow.\n\nAlternatively you may be able to provide the input in the web-ui (needs refresh at the moment) or provide it by `InputProvideAction` in grpc channel.\n\n## \ud83d\udee0\ufe0f Hardware \n\nThis section presents different hardware or emulation options that you can use with Ubo app.\n\n### Emulation\n\nTo remove barriers to adoption as much as possible and allow developers use Ubo app without hardware depenencies, we are currently emulating the physical GUI in the browser. \n\nThe audio playback is also streamed through the broswer. \n\nWe plan to emulate camera and microphone with WebRTC in the future.\n\n\n\nHowever, other specialized hardware components (sensors, infrared rx/tx, etc) cannot be emulated. \n\n### Ubo Pod\n\n\n\nUbo pod is an open hardware that includes the following additional hardware capabilities that is supported by Ubo app out of the box:\n\n- A built-in minimal GUI (color LCD display and keypad)\n- Stereo microphone and speakers (2W)\n- Camera (5MP)\n- LED ring (27 addressable RGB LEDs)\n- Sensors\n - Ambient light sensor\n - Temperature sensor\n - STEMMA QT / Qwiic connector for additional sensors\n- Infrared\n - Receiver (wideband)\n - Transmitter (4 high power LEDs)\n- 2 full HDMI ports\n- Power/reset button \n- NVMe storage (Pi 5 only)\n\nFor more information on hardware spec, see the website [getubo.com](https://getubo.com).\n\nThis is an open hardware. You can access mechanical design files [here](https://github.com/ubopod/ubo-mechanical) and electrical design files [here](https://github.com/ubopod/ubo-pcb).\n\n### DIY path\n\nYou can also buy different HATs from different vendors to DIY the hardware. Future plans include supporting USB microphone, speakers, cameras as well with headless setup.\n\nThis however involves having to purchase multiple HATs from different vendors and the process may not be the easiest and most frictionless. You may have to dig into the code and make some small changes to certain setups and configurations.\n\nI made the table below that shows options for audio, cameras, and other sub-components:\n\n| Function | Options |\n| --- | --- |\n| Audio | [Respeaker 2-Mic Audio HAT](https://www.seeedstudio.com/ReSpeaker-2-Mics-Pi-HAT.html), [Adafruit Voice Bonnet](https://www.adafruit.com/product/4757), [Waveshare WM8960 Hat](https://www.waveshare.com/wm8960-audio-hat.htm), [Adafruit BrainCraft HAT](https://www.adafruit.com/product/4374) |\n| Speakers | [1 or 2W, 8 Ohm](https://www.adafruit.com/product/1669) |\n| Camera | Raspberry Pi Camera Modules V1.3, [V2](https://www.raspberrypi.com/products/camera-module-v2/), or [V3](https://www.raspberrypi.com/products/camera-module-3/) |\n| LCD (also emulated in the browser) | [240x240 TFT Display](https://www.adafruit.com/product/4421), [Adafruit BrainCraft HAT](https://www.adafruit.com/product/4374) |\n| Keypad | [AW9523 GPIO Expander](https://www.adafruit.com/product/4886) |\n| LED ring | [Neopixel LED ring](https://www.adafruit.com/product/1586) |\n| Ambient Light Sensor | [VEML7700 Lux Sensor](https://www.adafruit.com/product/4162) |\n| Temperature Sensor | [PCT2075 Temperature Sensor](https://www.adafruit.com/product/4369) |\n\n## \ud83c\udfd7\ufe0f Architecture\n\nThe architecture is fundamentally event-driven and reactive, built around a centralized Redux store that coordinates all system interactions through immutable state updates and event dispatching. \n\nServices communicate exclusively through Redux actions and events rather than direct method calls, with each service running in its own isolated thread while subscribing to relevant state changes and events. \n\nThe system uses custom event handlers that automatically route events to the appropriate service threads, enabling reactive responses to state changes across hardware interfaces, user interactions, and system events. \n\nThis reactive architecture allows components like the web UI to subscribe to display render events and audio playback events in real-time, creating a responsive system where changes propagate automatically through the event stream without tight coupling between components.\n\n\n\nThe following is a summary of key architecture components.\n\n- <b>Redux-Based State Management</b>: Central `UboStore` manages all application state through immutable state trees, with each service contributing its own state slice (audio, camera, display, docker, wifi, etc.) and communicating via actions and events.\n\n- <b>Modular Service Architecture</b>: 21+ core services run in isolated threads with dedicated event loops, organized by priority (`000-0xx` for hardware, `030-0xx` for networking, `080-0xx` for applications, `090-0xx` for UI), each with their own setup.py, reducer.py, and ubo_handle.py files.\n\n- <b>Hardware Abstraction Layer</b>: Comprehensive abstraction for Raspberry Pi components (ST7789 LCD, WM8960 audio, GPIO keypad, sensors, camera, RGB ring) with automatic environment detection and mock implementations for development on non-RPi systems.\n\n- <b>Multi-Interface Access</b>: Supports web browser access (port 4321), gRPC API (port 50051), SSH access, and direct hardware interaction, with a web UI service providing hotspot configuration and dashboard functionality.\n\n- <b>System Integration</b>: Integrates with `systemd` and `d-bus` for service management, Docker for container runtime, and `NetworkManager` for network configuration, with a separate system manager process handling root-privilege operations via Unix sockets.\n\n<b>Notes:</b> \n\nThe application follows a structured initialization sequence through `ubo_app/main.py` and uses the `uv` package manager for dependency management. \n\nThe architecture supports both production deployment on Raspberry Pi devices and development environments with comprehensive mocking systems, making it suitable for cross-platform development while maintaining hardware-specific capabilities.\n\nDeepWiki pages you might want to explore:\n\n- [Overview](https://deepwiki.com/ubopod/ubo_app/1-overview)\n- [Architecture](https://deepwiki.com/ubopod/ubo_app/2-architecture)\n\n## Notable dependencies\n\nHere are the key dependencies organized by category:\n\n### Core Framework & State Management\n\n- `python-redux`: Redux-based state management system for the entire app\n- `ubo-gui`: Custom GUI framework built on Kivy for the user interface\n- `headless-kivy`: Headless Kivy implementation for supporting LCD display over SPI\n\n### Hardware Control (Raspberry Pi)\n\n- `adafruit-circuitpython-rgb-display`: ST7789 LCD display driver\n- `adafruit-circuitpython-neopixel`: RGB LED ring control\n- `adafruit-circuitpython-aw9523`: I2C GPIO expander for keypad\n- `adafruit-circuitpython-pct2075`: Temperature sensor driver\n- `adafruit-circuitpython-veml7700`: Light sensor driver\n- `rpi-lgpio`: Low-level GPIO access for Raspberry Pi\n- `gpiozero`: GPIO abstraction layer\n- `rpi-ws281x`: WS281x LED strip control library\n- `pyalsaaudio`: ALSA audio interface for Linux audio control\n- `pulsectl`: PulseAudio control for audio management\n- `simpleaudio`: Simple audio playback functionality\n\n### Voice AI\n\n- `piper-tts`: Text-to-speech synthesis engine\n- `vosk`: Speech recognition library\n- `pvorca`: Picovoice Text-to-speech synthesis engine\n- `pipecat-ai`: framework for building real-time voice and multimodal conversational agents\n\n### Networking & Services\n\n- `aiohttp`: Async HTTP client/server for web services\n- `quart`: Async web framework for the web UI service\n- `sdbus-networkmanager`: NetworkManager D-Bus interface for WiFi\n- `netifaces`: Network interface enumeration\n- `docker`: Docker API client for container management\n\n### QR Codes\n\n- `pyzbar`: QR code and barcode scanning library\n\n### System Utilities\n\n- `psutil`: System and process monitoring utilities\n- `platformdirs`: Platform-specific directory paths\n- `tenacity`: Retry logic and error handling\n- `fasteners`: File locking and synchronization\n\n### Development Environment Abstraction\n\n- `python-fake`: Mock hardware components for development\n\n### gRPC Communication\n\n- `betterproto`: Protocol buffer compiler and runtime\n\n<b>Notes:</b>\nThe project uses platform-specific dependencies with markers like `platform_machine=='aarch64'` for Raspberry Pi-specific libraries and `sys_platform=='linux'` for Linux-only components. The python-fake library enables development on non-Raspberry Pi systems by providing mock implementations of hardware components.\n\n## \ud83d\uddfa\ufe0f Roadmap\n\nThis is a tentative roadmap for future features. It is subject to change.\n\n- Emulation for camera and microphone inside browser (requires SSL certificate for browser permissions)\n- Allow users to pick their soundcard for play and record via GUI (e.g. USB audio)\n- Allow users to pick their camera for video via GUI (e.g. USB camera)\n- Option to turn Ubo pod into a voice satellite with wyoming protocol with Home Assistant\n- Make all on-board sensors and infrared discoverable and accessible by Home Assistant\n- Let users record Infrared signals and assign them to trigger custom actions\n- Expose `pipecat-ai` preset pipeline configuration via GUI\n- Support for Debian Trixie (13)\n\nIf you have any suggestions or feature requests, please open a discussion [here](https://github.com/ubopod/ubo_app/discussions).\n\n## \ud83d\udd12 License\n\nThis project is released under the Apache-2.0 License. See the [LICENSE](./LICENSE) file for more details.\n",
"bugtrack_url": null,
"license": null,
"summary": "Ubo main app, running on device initialization. A platform for running other apps.",
"version": "1.6.0",
"project_urls": null,
"split_keywords": [
"home assistance",
" raspberry pi",
" rpi",
" ubo",
" ubo-pod"
],
"urls": [
{
"comment_text": null,
"digests": {
"blake2b_256": "fe0662bbecdbf9ba17fdcf2e28df962709828380ba2fa7f9551b3dc48cbed328",
"md5": "3e09b0d792c17061e1daf5610ac2e6cb",
"sha256": "9b1b56d36ef0f75848a91ece3f3a1812665e4a62a7ab00dfe8e091856f9f2f99"
},
"downloads": -1,
"filename": "ubo_app-1.6.0-py3-none-any.whl",
"has_sig": false,
"md5_digest": "3e09b0d792c17061e1daf5610ac2e6cb",
"packagetype": "bdist_wheel",
"python_version": "py3",
"requires_python": "<3.12,>=3.11",
"size": 2303305,
"upload_time": "2025-08-24T23:15:42",
"upload_time_iso_8601": "2025-08-24T23:15:42.440769Z",
"url": "https://files.pythonhosted.org/packages/fe/06/62bbecdbf9ba17fdcf2e28df962709828380ba2fa7f9551b3dc48cbed328/ubo_app-1.6.0-py3-none-any.whl",
"yanked": false,
"yanked_reason": null
},
{
"comment_text": null,
"digests": {
"blake2b_256": "c4e8ff0e5b3f8bdefb77dbdd46fbe6ffdbc5779435c6da7f9a2a6af39c264783",
"md5": "d29ff242d4e11fd468aaa3e5add7e9cf",
"sha256": "bf1f243c1b8d4e2b7c9395409133b78d80d9b867405818fa1c40894184f1a9af"
},
"downloads": -1,
"filename": "ubo_app-1.6.0.tar.gz",
"has_sig": false,
"md5_digest": "d29ff242d4e11fd468aaa3e5add7e9cf",
"packagetype": "sdist",
"python_version": "source",
"requires_python": "<3.12,>=3.11",
"size": 2163903,
"upload_time": "2025-08-24T23:15:48",
"upload_time_iso_8601": "2025-08-24T23:15:48.626059Z",
"url": "https://files.pythonhosted.org/packages/c4/e8/ff0e5b3f8bdefb77dbdd46fbe6ffdbc5779435c6da7f9a2a6af39c264783/ubo_app-1.6.0.tar.gz",
"yanked": false,
"yanked_reason": null
}
],
"upload_time": "2025-08-24 23:15:48",
"github": false,
"gitlab": false,
"bitbucket": false,
"codeberg": false,
"lcname": "ubo-app"
}
