<h1 align="center"><img src="https://raw.githubusercontent.com/mantasu/glasses-detector/main/docs/_static/img/logo-light.png" width=27px height=27px> Glasses Detector</h1>
<div align="center">
[](https://colab.research.google.com/github/mantasu/glasses-detector/blob/main/notebooks/demo.ipynb)
[](https://mantasu.github.io/glasses-detector/)
[](https://pypi.org/project/glasses-detector/)
[](https://docs.python.org/3/)
[](https://developer.nvidia.com/cuda-toolkit)
[](https://zenodo.org/badge/latestdoi/610509640)
[](https://opensource.org/licenses/MIT)
</div>
## About
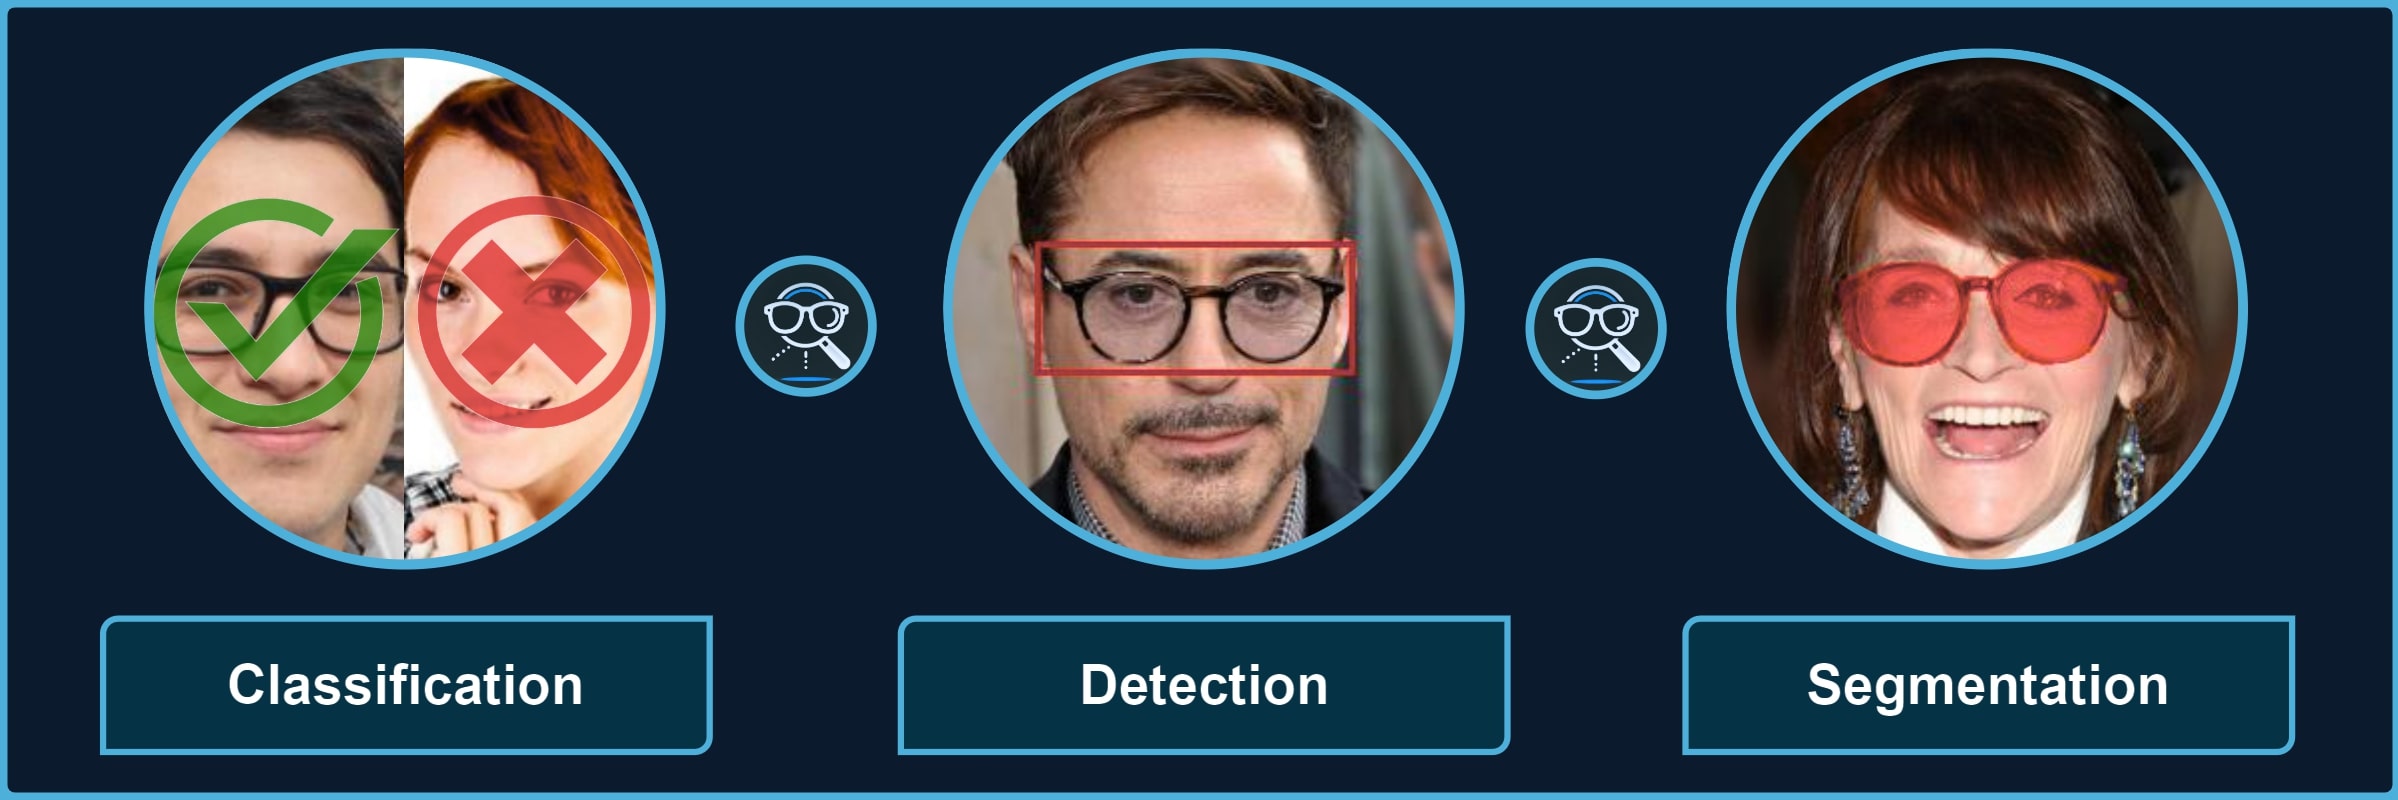
Package for processing images with different types of glasses and their parts. It provides a quick way to use the pre-trained models for **3** kinds of tasks, each divided into multiple categories, for instance, *classification of sunglasses* or *segmentation of glasses frames*.
<br>
<div align="center">
<table align="center"><tbody>
<tr><td><strong>Classification</string></td> <td> 👓 <em>transparent</em> 🕶️ <em>opaque</em> 🥽 <em>any</em> ➿<em>shadows</em></td></tr>
<tr><td><strong>Detection</string></td> <td> 🤓 <em>worn</em> 👓 <em>standalone</em> 👀 <em>eye-area</em></td></tr>
<tr><td><strong>Segmentation</string></td> <td> 😎 <em>full</em> 🖼️ <em>frames</em> 🦿 <em>legs</em> 🔍 <em>lenses</em> 👥 <em>shadows</em></td></tr>
</tbody></table>
$\color{gray}{\textit{Note: }\text{refer to}}$ [Glasses Detector Features](https://mantasu.github.io/glasses-detector/docs/features.html) $\color{gray}{\text{for visual examples.}}$
</div>
## Installation
> [!IMPORTANT]
> Minimum version of [Python 3.12](https://www.python.org/downloads/release/python-3120/) is **REQUIRED**. Also, you may want to install [Pytorch](https://pytorch.org/get-started/locally/) in advance to select specific configuration for your device and environment.
### Pip Package
If you only need the library with pre-trained models, just install the [pip package](https://pypi.org/project/glasses-detector/) and see **Quick Start** for usage (also check [Glasses Detector Installation](https://mantasu.github.io/glasses-detector/docs/features.html) for more details):
```bash
pip install glasses-detector
```
You can also install it from the source:
```bash
git clone https://github.com/mantasu/glasses-detector
cd glasses-detector && pip install .
```
### Local Project
If you want to train your own models on the given datasets (or on some other datasets), just clone the project and install training requirements, then see **[Running](https://github.com/mantasu/glasses-detector?tab=readme-ov-file#running)** section to see how to run training and testing.
```bash
git clone https://github.com/mantasu/glasses-detector
cd glasses-detector && pip install -r requirements.txt
```
You can create a virtual environment for your packages via [venv](https://docs.python.org/3/library/venv.html), however, if you have conda, then you can simply use it to create a new environment, for example:
```bash
conda create -n glasses-detector python=3.12
conda activate glasses-detector
```
> To set-up the datasets, refer to **[Data](https://github.com/mantasu/glasses-detector?tab=readme-ov-file#data)** section.
## Quick Start
### Command Line
You can run predictions via the command line. For example, classification of a single image and segmentation of images inside a directory can be performed by running:
```bash
glasses-detector -i path/to/img.jpg -t classification -d cuda -f int # Prints 1 or 0
glasses-detector -i path/to/img_dir -t segmentation -f mask -e .jpg # Generates masks
```
> [!TIP]
> You can also specify things like `--output-path`, `--size`, `--batch-size` etc. Check the [Glasses Detector CLI](https://mantasu.github.io/glasses-detector/docs/cli.html) and [Command Line Examples](https://mantasu.github.io/glasses-detector/docs/examples.html#command-line) for more details.
### Python Script
You can import the package and its models via the python script for more flexibility. Here is an example of how to classify people wearing sunglasses:
```python
from glasses_detector import GlassesClassifier
# Generates a CSV with each line "<img_name.jpg>,<True|False>"
classifier = GlassesClassifier(size="small", kind="sunglasses")
classifier.process_dir("path/to/dir", "path/to/preds.csv", format="bool")
```
And here is a more efficient way to process a dir for detection task (only single bbox per image is currently supported):
```python
from glasses_detector import GlassesDetector
# Generates dir_preds with bboxes as .txt for each img
detector = GlassesDetector(kind="eyes", device="cuda")
detector.process_dir("path/to/dir", ext=".txt", batch_size=64)
```
> [!TIP]
> Again, there are a lot more things that can be specified, for instance, `output_size` and `pbar`. It is also possible to directly output the results or save them in a variable. See [Glasses Detector API](https://mantasu.github.io/glasses-detector/docs/api.html) and [Python Script Examples](https://mantasu.github.io/glasses-detector/docs/examples.html#python-script) for more details.
### Demo
Feel free to play around with some [demo image files](https://github.com/mantasu/glasses-detector/demo/). For example, after installing through [pip](https://pypi.org/project/glasses-detector/), you can run:
```bash
git clone https://github.com/mantasu/glasses-detector && cd glasses-detector/data
glasses-detector -i demo -o demo_labels.csv --task classification:eyeglasses
```
You can also check out the [demo notebook](https://github.com/mantasu/glasses-detector/notebooks/demo.ipynb) which can be also accessed via [Google Colab](https://colab.research.google.com/github/mantasu/glasses-detector/blob/master/notebooks/demo.ipynb).
## Credits
For references and citation, please see [Glasses Detector Credits](https://mantasu.github.io/glasses-detector/docs/credits.html).
Raw data
{
"_id": null,
"home_page": "https://github.com/mantasu/glasses-detector",
"name": "glasses-detector",
"maintainer": null,
"docs_url": null,
"requires_python": ">=3.12",
"maintainer_email": null,
"keywords": "python, pytorch, torchvision, computer, vision, image, face, eyes, transparent, opaque, glasses, googles, spectacles, eyeglasses, sunglasses, frames, lenses, legs, shadows, binary, identification, identifier, classification, classifier, segmentation, segmenter, detection, detector, cuda, mps, gpu",
"author": "Mantas Bir\u0161kus",
"author_email": "mantix7@gmail.com",
"download_url": "https://files.pythonhosted.org/packages/05/ab/e0c8f59212cd7af26a2cc2a675ed9b3ebbb85d2389204301dfedd5f3c49e/glasses_detector-1.0.4.tar.gz",
"platform": null,
"description": "\n<h1 align=\"center\"><img src=\"https://raw.githubusercontent.com/mantasu/glasses-detector/main/docs/_static/img/logo-light.png\" width=27px height=27px> Glasses Detector</h1>\n\n<div align=\"center\">\n\n[](https://colab.research.google.com/github/mantasu/glasses-detector/blob/main/notebooks/demo.ipynb)\n[](https://mantasu.github.io/glasses-detector/)\n[](https://pypi.org/project/glasses-detector/)\n[](https://docs.python.org/3/)\n[](https://developer.nvidia.com/cuda-toolkit)\n[](https://zenodo.org/badge/latestdoi/610509640)\n[](https://opensource.org/licenses/MIT)\n\n\n\n</div>\n\n## About\n\nPackage for processing images with different types of glasses and their parts. It provides a quick way to use the pre-trained models for **3** kinds of tasks, each divided into multiple categories, for instance, *classification of sunglasses* or *segmentation of glasses frames*.\n\n<br>\n\n<div align=\"center\">\n\n<table align=\"center\"><tbody>\n <tr><td><strong>Classification</string></td> <td> \ud83d\udc53 <em>transparent</em> \ud83d\udd76\ufe0f <em>opaque</em> \ud83e\udd7d <em>any</em> \u27bf<em>shadows</em></td></tr>\n <tr><td><strong>Detection</string></td> <td> \ud83e\udd13 <em>worn</em> \ud83d\udc53 <em>standalone</em> \ud83d\udc40 <em>eye-area</em></td></tr>\n <tr><td><strong>Segmentation</string></td> <td> \ud83d\ude0e <em>full</em> \ud83d\uddbc\ufe0f <em>frames</em> \ud83e\uddbf <em>legs</em> \ud83d\udd0d <em>lenses</em> \ud83d\udc65 <em>shadows</em></td></tr>\n</tbody></table>\n\n$\\color{gray}{\\textit{Note: }\\text{refer to}}$ [Glasses Detector Features](https://mantasu.github.io/glasses-detector/docs/features.html) $\\color{gray}{\\text{for visual examples.}}$\n\n</div>\n\n## Installation\n\n> [!IMPORTANT]\n> Minimum version of [Python 3.12](https://www.python.org/downloads/release/python-3120/) is **REQUIRED**. Also, you may want to install [Pytorch](https://pytorch.org/get-started/locally/) in advance to select specific configuration for your device and environment.\n\n### Pip Package\n\nIf you only need the library with pre-trained models, just install the [pip package](https://pypi.org/project/glasses-detector/) and see **Quick Start** for usage (also check [Glasses Detector Installation](https://mantasu.github.io/glasses-detector/docs/features.html) for more details):\n\n```bash\npip install glasses-detector\n```\n\nYou can also install it from the source:\n\n```bash\ngit clone https://github.com/mantasu/glasses-detector\ncd glasses-detector && pip install .\n```\n\n### Local Project\n\nIf you want to train your own models on the given datasets (or on some other datasets), just clone the project and install training requirements, then see **[Running](https://github.com/mantasu/glasses-detector?tab=readme-ov-file#running)** section to see how to run training and testing.\n\n```bash\ngit clone https://github.com/mantasu/glasses-detector\ncd glasses-detector && pip install -r requirements.txt\n```\n\nYou can create a virtual environment for your packages via [venv](https://docs.python.org/3/library/venv.html), however, if you have conda, then you can simply use it to create a new environment, for example:\n\n```bash\nconda create -n glasses-detector python=3.12\nconda activate glasses-detector \n```\n\n> To set-up the datasets, refer to **[Data](https://github.com/mantasu/glasses-detector?tab=readme-ov-file#data)** section.\n\n## Quick Start\n\n### Command Line\n\nYou can run predictions via the command line. For example, classification of a single image and segmentation of images inside a directory can be performed by running:\n\n```bash\nglasses-detector -i path/to/img.jpg -t classification -d cuda -f int # Prints 1 or 0\nglasses-detector -i path/to/img_dir -t segmentation -f mask -e .jpg # Generates masks\n```\n\n> [!TIP]\n> You can also specify things like `--output-path`, `--size`, `--batch-size` etc. Check the [Glasses Detector CLI](https://mantasu.github.io/glasses-detector/docs/cli.html) and [Command Line Examples](https://mantasu.github.io/glasses-detector/docs/examples.html#command-line) for more details.\n\n### Python Script\n\nYou can import the package and its models via the python script for more flexibility. Here is an example of how to classify people wearing sunglasses:\n\n```python\nfrom glasses_detector import GlassesClassifier\n\n# Generates a CSV with each line \"<img_name.jpg>,<True|False>\"\nclassifier = GlassesClassifier(size=\"small\", kind=\"sunglasses\")\nclassifier.process_dir(\"path/to/dir\", \"path/to/preds.csv\", format=\"bool\")\n```\n\nAnd here is a more efficient way to process a dir for detection task (only single bbox per image is currently supported):\n\n```python\nfrom glasses_detector import GlassesDetector\n\n# Generates dir_preds with bboxes as .txt for each img\ndetector = GlassesDetector(kind=\"eyes\", device=\"cuda\")\ndetector.process_dir(\"path/to/dir\", ext=\".txt\", batch_size=64)\n```\n\n> [!TIP]\n> Again, there are a lot more things that can be specified, for instance, `output_size` and `pbar`. It is also possible to directly output the results or save them in a variable. See [Glasses Detector API](https://mantasu.github.io/glasses-detector/docs/api.html) and [Python Script Examples](https://mantasu.github.io/glasses-detector/docs/examples.html#python-script) for more details.\n\n### Demo\n\nFeel free to play around with some [demo image files](https://github.com/mantasu/glasses-detector/demo/). For example, after installing through [pip](https://pypi.org/project/glasses-detector/), you can run:\n\n```bash\ngit clone https://github.com/mantasu/glasses-detector && cd glasses-detector/data\nglasses-detector -i demo -o demo_labels.csv --task classification:eyeglasses\n```\n\nYou can also check out the [demo notebook](https://github.com/mantasu/glasses-detector/notebooks/demo.ipynb) which can be also accessed via [Google Colab](https://colab.research.google.com/github/mantasu/glasses-detector/blob/master/notebooks/demo.ipynb).\n\n## Credits\n\nFor references and citation, please see [Glasses Detector Credits](https://mantasu.github.io/glasses-detector/docs/credits.html).\n",
"bugtrack_url": null,
"license": "MIT",
"summary": "Glasses classification, detection, and segmentation.",
"version": "1.0.4",
"project_urls": {
"Bug Tracker": "https://github.com/mantasu/glasses-detector/issues",
"Documentation": "https://mantasu.github.io/glasses-detector",
"Homepage": "https://github.com/mantasu/glasses-detector"
},
"split_keywords": [
"python",
" pytorch",
" torchvision",
" computer",
" vision",
" image",
" face",
" eyes",
" transparent",
" opaque",
" glasses",
" googles",
" spectacles",
" eyeglasses",
" sunglasses",
" frames",
" lenses",
" legs",
" shadows",
" binary",
" identification",
" identifier",
" classification",
" classifier",
" segmentation",
" segmenter",
" detection",
" detector",
" cuda",
" mps",
" gpu"
],
"urls": [
{
"comment_text": null,
"digests": {
"blake2b_256": "81c13f0c9a126d0016fd34806b8b78ec991770efcb44a3ea00a9a57e23183381",
"md5": "194b9461ce748278857860b1eee288ca",
"sha256": "15c1e1a32a69585a6c75ad4bfeef13191fb7296349609e1ba2831911cfe41aa9"
},
"downloads": -1,
"filename": "glasses_detector-1.0.4-py3-none-any.whl",
"has_sig": false,
"md5_digest": "194b9461ce748278857860b1eee288ca",
"packagetype": "bdist_wheel",
"python_version": "py3",
"requires_python": ">=3.12",
"size": 73809,
"upload_time": "2025-09-12T21:08:24",
"upload_time_iso_8601": "2025-09-12T21:08:24.423212Z",
"url": "https://files.pythonhosted.org/packages/81/c1/3f0c9a126d0016fd34806b8b78ec991770efcb44a3ea00a9a57e23183381/glasses_detector-1.0.4-py3-none-any.whl",
"yanked": false,
"yanked_reason": null
},
{
"comment_text": null,
"digests": {
"blake2b_256": "05abe0c8f59212cd7af26a2cc2a675ed9b3ebbb85d2389204301dfedd5f3c49e",
"md5": "28867beb6ab56efba3abc42af1d38cbe",
"sha256": "dc7a53b1c6b4eb0351b127e0825dbdeb2ca2558ca63b67e8417a251950096ee7"
},
"downloads": -1,
"filename": "glasses_detector-1.0.4.tar.gz",
"has_sig": false,
"md5_digest": "28867beb6ab56efba3abc42af1d38cbe",
"packagetype": "sdist",
"python_version": "source",
"requires_python": ">=3.12",
"size": 87768,
"upload_time": "2025-09-12T21:08:25",
"upload_time_iso_8601": "2025-09-12T21:08:25.433089Z",
"url": "https://files.pythonhosted.org/packages/05/ab/e0c8f59212cd7af26a2cc2a675ed9b3ebbb85d2389204301dfedd5f3c49e/glasses_detector-1.0.4.tar.gz",
"yanked": false,
"yanked_reason": null
}
],
"upload_time": "2025-09-12 21:08:25",
"github": true,
"gitlab": false,
"bitbucket": false,
"codeberg": false,
"github_user": "mantasu",
"github_project": "glasses-detector",
"travis_ci": false,
"coveralls": false,
"github_actions": true,
"requirements": [
{
"name": "tqdm",
"specs": []
},
{
"name": "torch",
"specs": []
},
{
"name": "scipy",
"specs": []
},
{
"name": "pyyaml",
"specs": []
},
{
"name": "fvcore",
"specs": []
},
{
"name": "rarfile",
"specs": []
},
{
"name": "ipykernel",
"specs": []
},
{
"name": "pycocotools",
"specs": []
},
{
"name": "torchvision",
"specs": []
},
{
"name": "prettytable",
"specs": []
},
{
"name": "albumentations",
"specs": []
},
{
"name": "pytorch_lightning",
"specs": []
},
{
"name": "tensorboard",
"specs": []
},
{
"name": "torch-tb-profiler",
"specs": []
},
{
"name": "jsonargparse",
"specs": []
}
],
"lcname": "glasses-detector"
}

